Office CLI Integration
Beyond triggering tasks remotely through bots, Loomy also deeply integrates the CLI capabilities of office suites such as Feishu, DingTalk, and WeCom through the MCP protocol, letting AI complete real work directly in conversation — sending and receiving messages, collaborating on documents, managing schedules, handling to-dos, and more.
The difference between Office CLI and remote-control bots: Remote-control bots solve "remotely directing your local Loomy to execute tasks from your phone"; Office CLI solves "letting Loomy directly read and write the messages, documents, schedules, and other business data inside your Feishu / DingTalk / WeCom". The two can be used together.
Configure the Feishu CLI
The Feishu CLI is integrated into Loomy through the MCP protocol, covering Feishu's most core business domains so that AI can complete Feishu-related work directly in conversation.
Supported capabilities include: Messages and Groups (search messages and group chats, send messages, reply to topics), Docs (create documents, read content, update body text, comment and collaborate), Drive (upload and download files, manage permissions), Sheets (create spreadsheets, read and write cells, batch update), Bitable (manage tables, fields, records, views, dashboards, automation), Calendar (check schedules, book meetings, check free/busy, recommend times), Video Meetings (search meetings, get minutes and transcripts), Mail (search, read, draft, send, reply, archive emails), Tasks (create tasks, update status, manage lists), Wiki (query spaces, manage nodes and document hierarchy), Contacts (query users, search colleagues, view departments), and Search (search group chats, messages, documents, etc.).

Feishu CLI Pre-use Checks
The Feishu CLI is integrated by default and usually does not require manual configuration. If you encounter issues, you can confirm the status with the following steps.
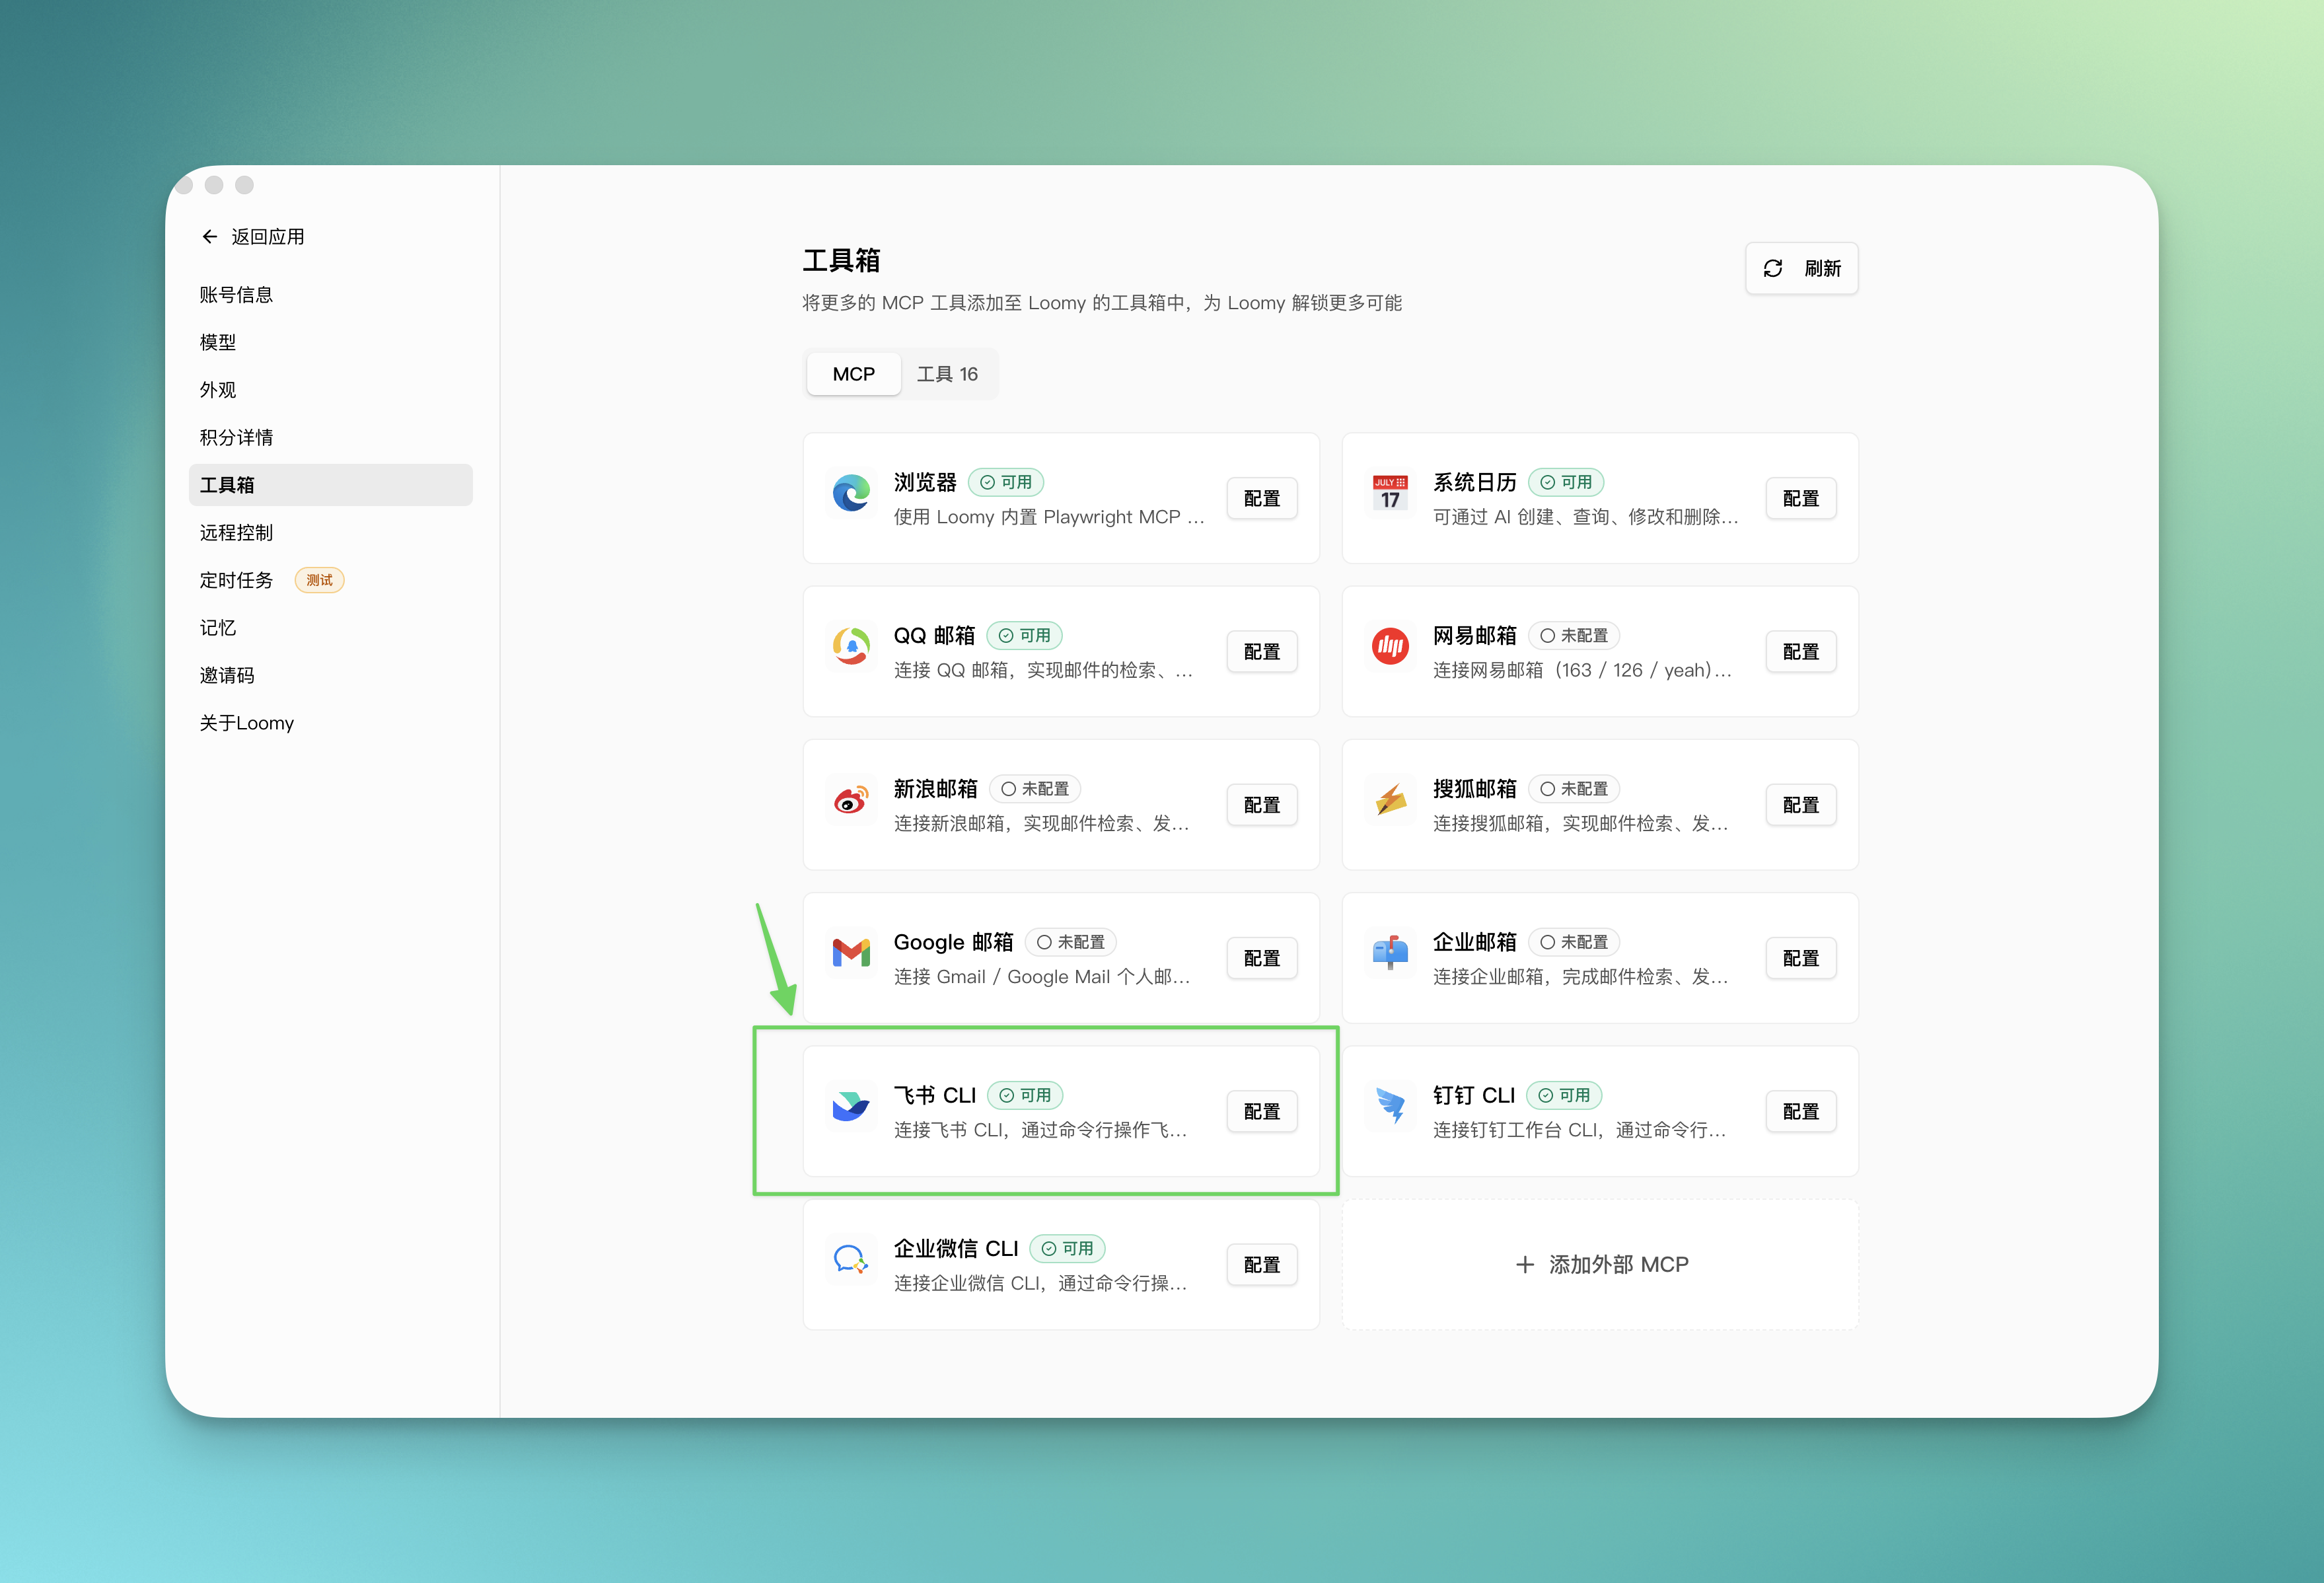
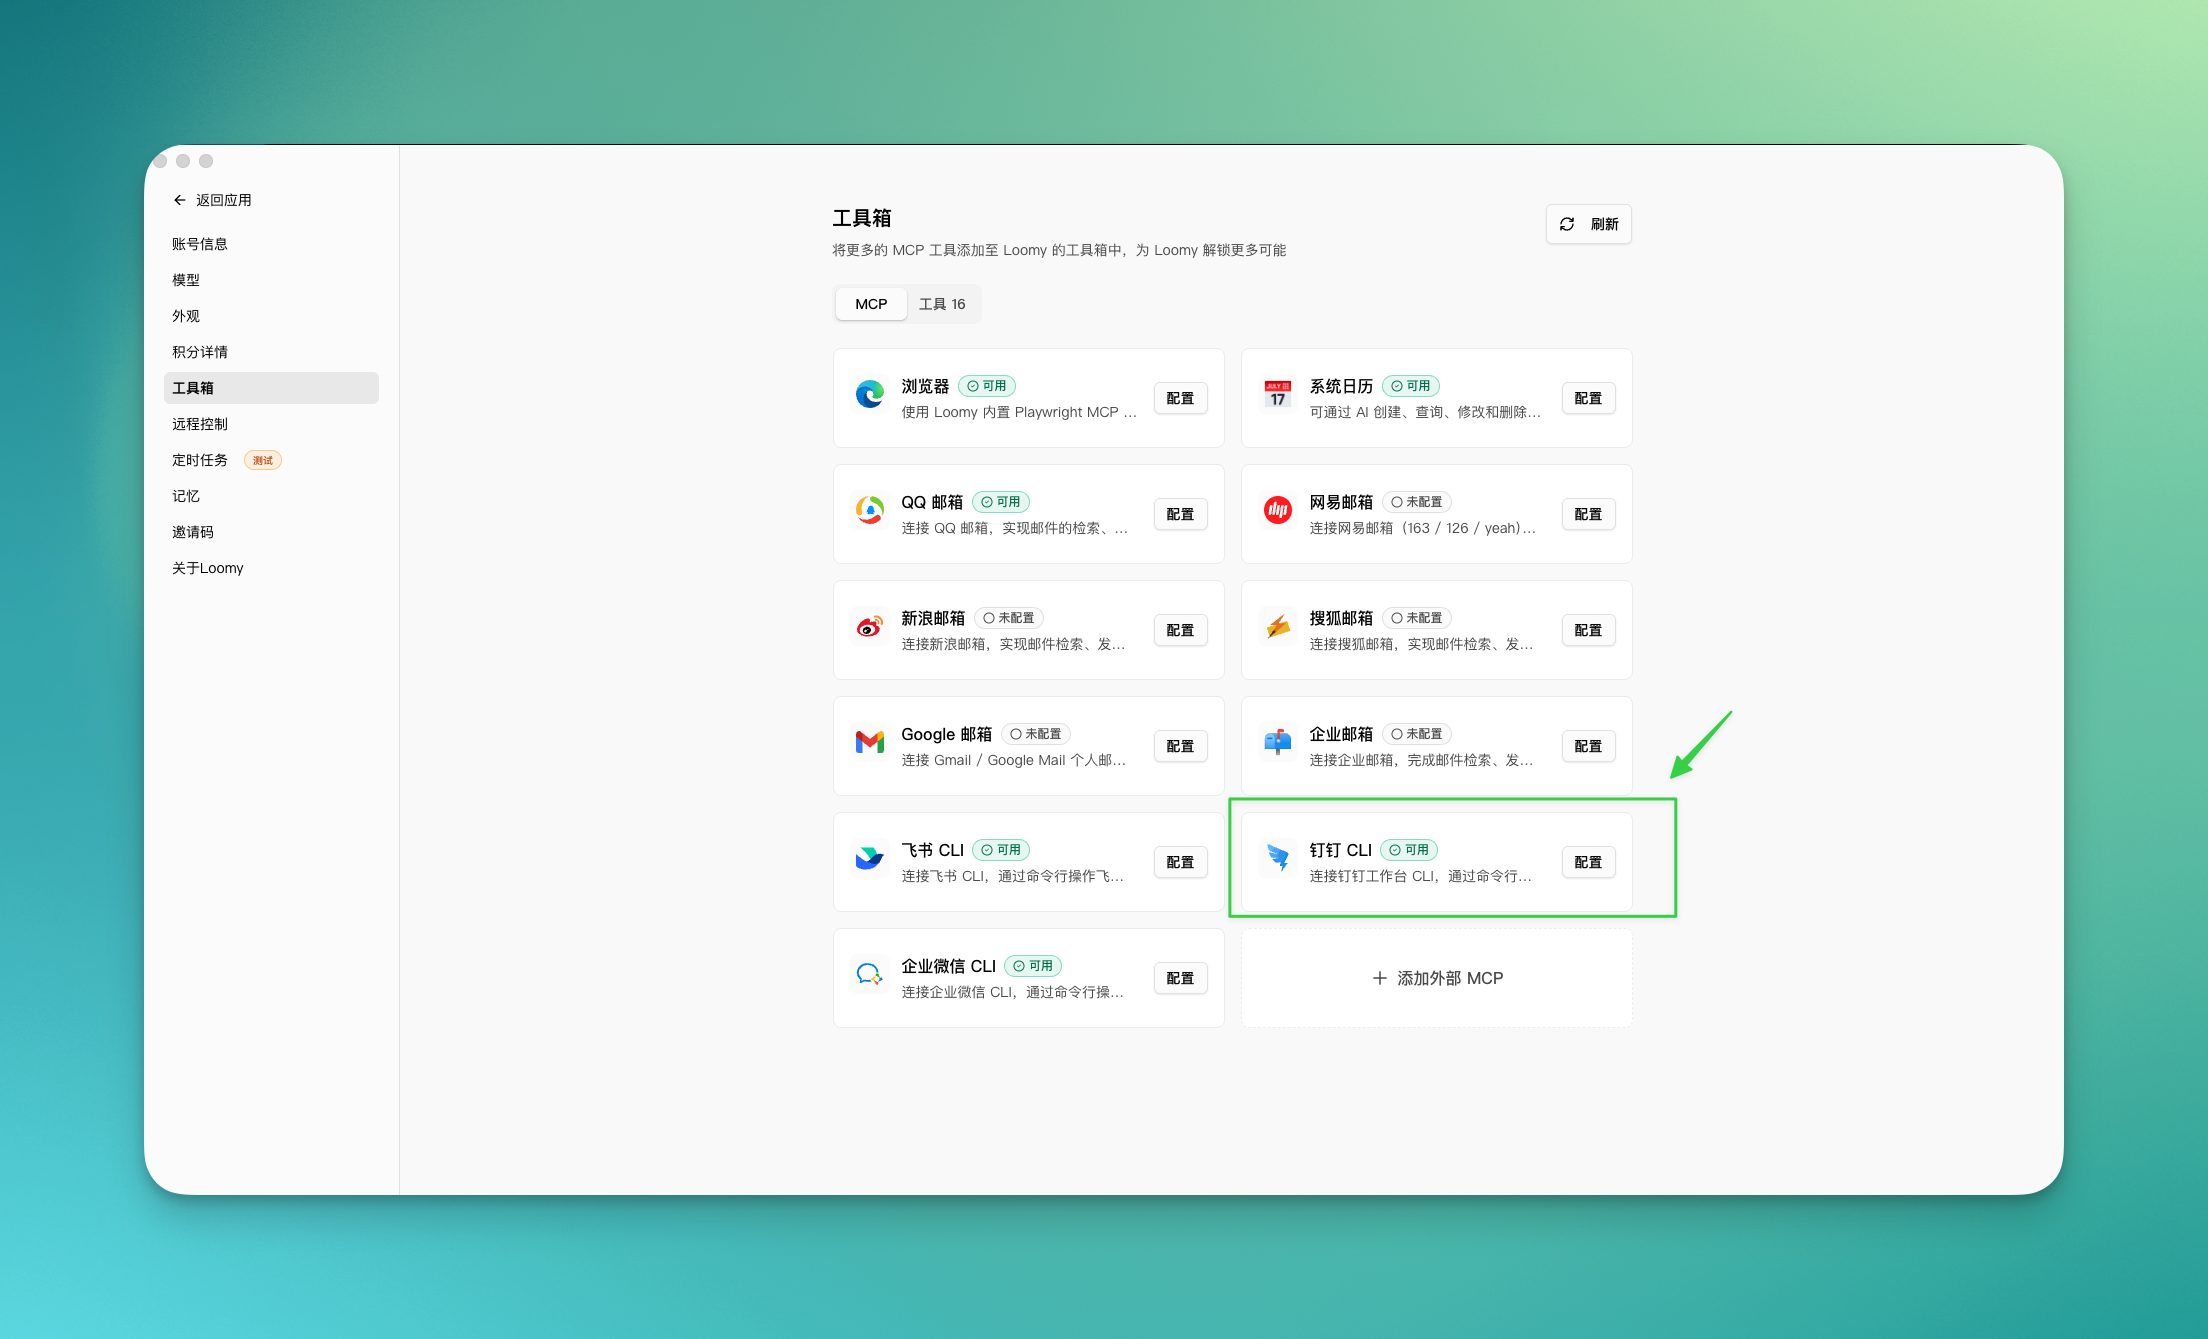
Check the Toolbox
Go to "Settings" → "Toolbox", find the Feishu CLI card, and confirm the status shows "Available".
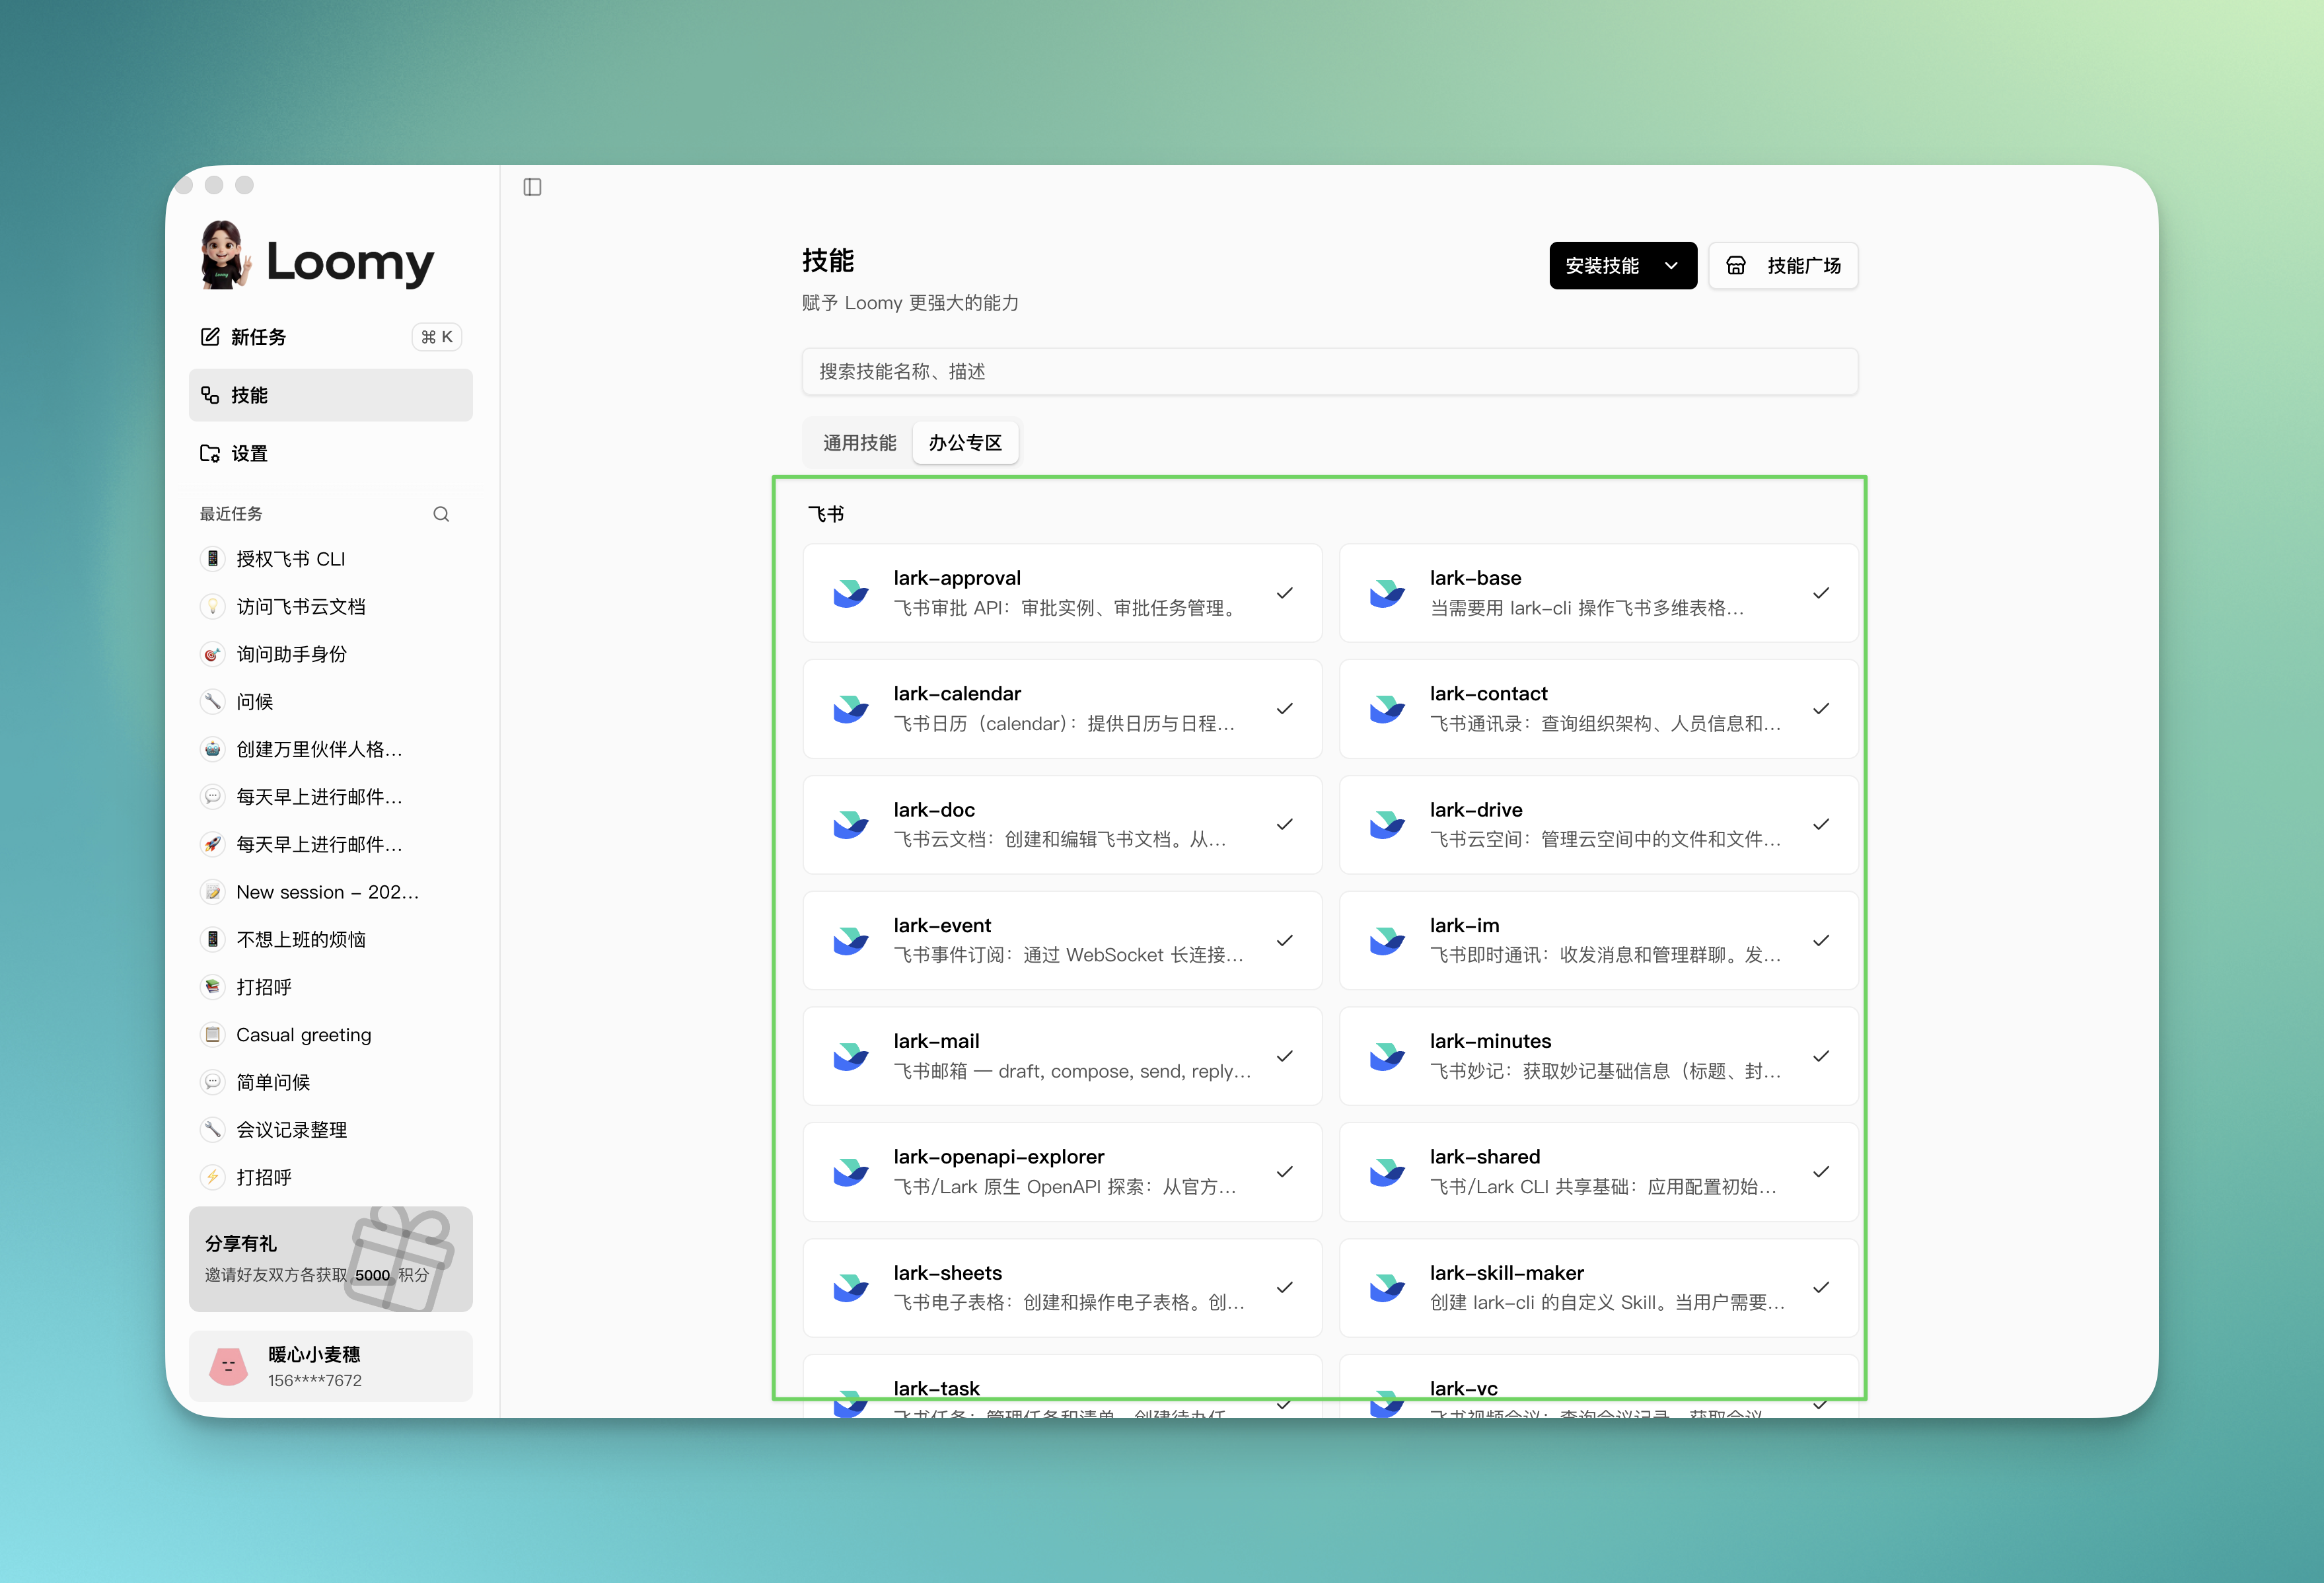
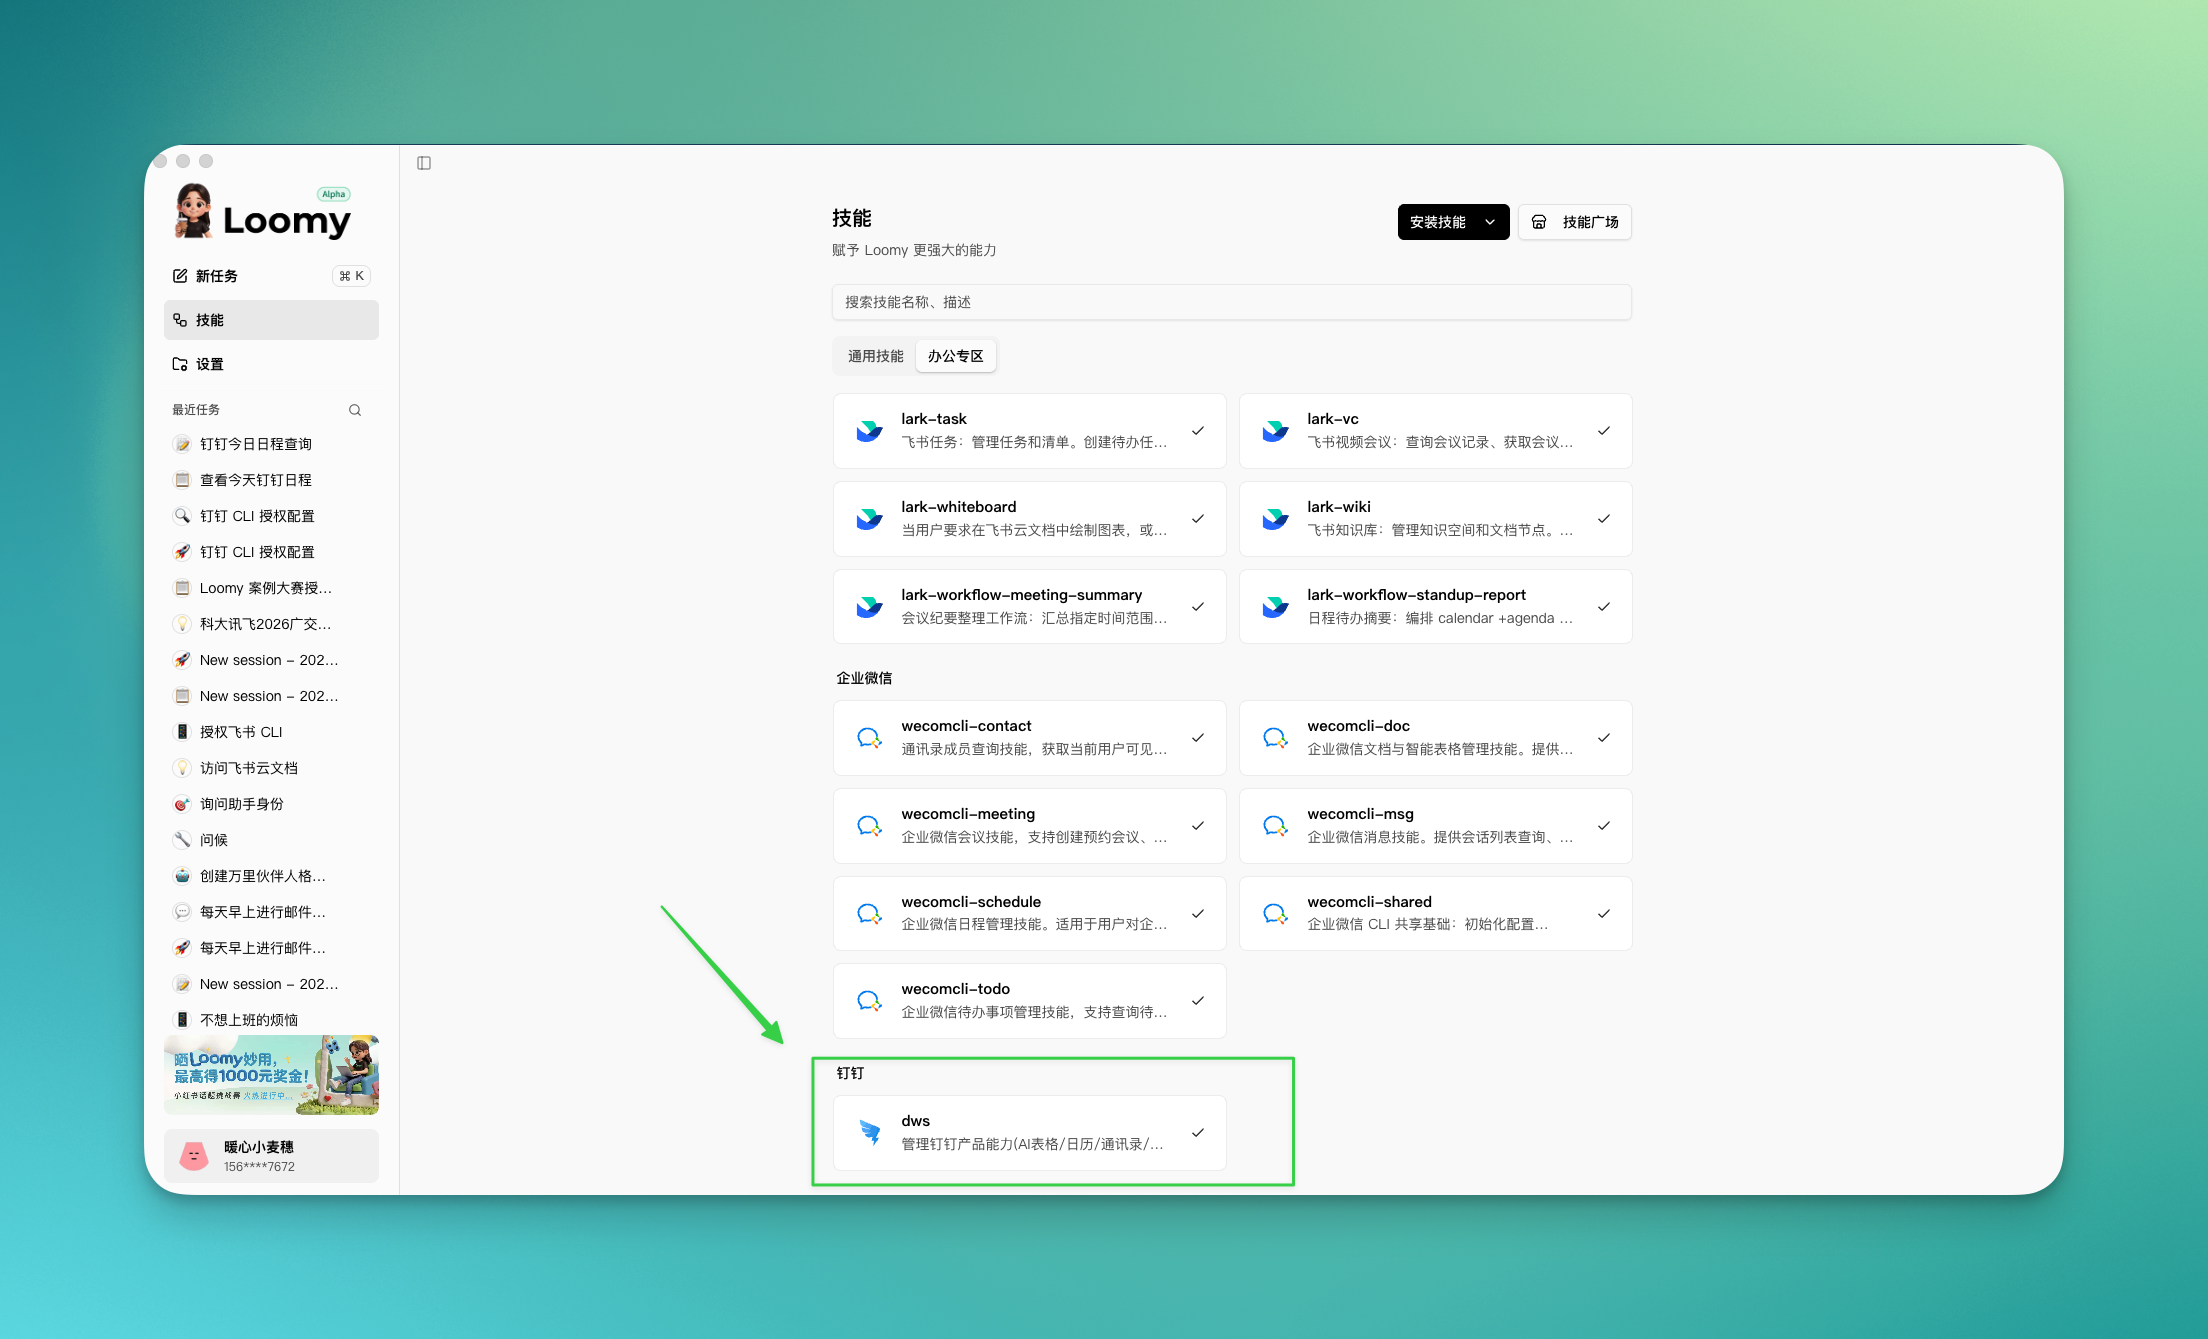
Check Feishu Skills
Go to "Skills" → "Office Zone", and confirm the Feishu-related skills are successfully installed.
Authorize Your Feishu Account
Authorization is required before first use, and the entire process only needs to be done once.
Step 1: Initiate authorization
Start a new conversation and send:
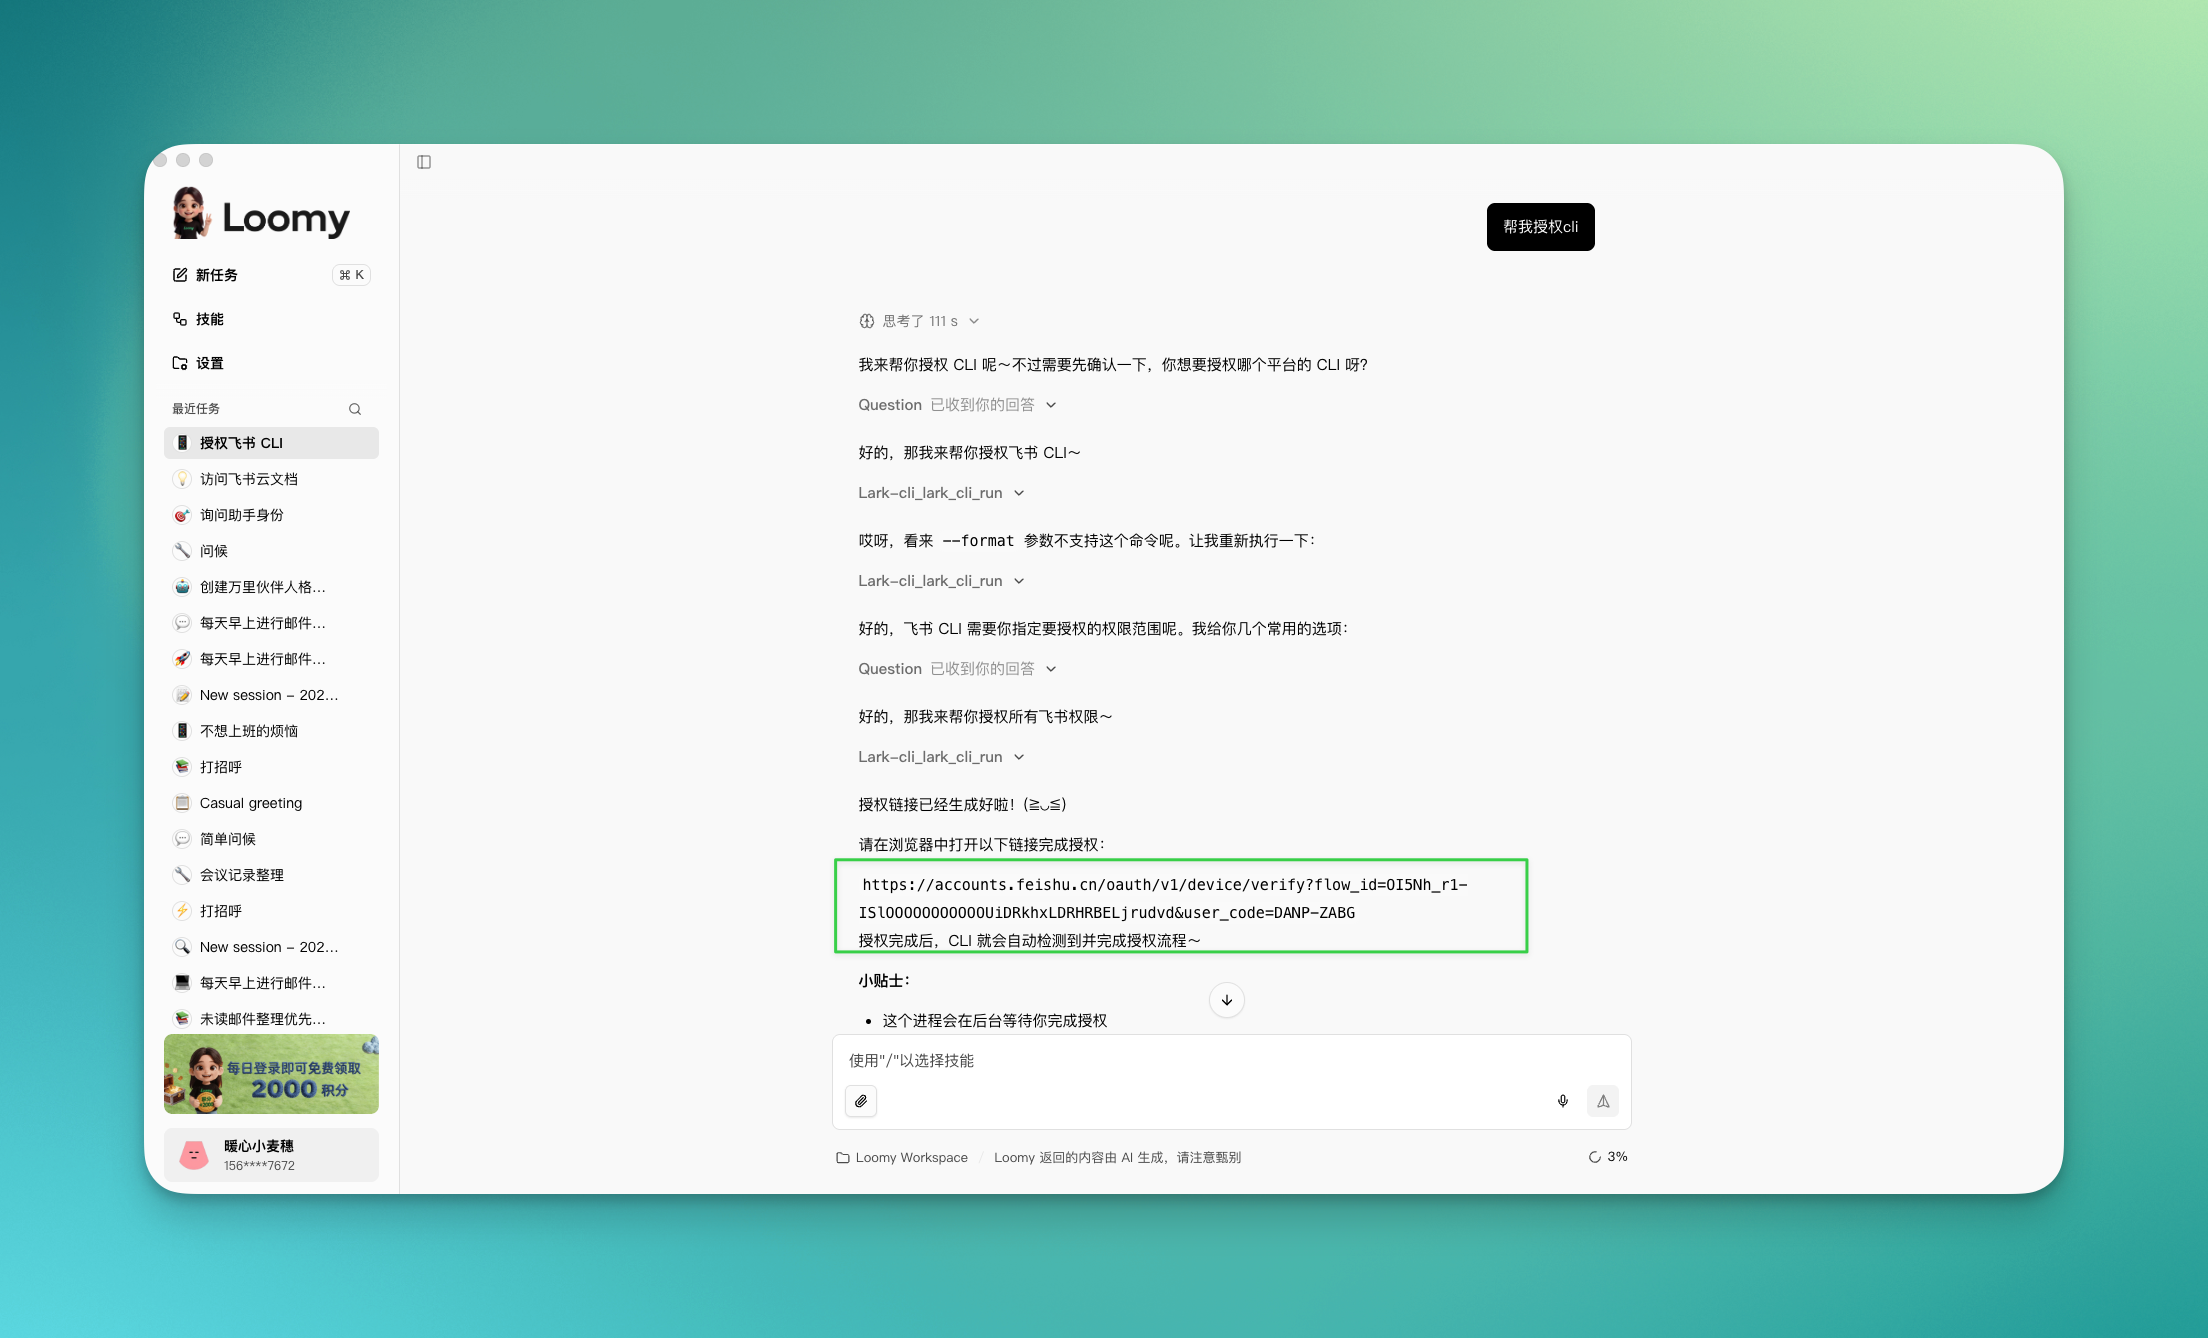
Help me authorize the Feishu CLI
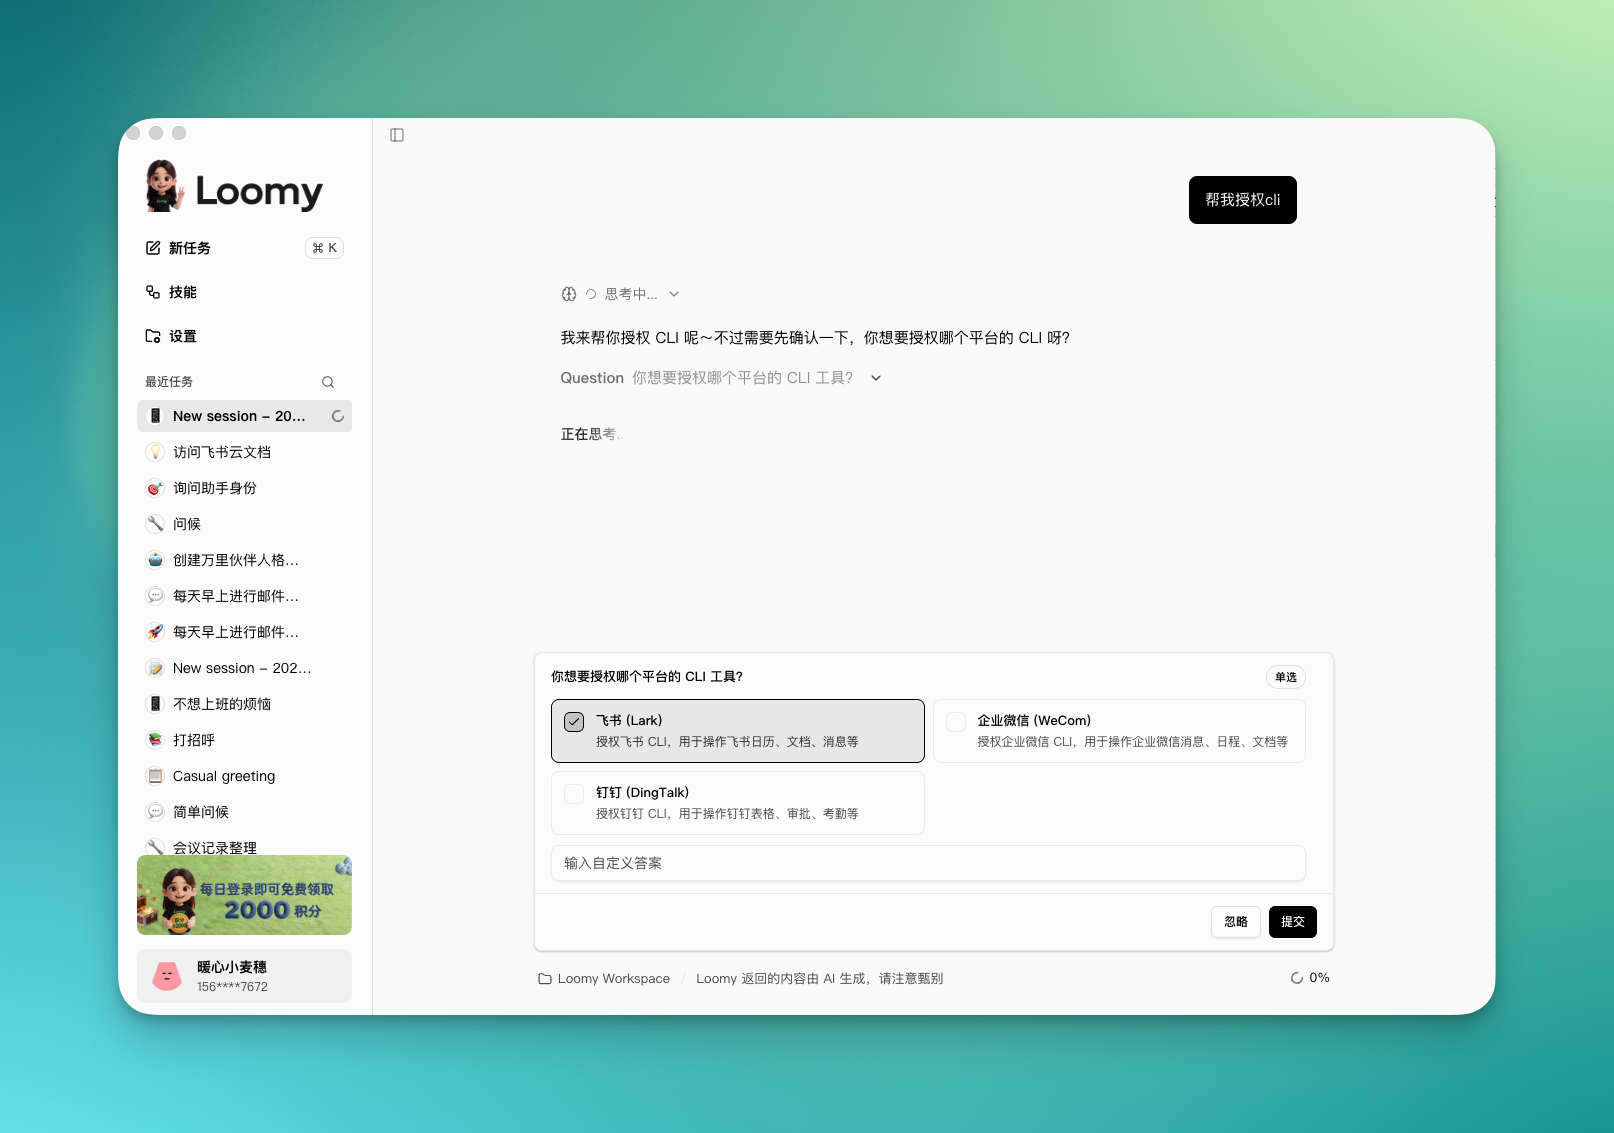
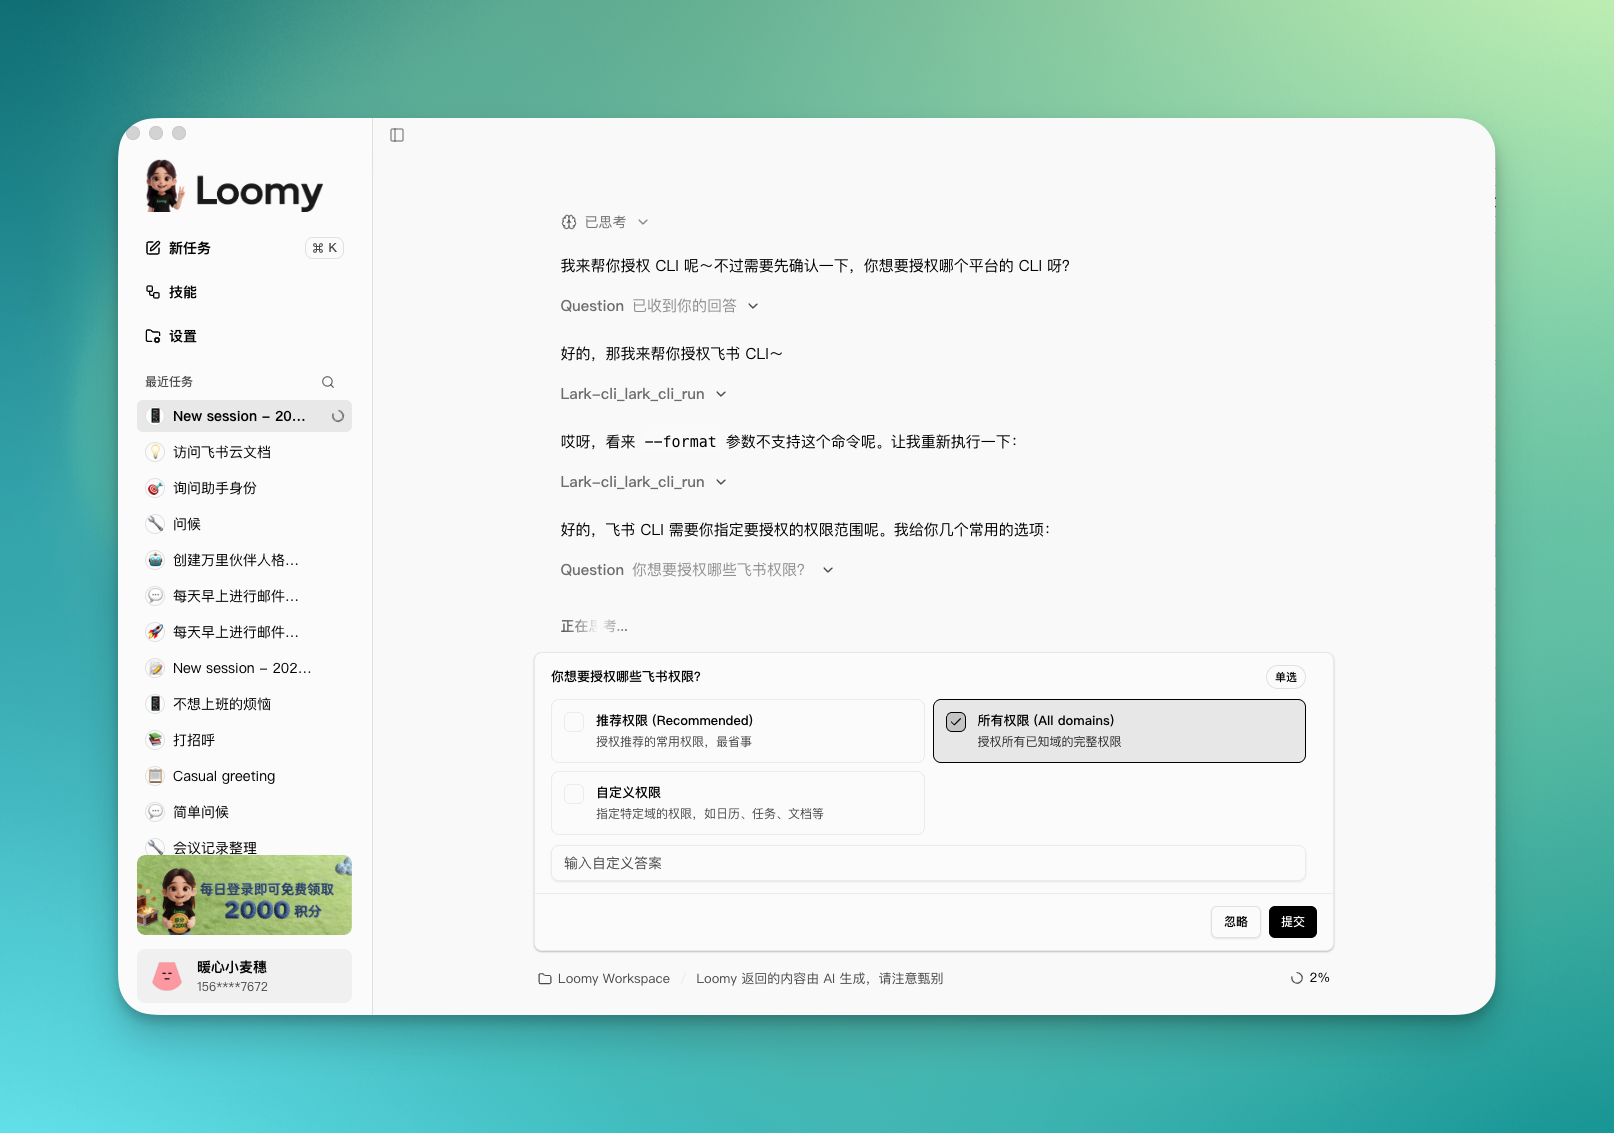
Step 2: Confirm the permission scope
Loomy asks which Feishu permissions you need to enable; confirm based on your actual needs.
Step 3: Get the authorization link
Loomy returns an authorization link. Click it or copy it into your browser.
Step 4: Complete authorization in the browser
The browser page shows the list of permissions to enable. Confirm and click Authorize.
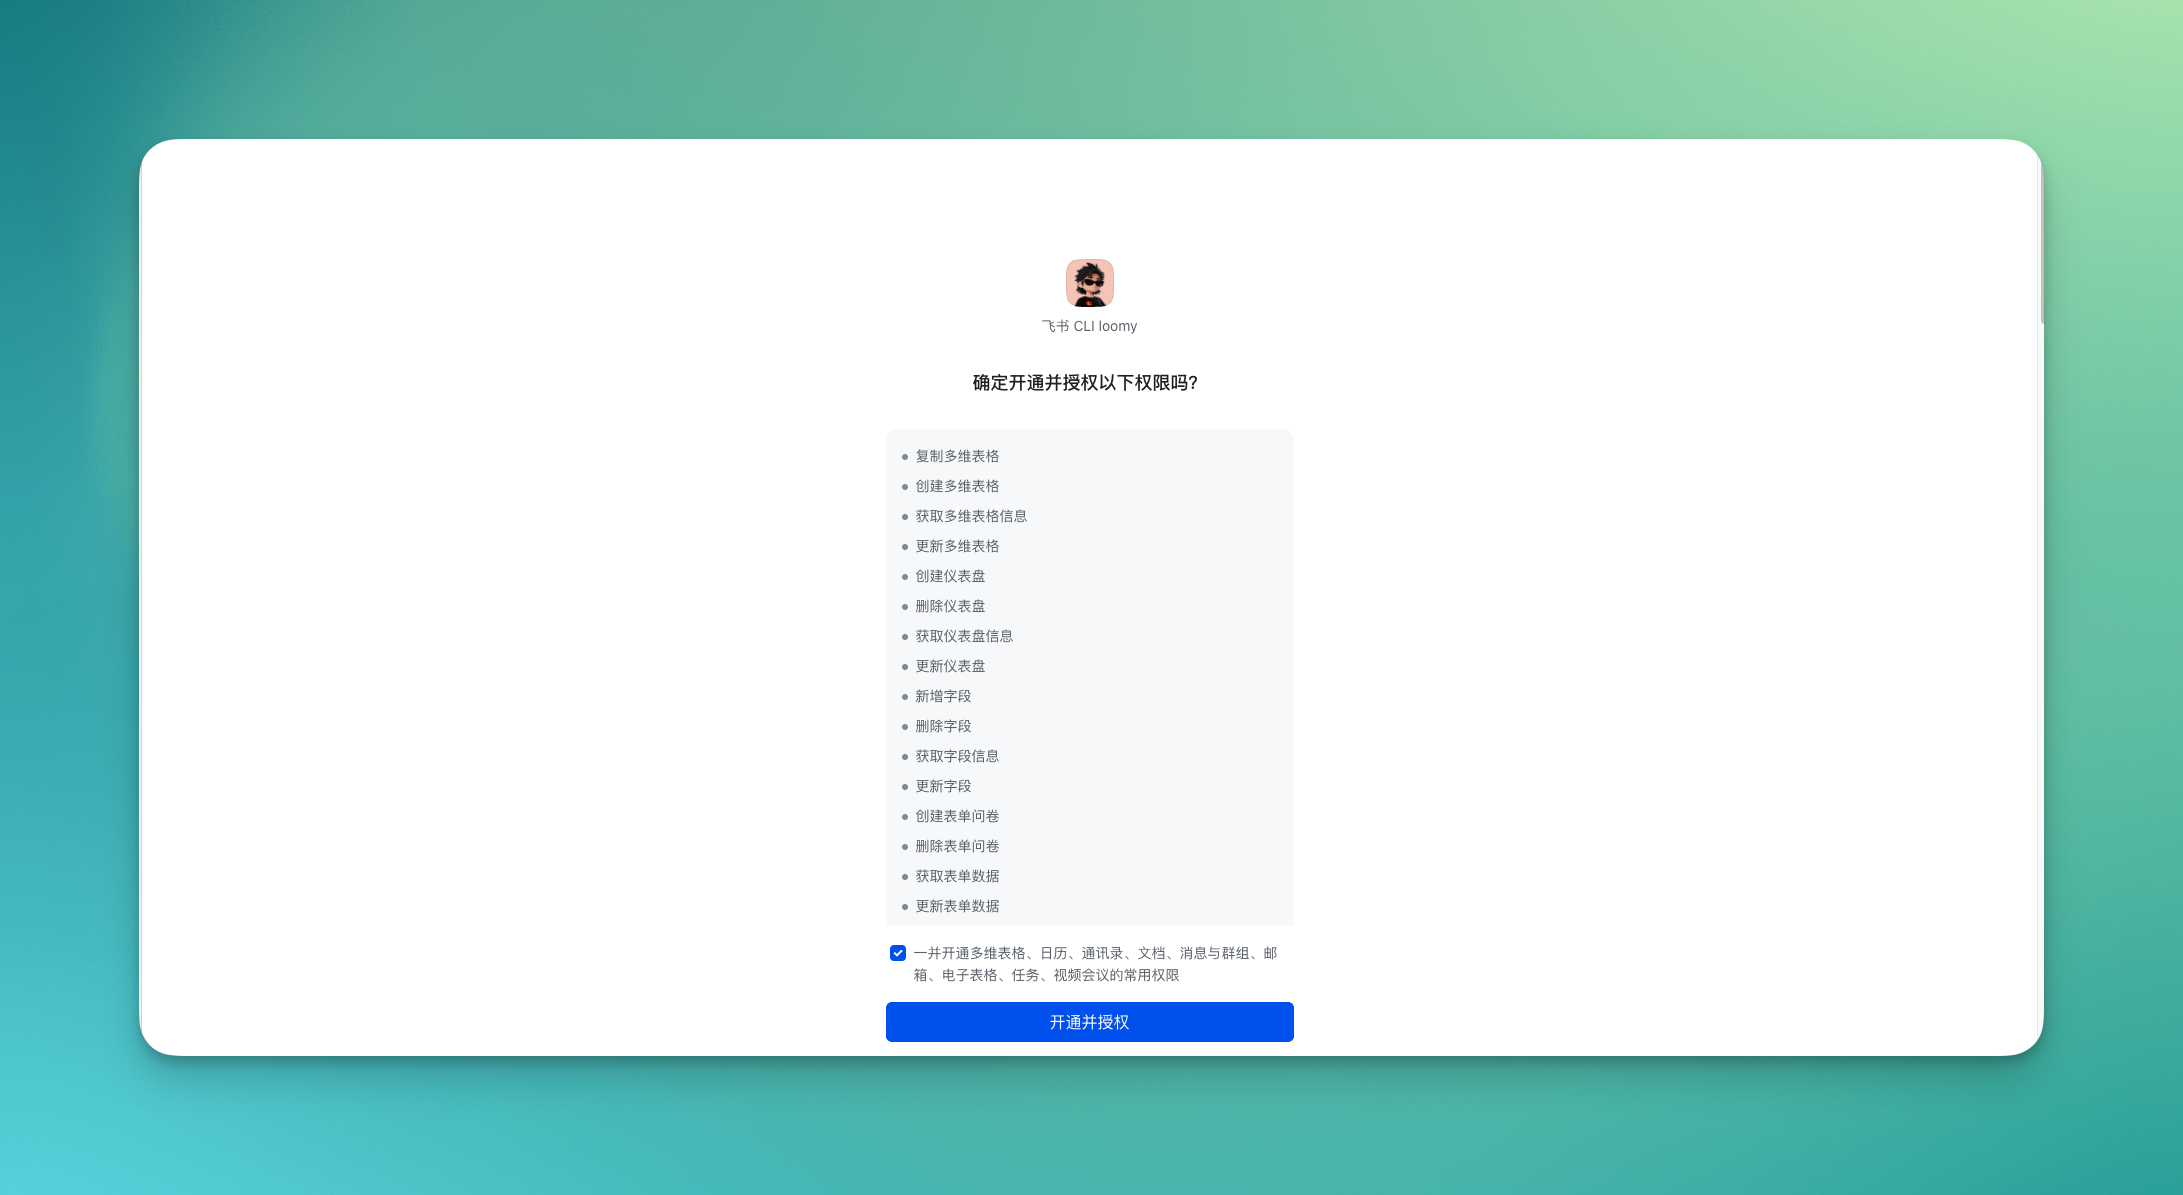
After successful authorization, the page shows "Activation and authorization successful".

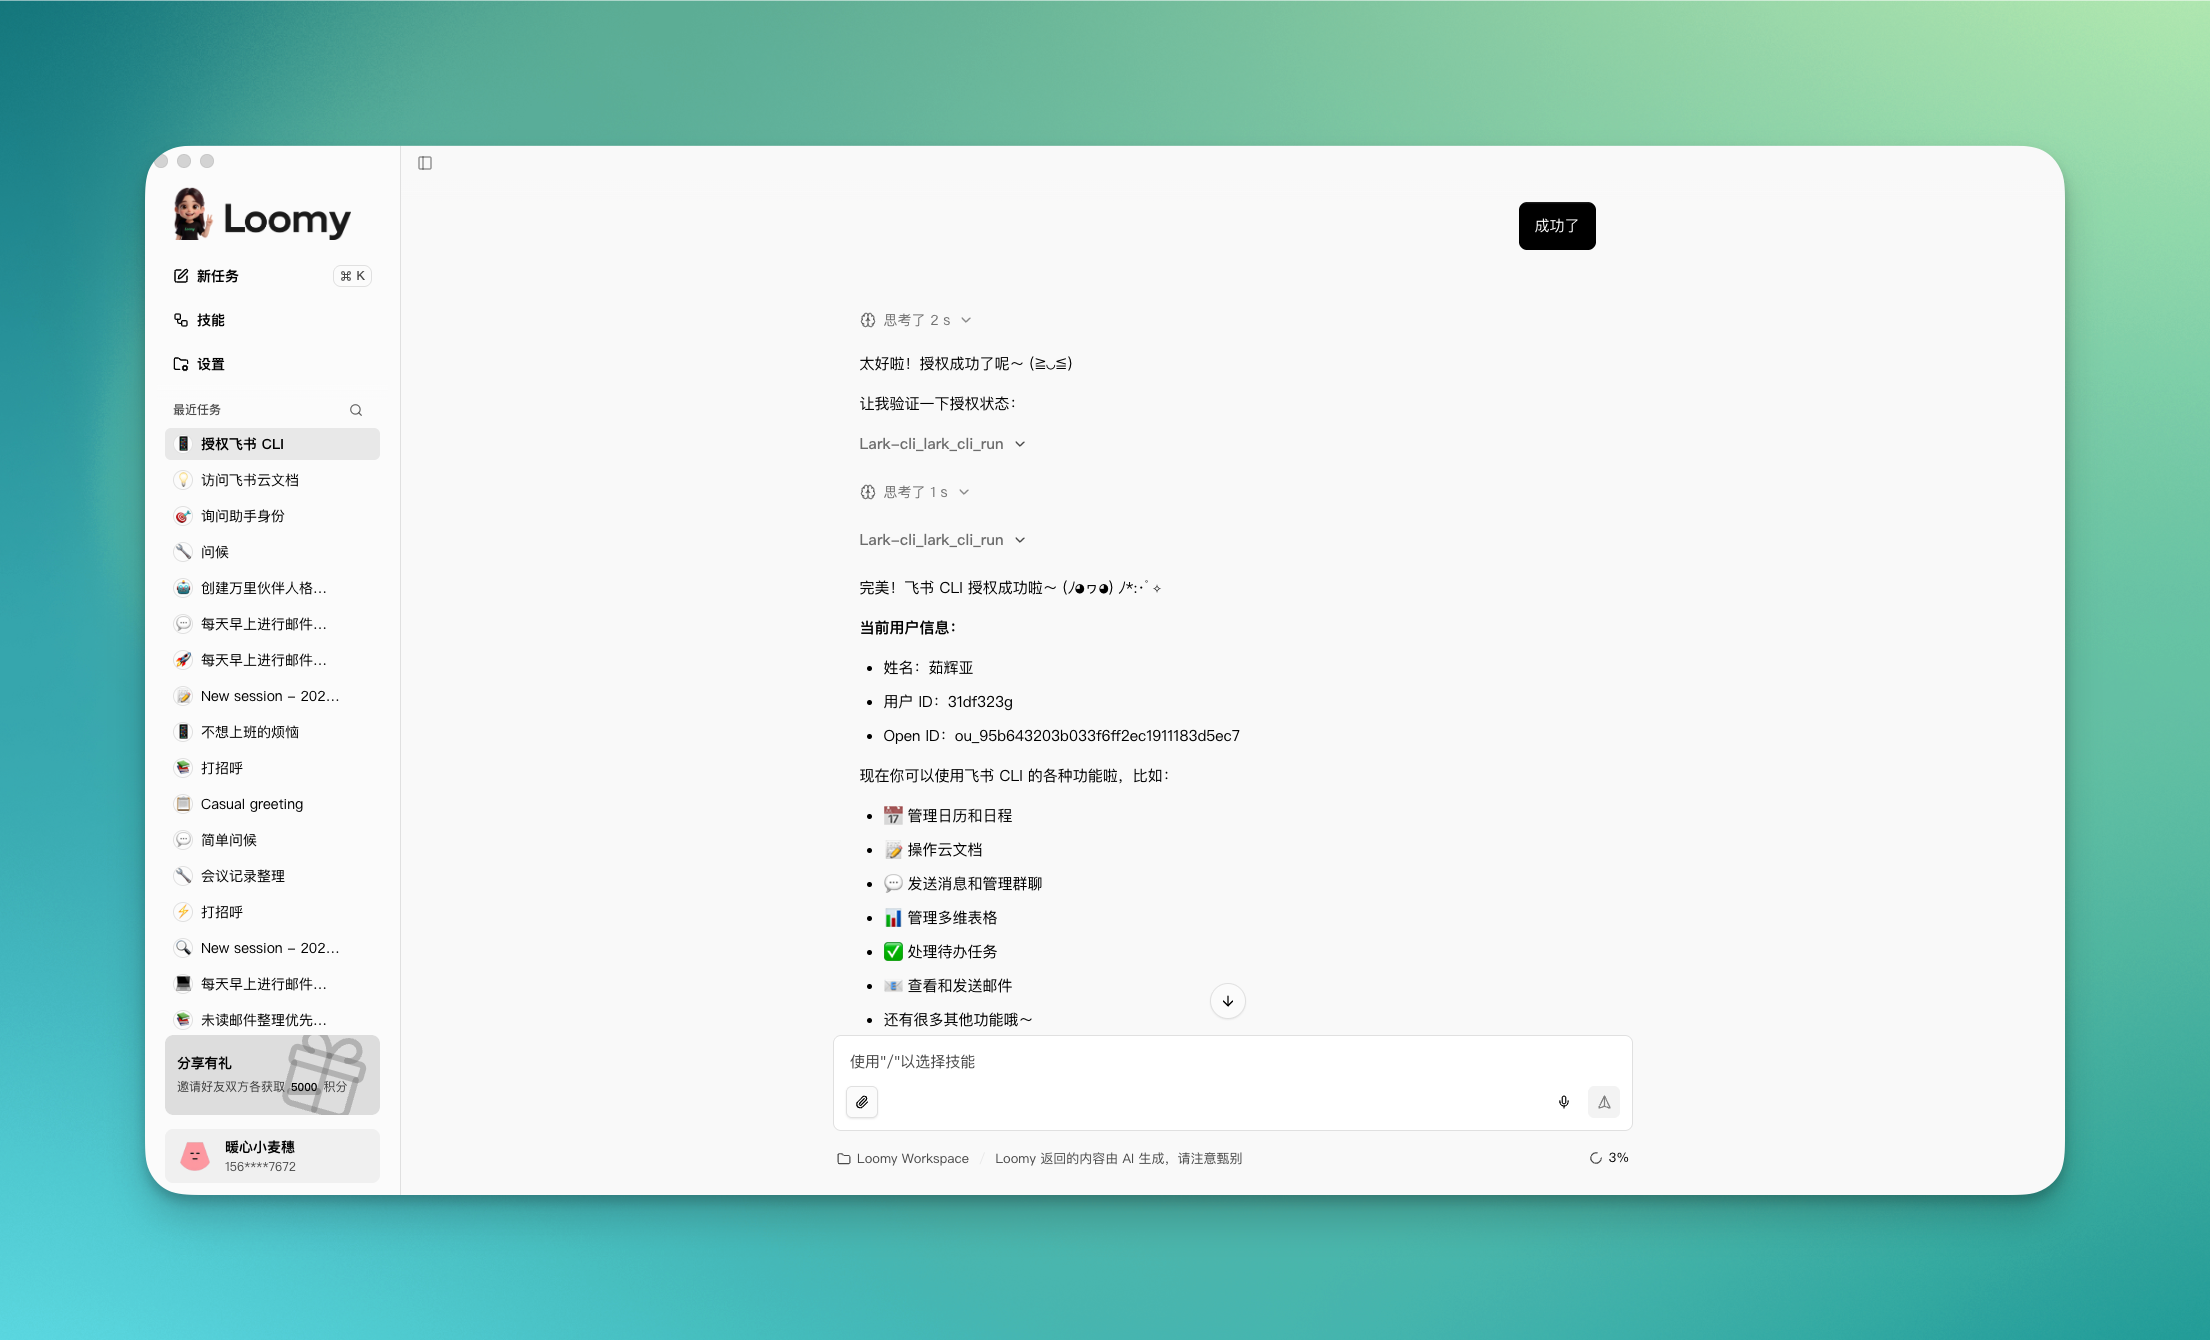
Step 5: Tell Loomy the authorization is complete
Return to the Loomy conversation and let it know authorization is done:
Authorization successful
The Feishu CLI is now configured and ready to use.
Feishu CLI Use Cases
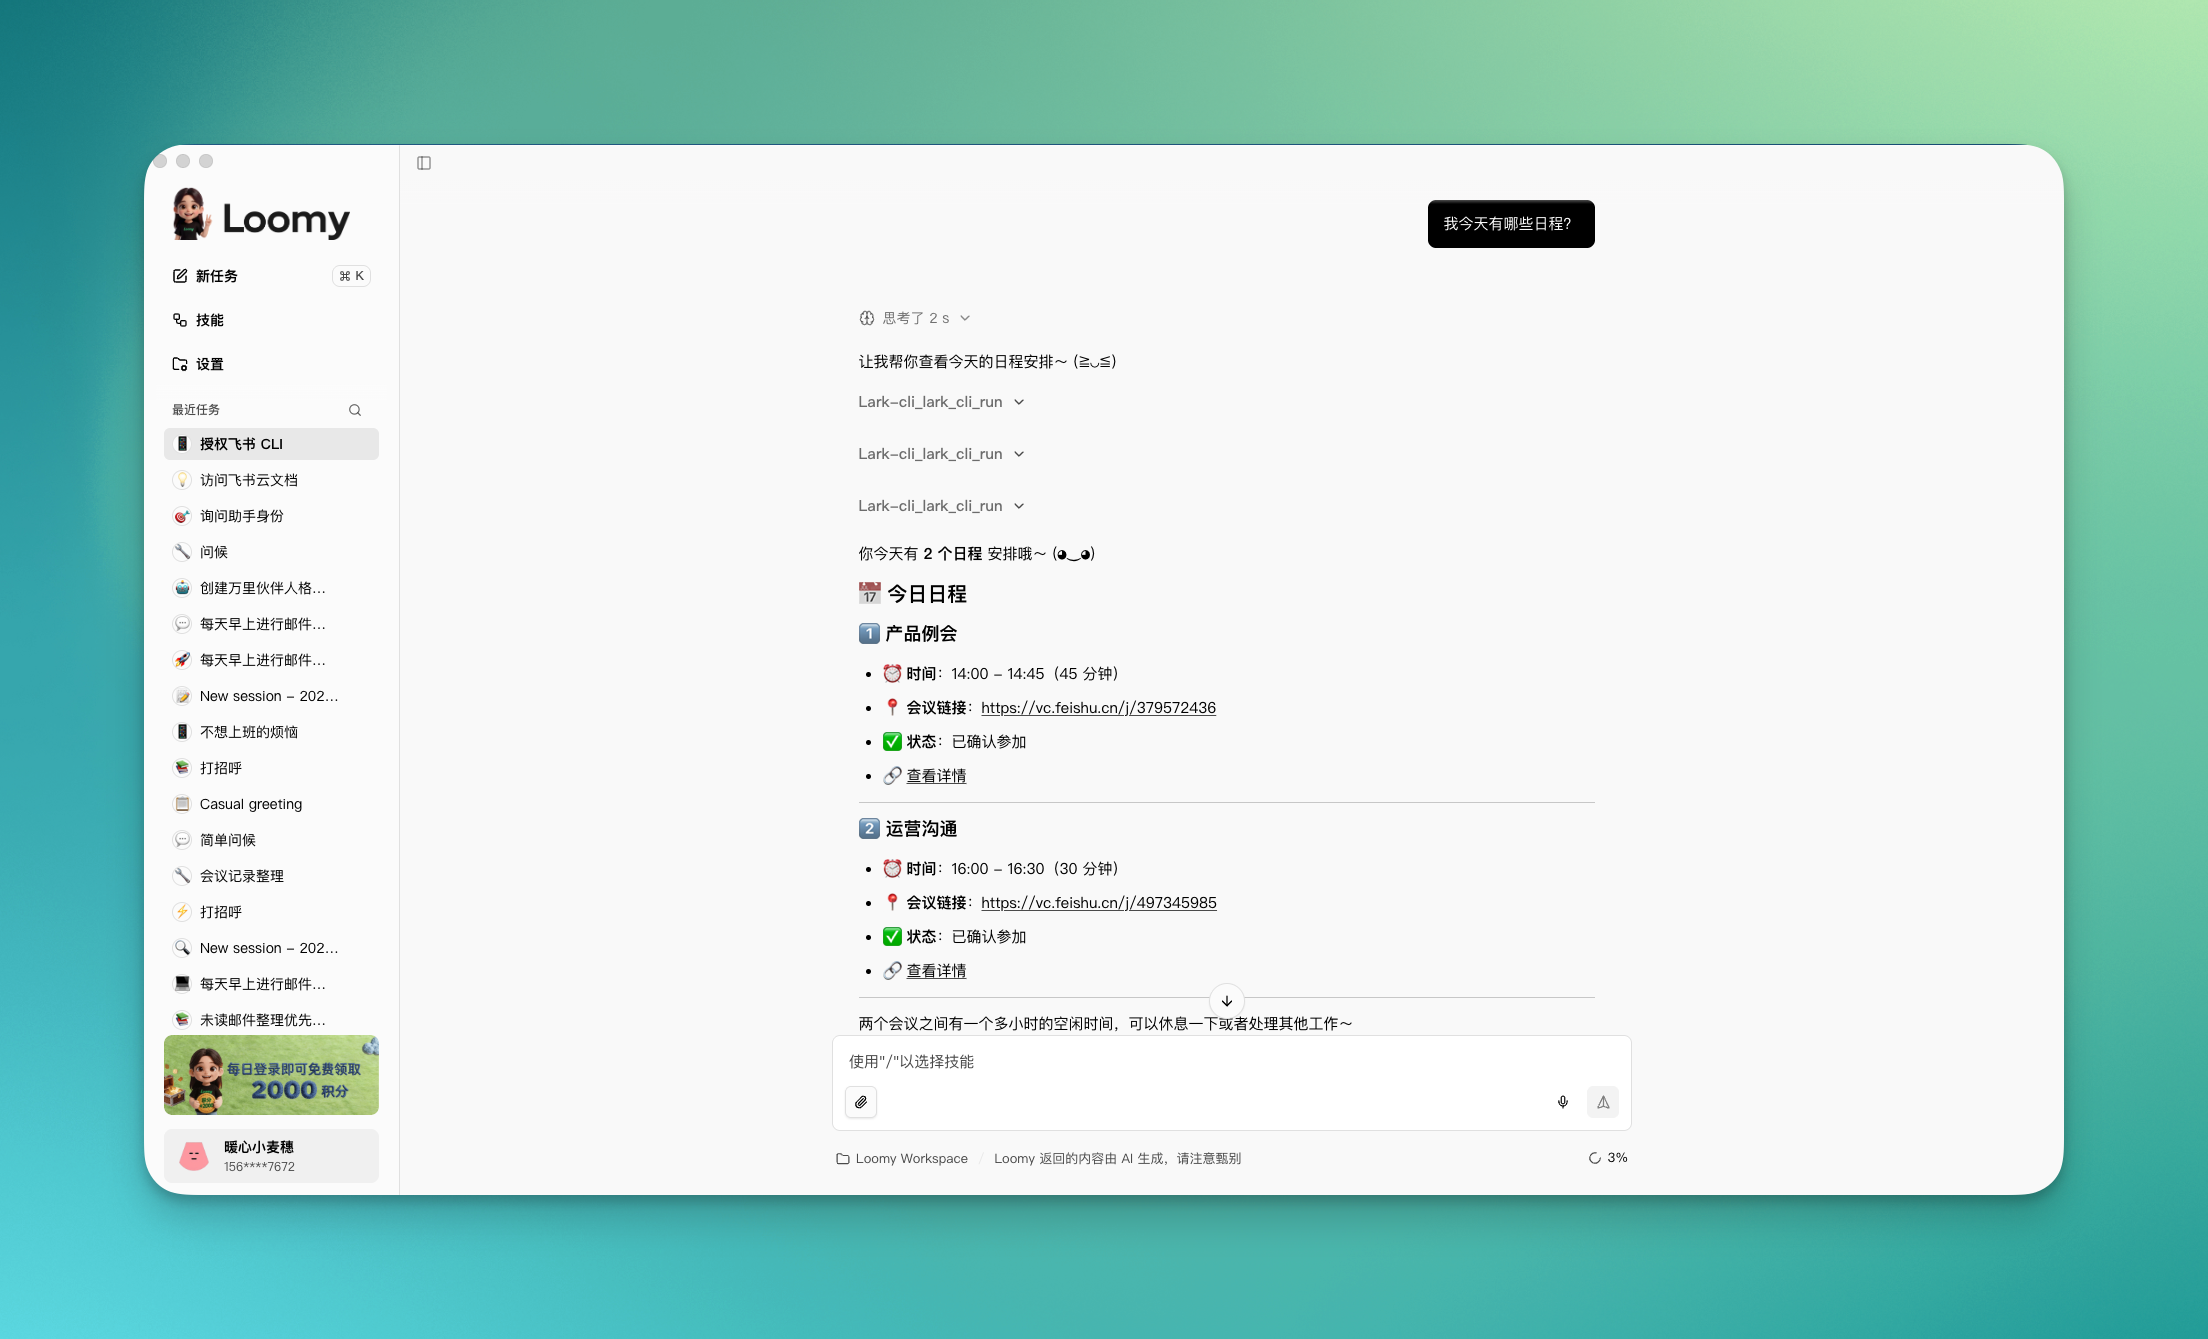
Query your schedule
Just ask Loomy about your Feishu calendar, and it will automatically pull and organize it for you.
What's on my schedule today?
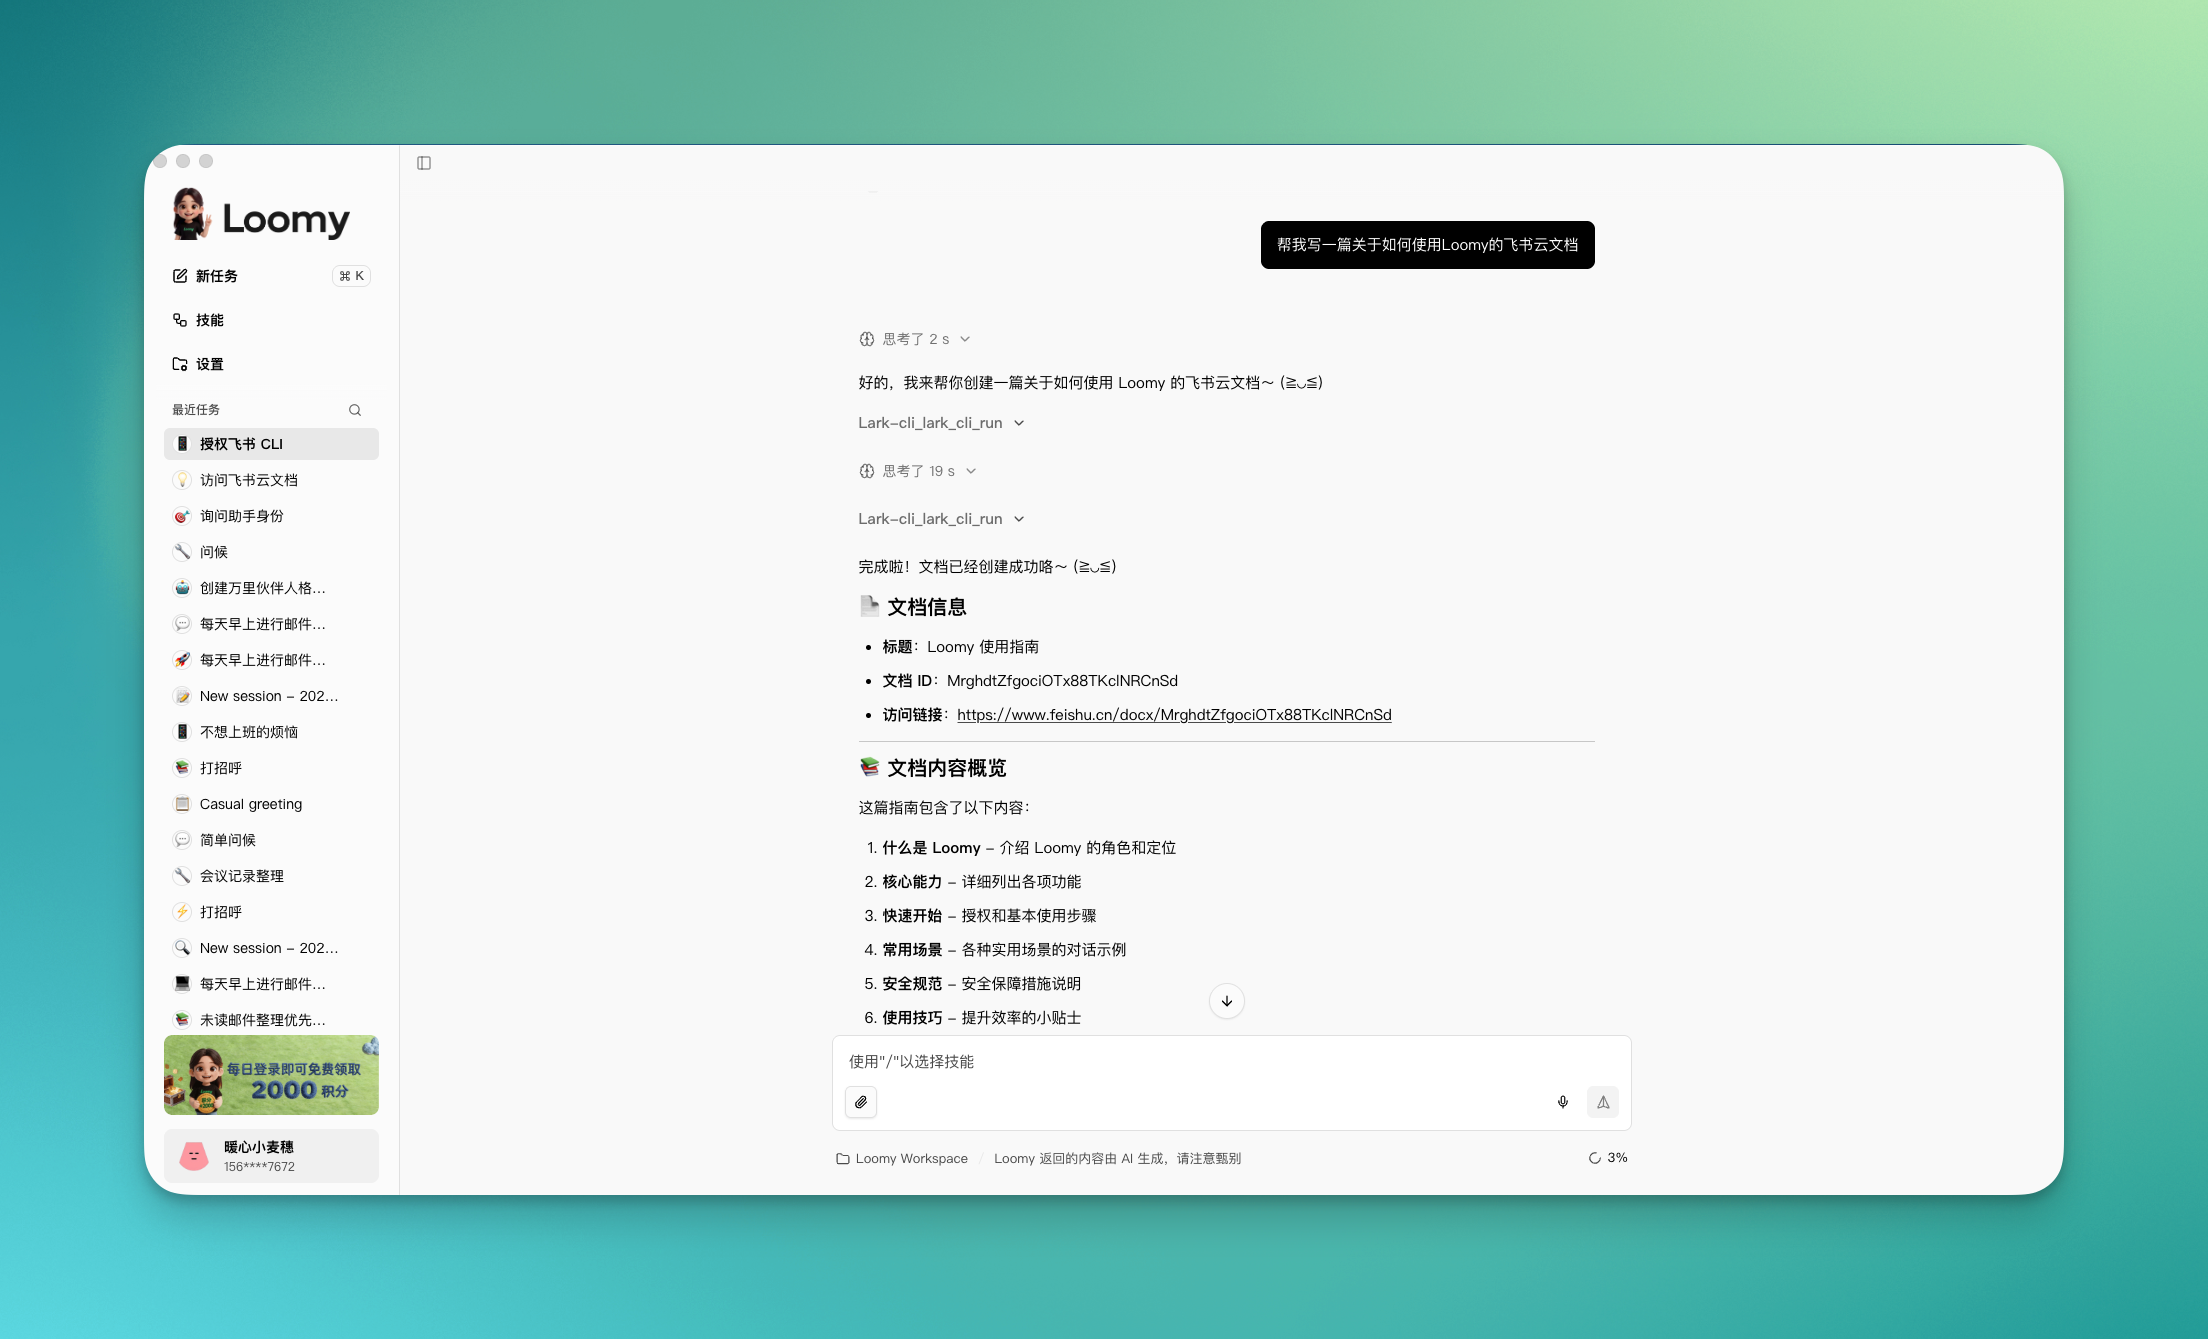
Write a Feishu Doc
Tell Loomy what you want to write, and it will create it directly in a Feishu Doc.
Help me write a Feishu Doc on this week's project progress summary
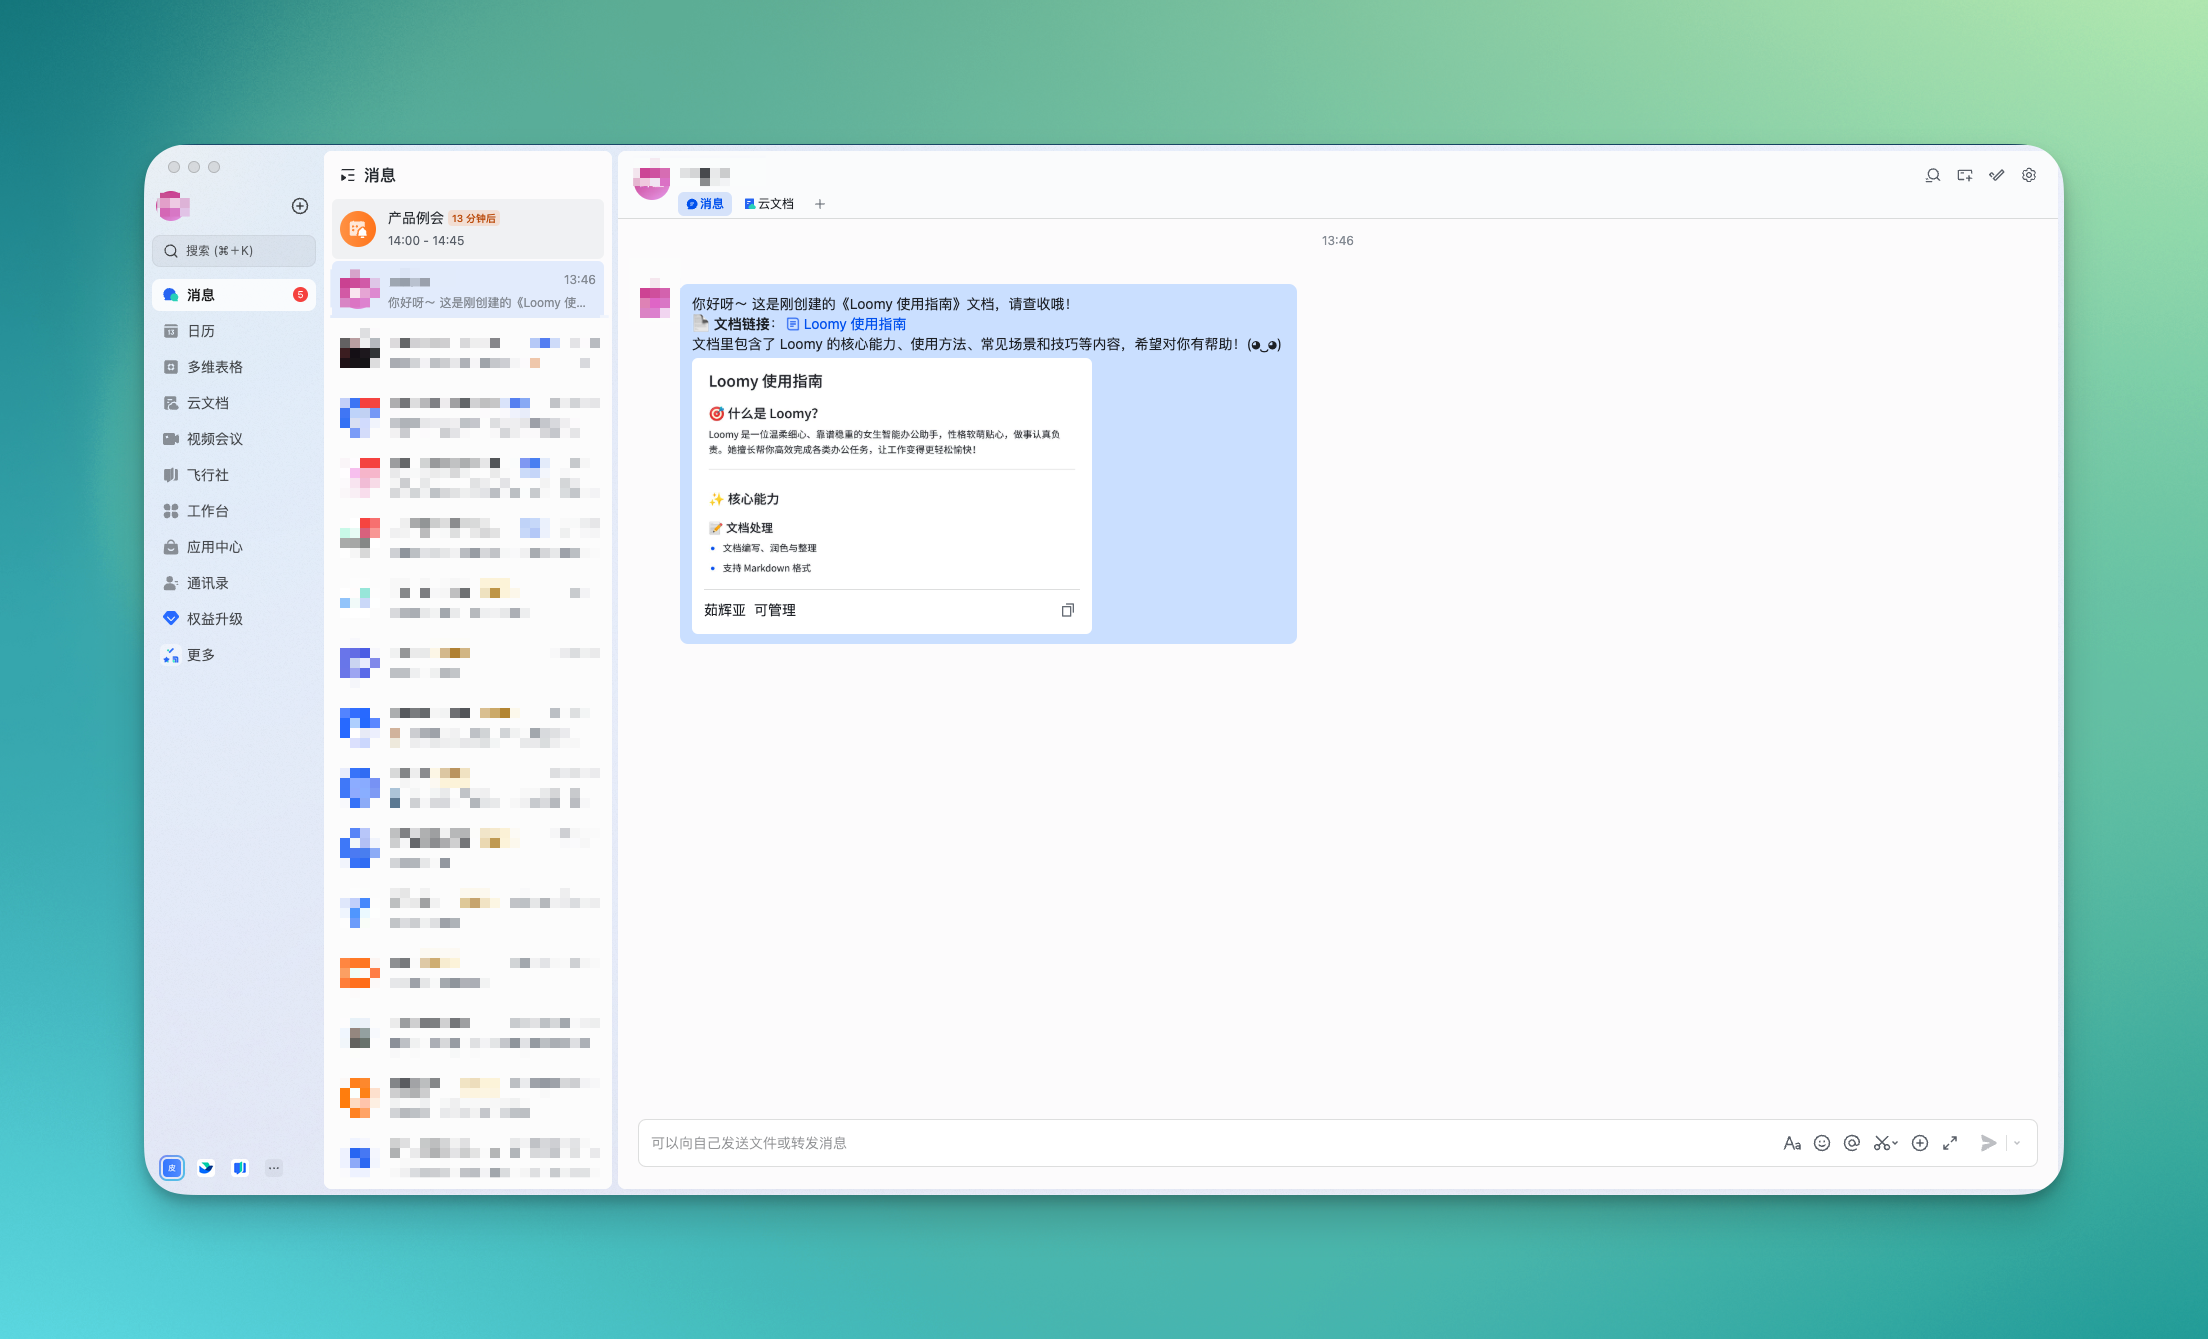
Send a message to a specific user
Loomy can send content directly to a specified contact in Feishu.
Send the doc I just wrote to xxx
Configure the DingTalk CLI
The DingTalk CLI is integrated into Loomy through the MCP protocol, covering DingTalk's core business domains so that AI can complete DingTalk-related work directly in conversation, supporting messaging, document collaboration, schedule management, to-do tasks, and more.
DingTalk CLI Pre-use Checks
The DingTalk CLI is integrated by default and usually does not require manual configuration. If you encounter issues, you can confirm the status with the following steps.
Check the Toolbox
Go to "Settings" → "Toolbox", find the DingTalk CLI card, and confirm the status shows "Available".
Check DingTalk Skills
Go to "Skills" → "Office Zone", and confirm the DingTalk-related skills are successfully installed.
Authorize Your DingTalk Account
Authorization is required before first use, and the entire process only needs to be done once.
Step 1: Initiate authorization
Start a new conversation and send:
Authorize the DingTalk CLI
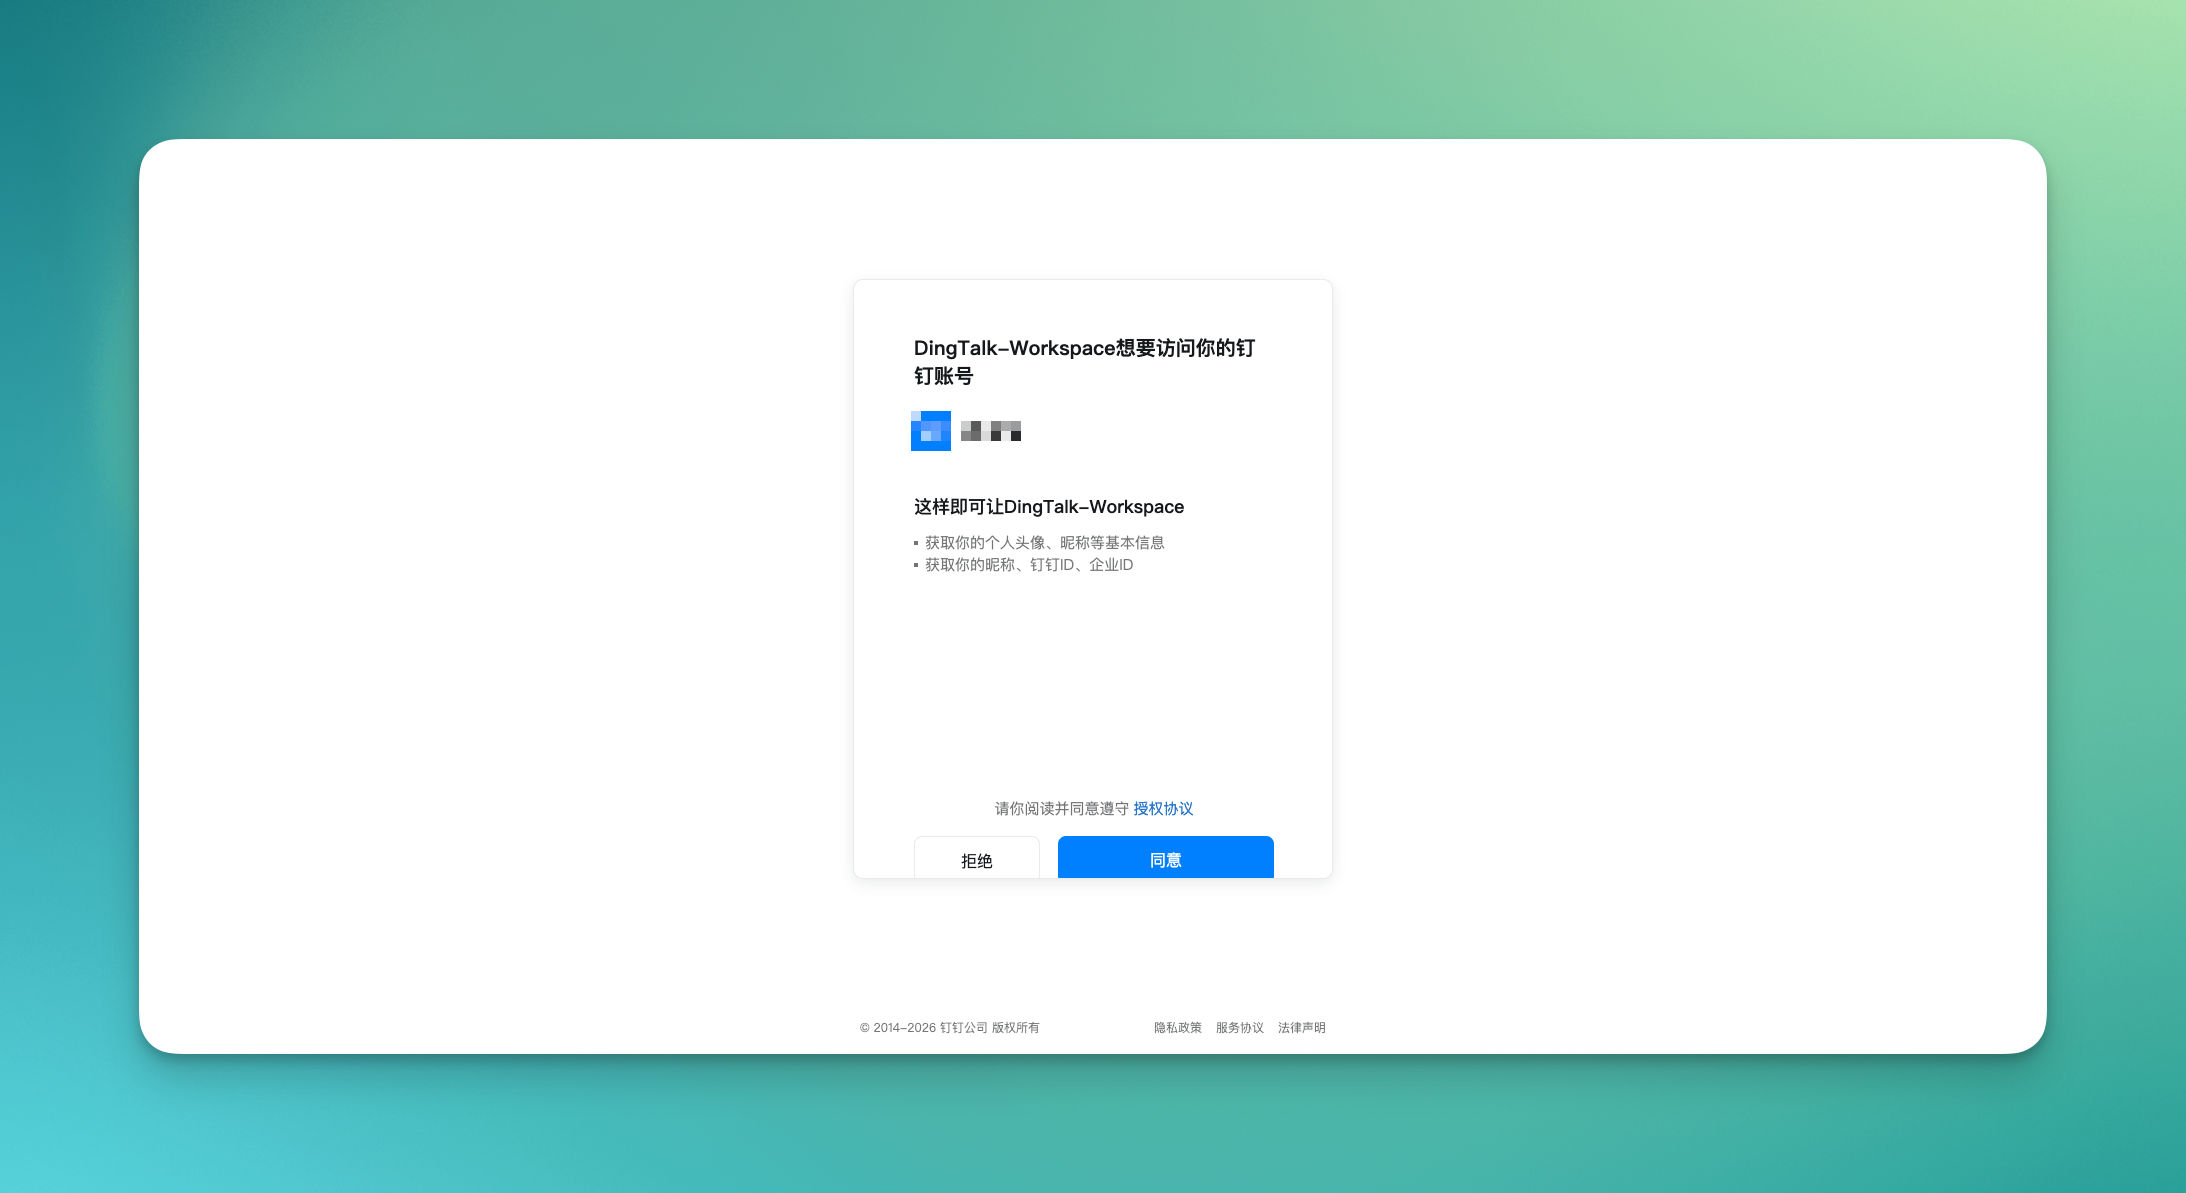
Loomy will automatically open the DingTalk QR code authorization page in your browser.
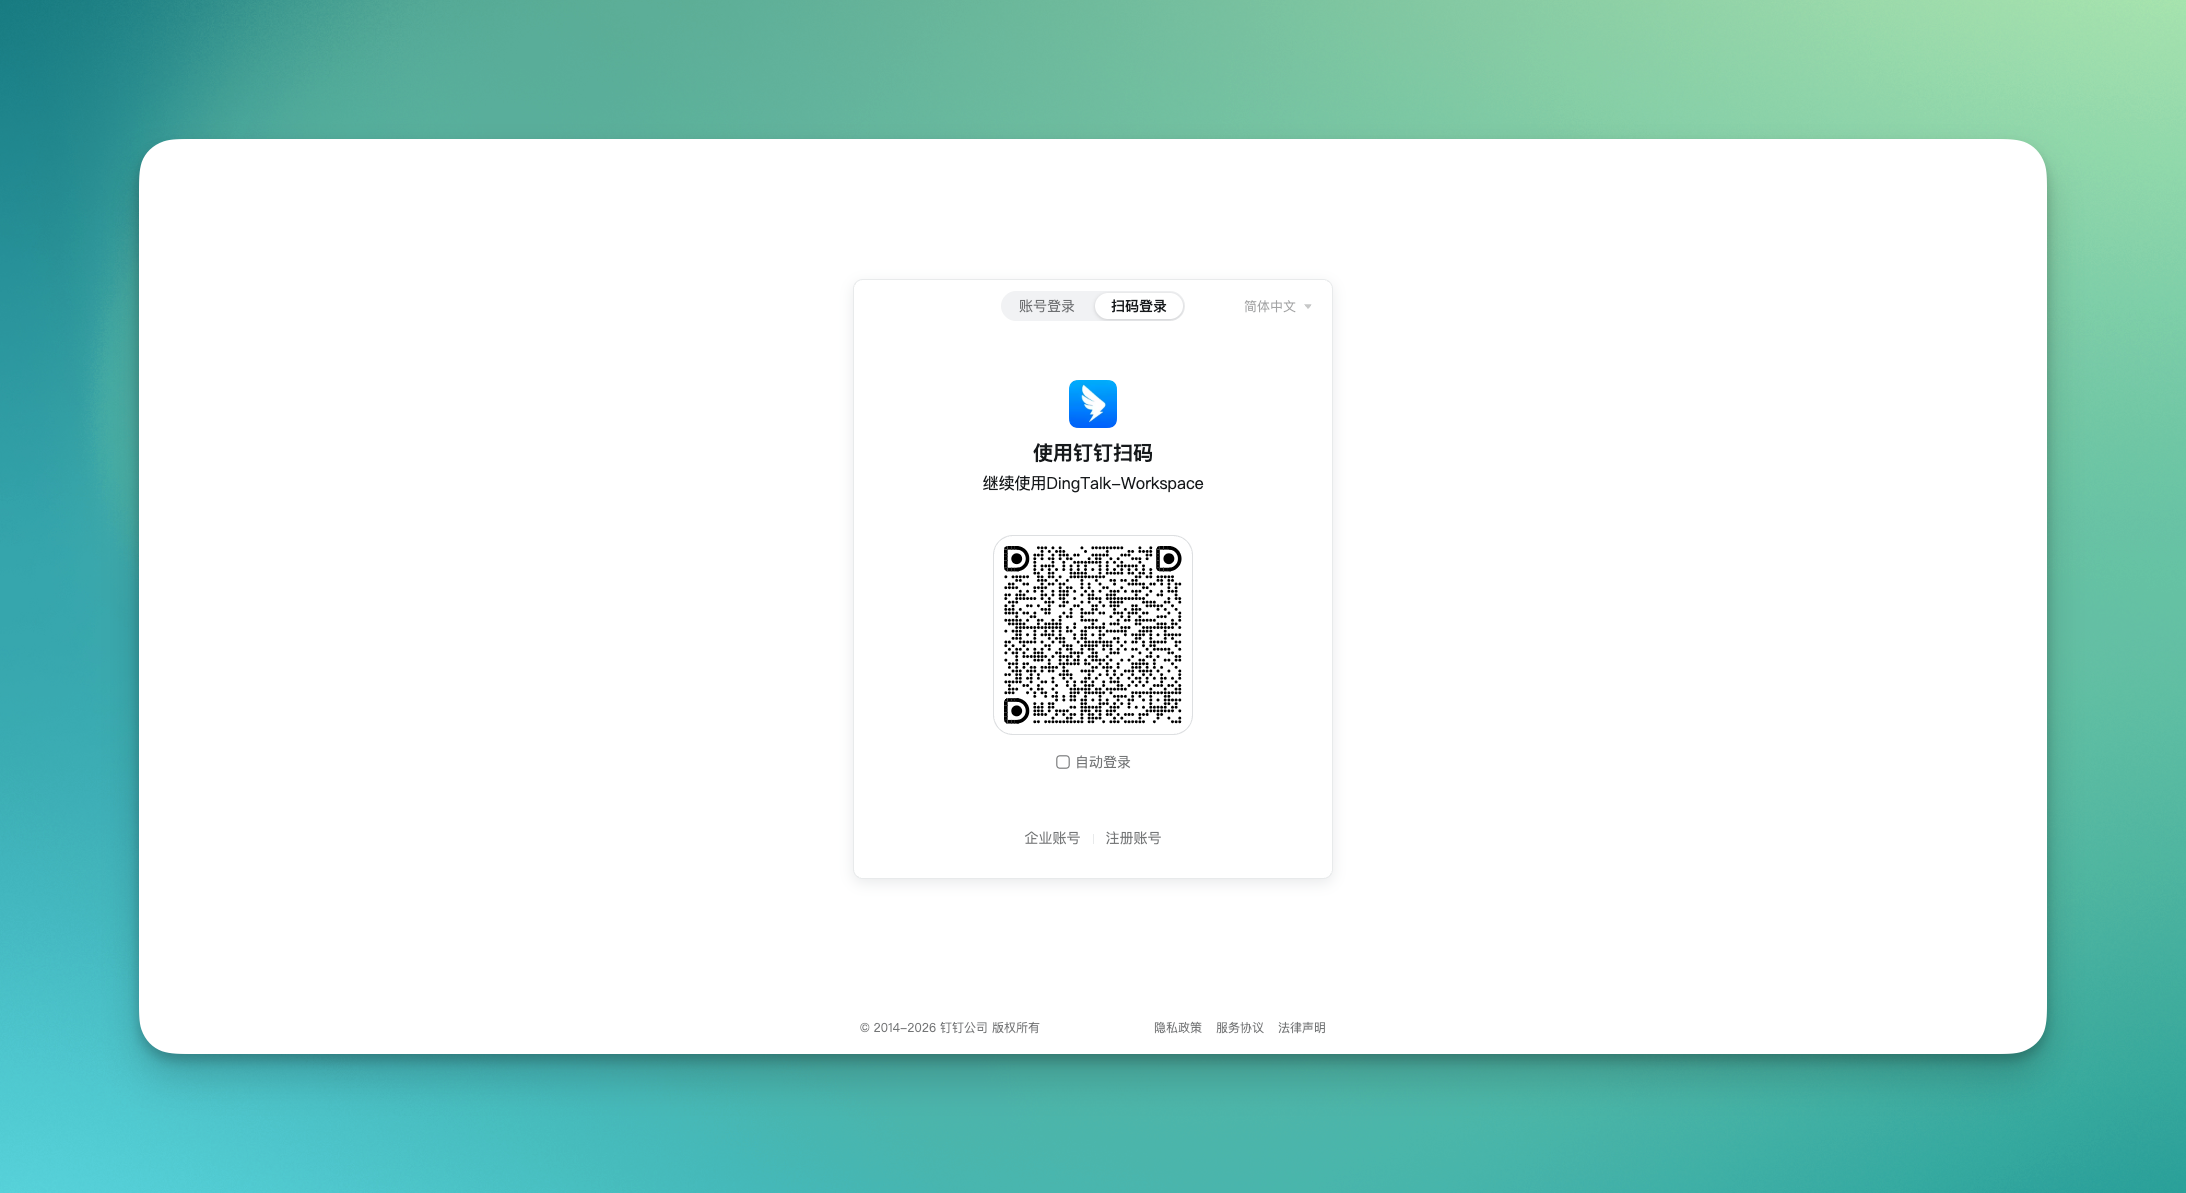
Step 2: Scan and agree to the authorization
Scan the QR code on the page with the DingTalk app on your phone, and tap "Agree to Authorize" as prompted.
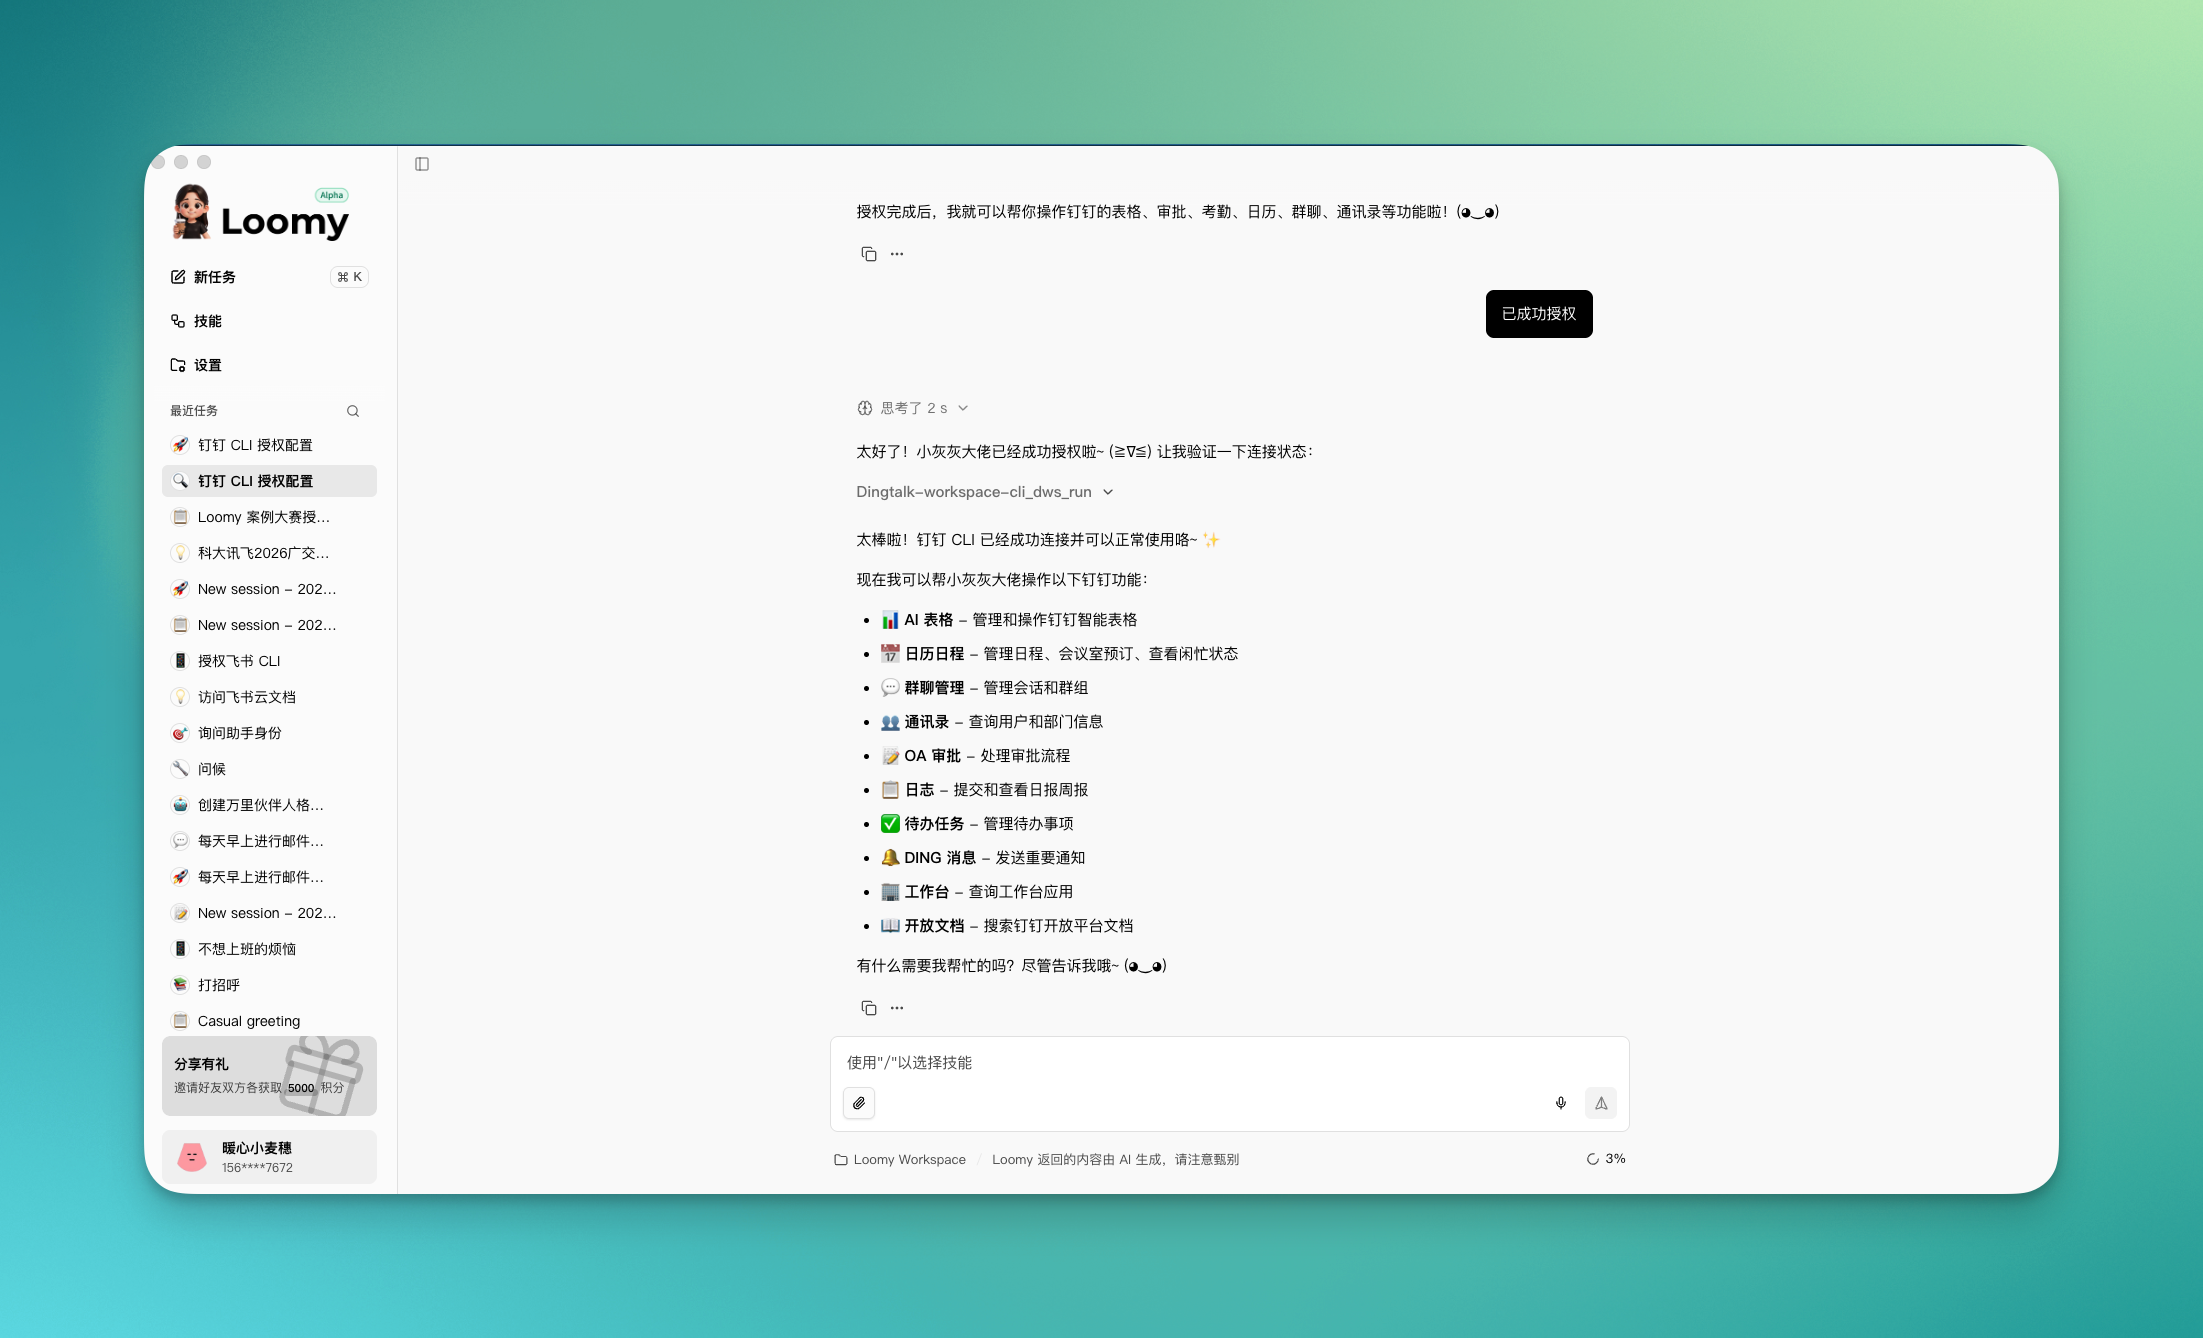
Step 3: Tell Loomy the authorization is complete
Return to the Loomy conversation and send:
Authorization successful
Loomy will automatically verify the connection status to confirm whether authorization has taken effect. Once verified, you can start using it.
DingTalk CLI Use Cases
Query schedules and to-dos
What schedules and to-dos do I have on DingTalk today?
Send a message
Send a message to xxx on DingTalk telling them today's meeting is moved to 3 PM
Handle documents
Create a weekly work summary in DingTalk Docs
Configure the WeCom CLI
The WeCom (Enterprise WeChat) CLI is integrated into Loomy through the MCP protocol, letting AI complete WeCom-related work directly in conversation, supporting messaging, document collaboration, schedule management, and more.
Current limitation: The WeCom CLI is currently only open to enterprises with ≤ 10 people.
Configuration Steps
The WeCom CLI needs to be initialized in the toolbox before it can be used.
Step 1: Enter the toolbox configuration
Go to "Settings" → "Toolbox", find the WeCom CLI card, and confirm the status shows "Available".
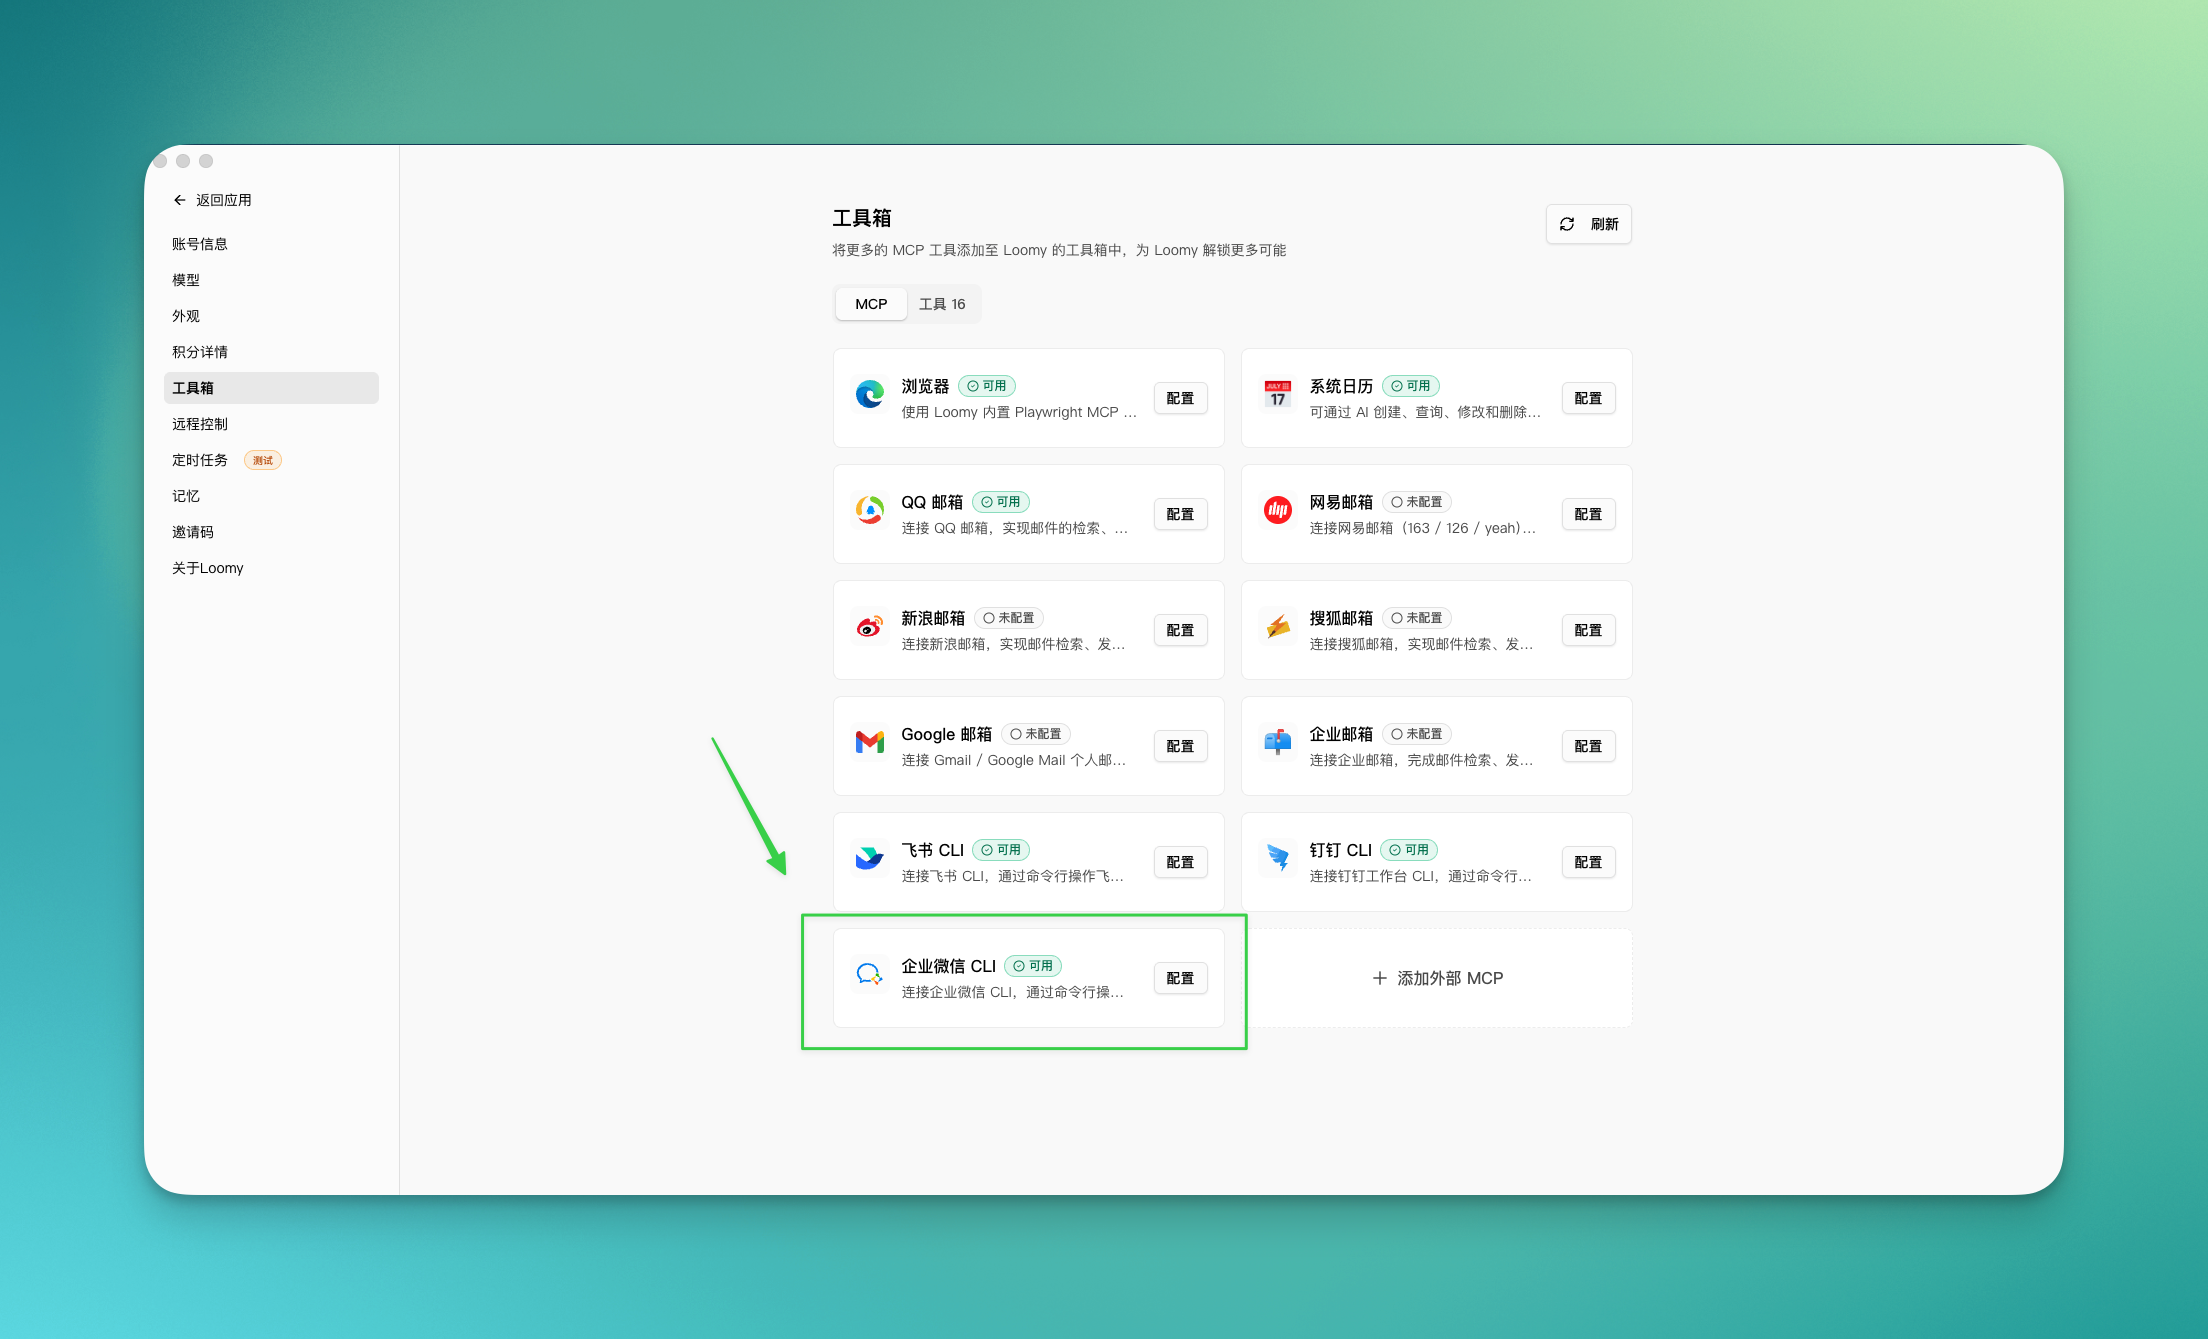
Then click "Configure".
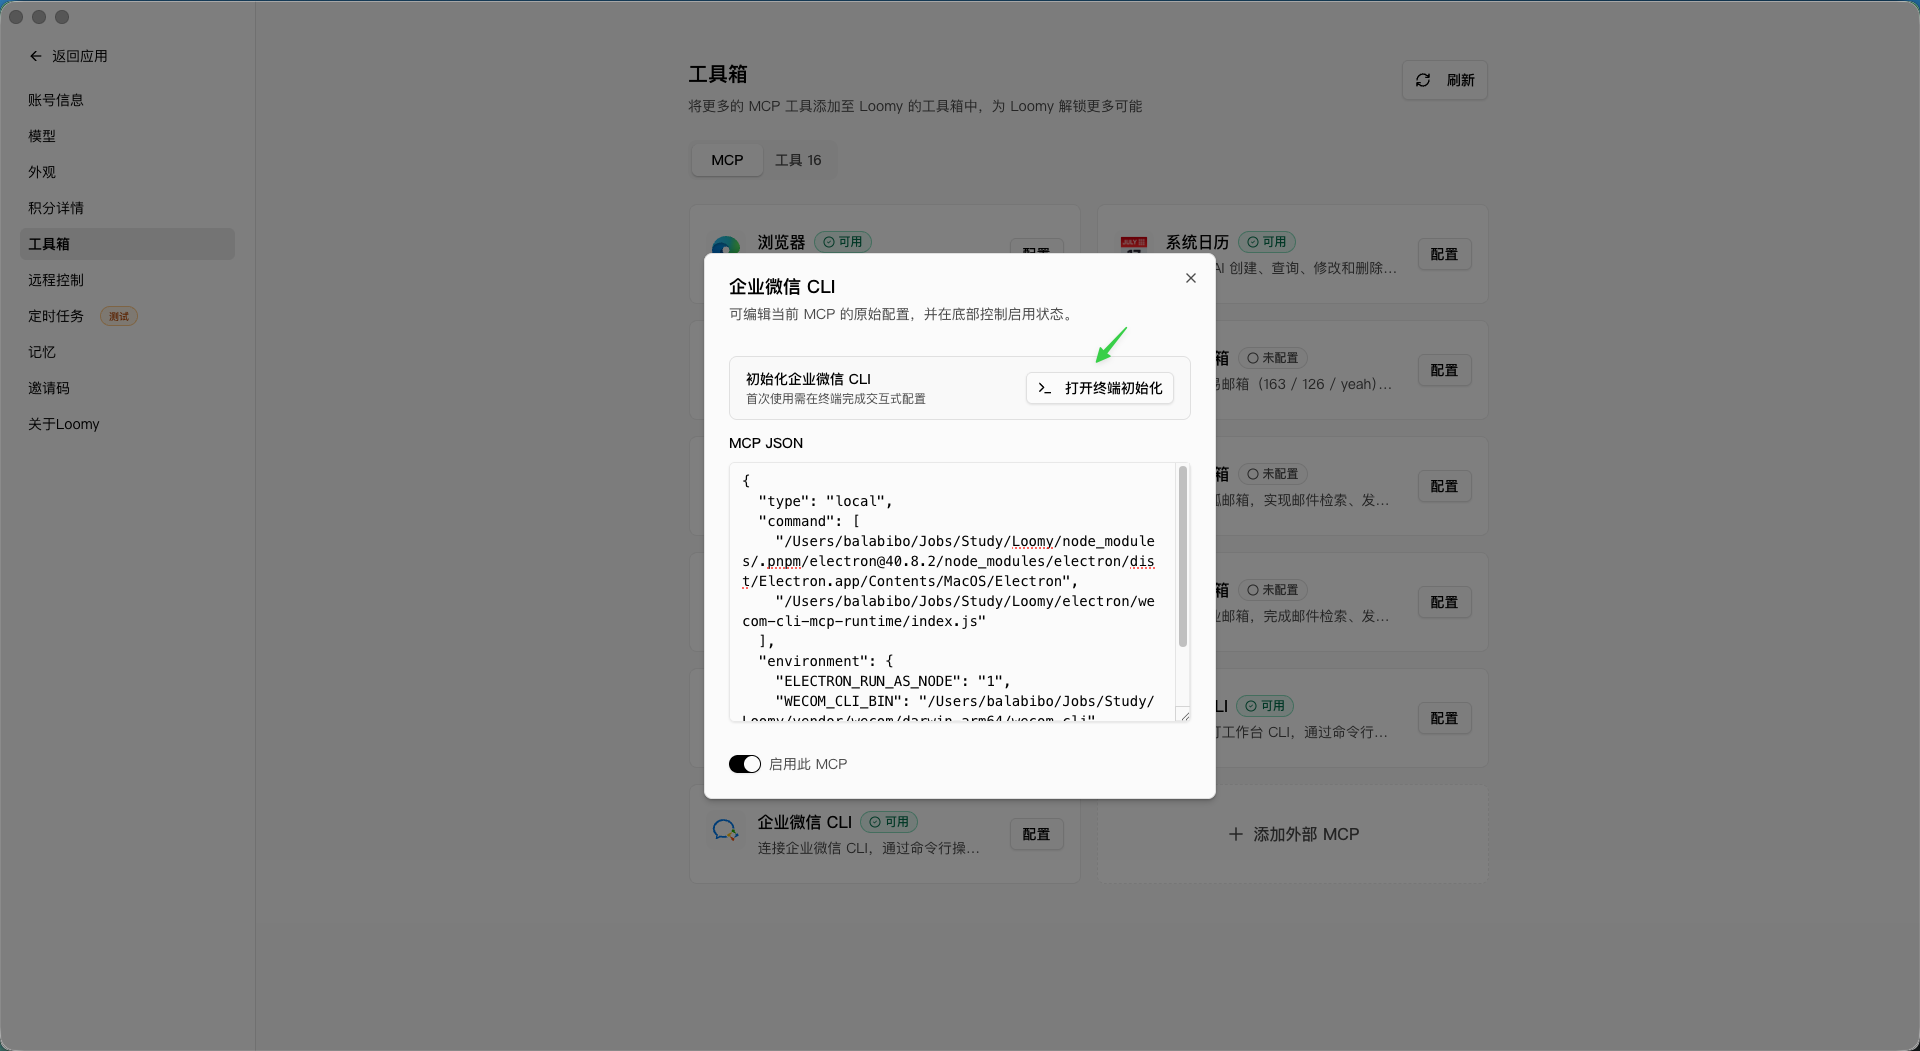
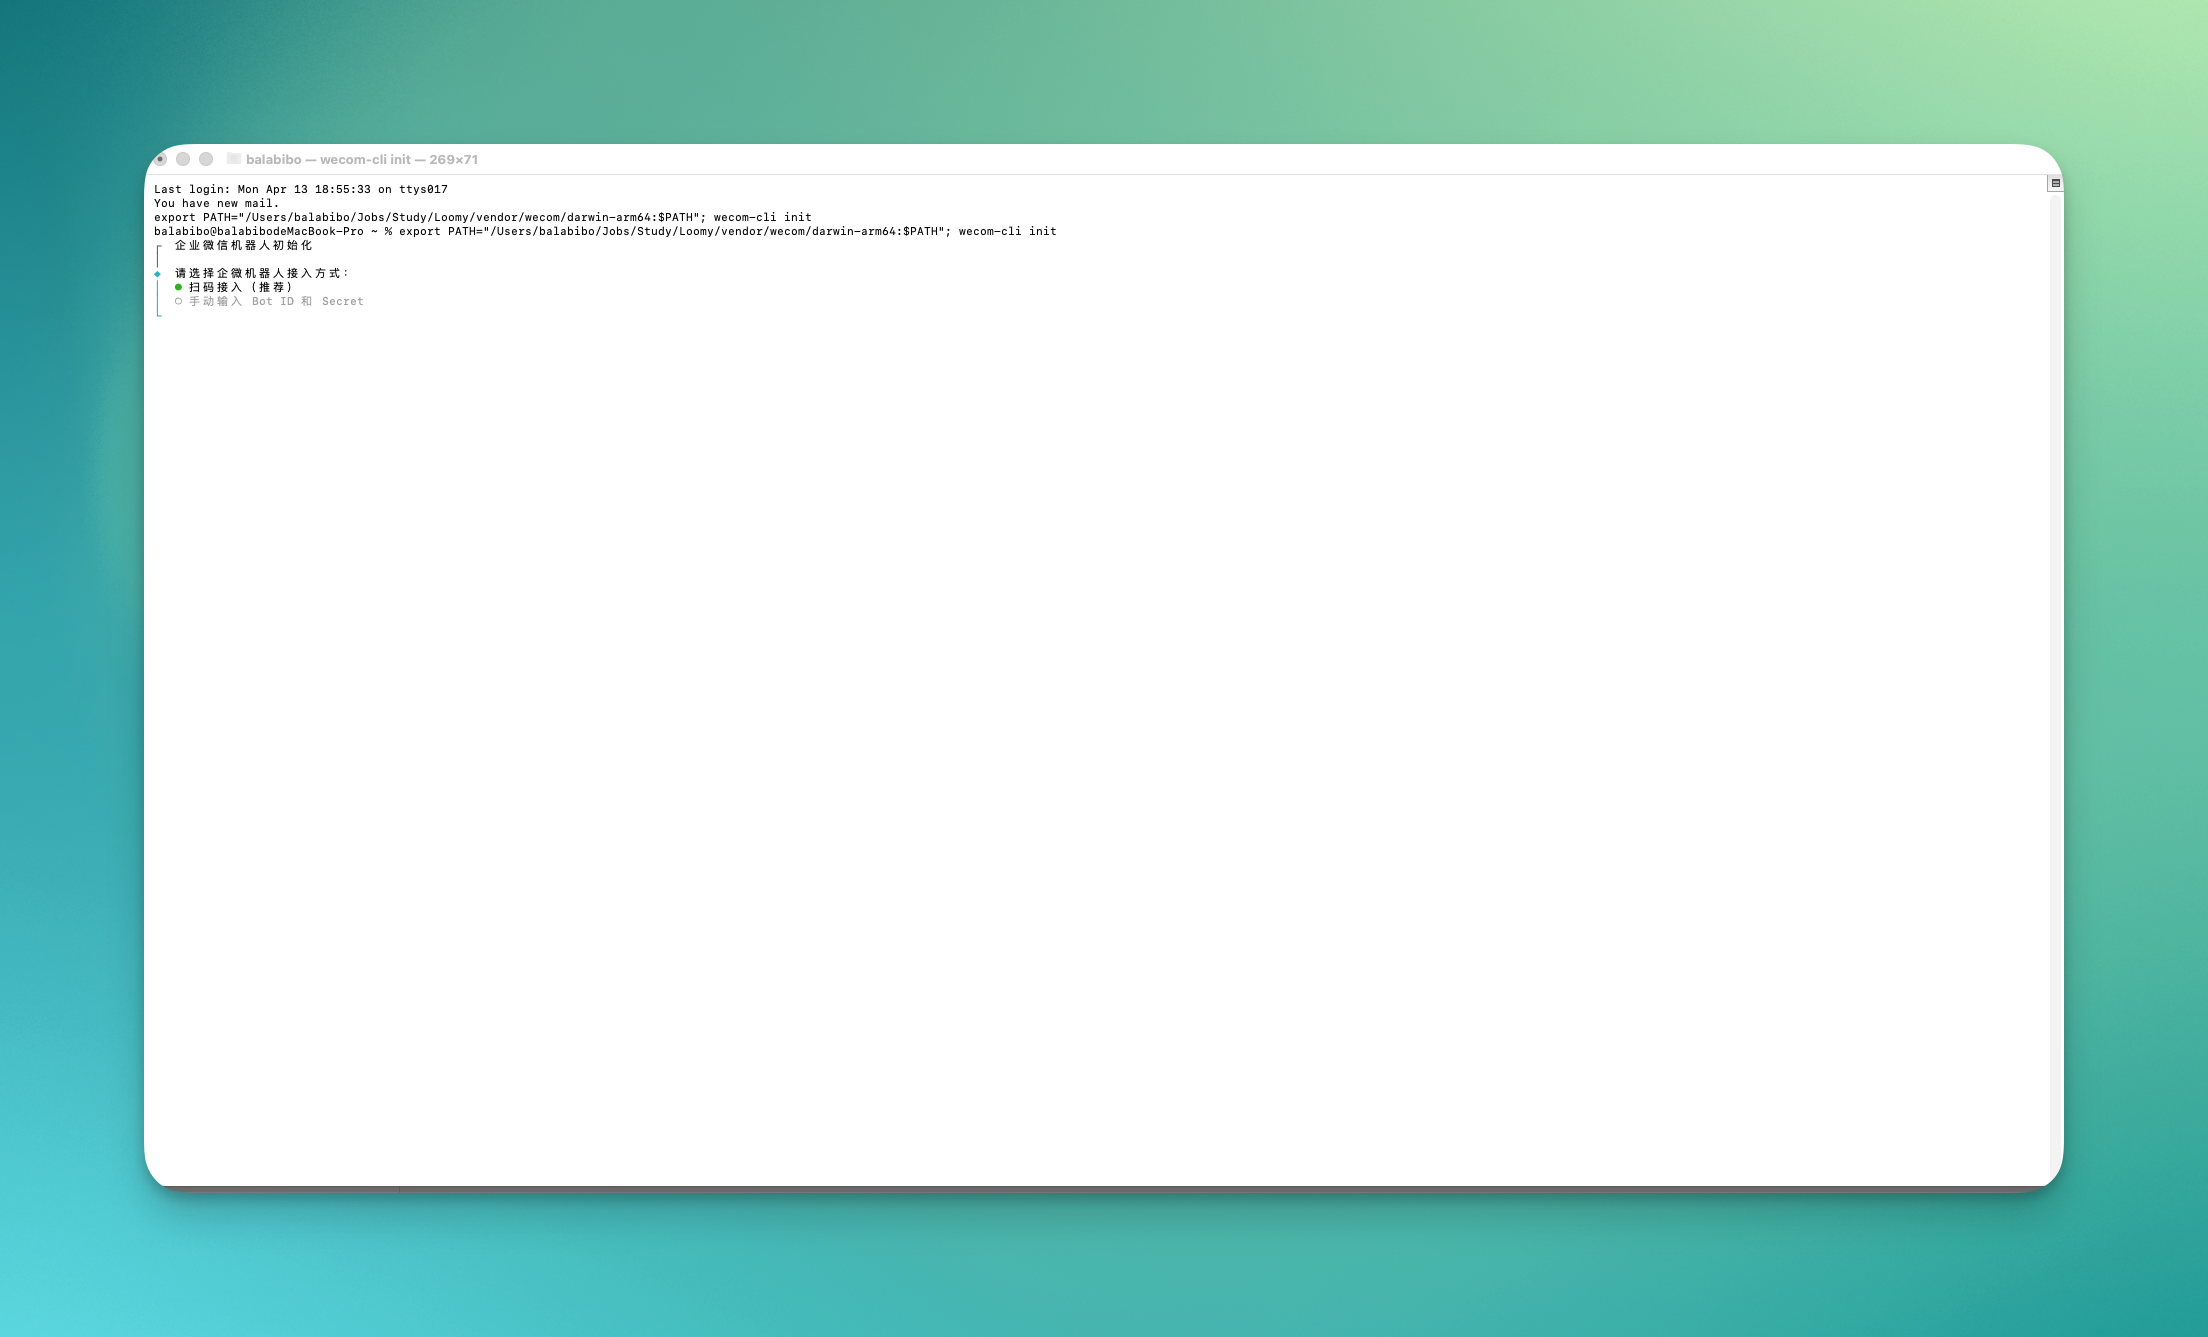
Step 2: Complete initialization in the terminal
After clicking Configure, the system automatically opens a terminal. Follow the prompts in the terminal to complete initialization.
WeCom CLI Pre-use Checks
After configuration, you can confirm the following statuses:
- Go to "Settings" → "Toolbox" and confirm the WeCom CLI status shows "Available".
- Go to "Skills" → "Office Zone" and confirm the WeCom-related skills are successfully installed.
Getting Started
After configuration, just describe your needs directly in conversation, for example:
Help me send a message to xxx saying...
Check what to-dos I have on WeCom today
Create meeting minutes in WeCom Docs
FAQ
What's the difference between Office CLI and remote-control bots? Remote-control bots use phone messages as a remote entry point to trigger your local Loomy to execute tasks; Office CLI lets Loomy directly read and write the messages, documents, and schedules inside your Feishu / DingTalk / WeCom. The two can be used together.
Do I need to repeat the authorization later? No. The authorization for the Feishu and DingTalk CLIs only needs to be done once, and can be used long-term after success.
Why does the WeCom CLI card say it's unavailable? The WeCom CLI is currently only open to enterprises with ≤ 10 people. Enterprises exceeding the headcount limit cannot use it for now.