Channel Configuration Guide
AstronClaw supports connecting to various enterprise collaboration platforms and social media, allowing you to interact with the AI assistant directly in your familiar tools.
Feishu Channel Configuration Guide
This guide introduces how to connect AstronClaw to Feishu (Lark), so you can interact directly with the AstronClaw agent and execute tasks within Feishu.
Prerequisites
- Have Feishu Administrator Permissions
- Successfully Deployed AstronClaw
- Entered the Channels configuration module
Steps
Step 1: Create a Feishu App
- Open the Feishu Open Platform
- Click Create Custom App
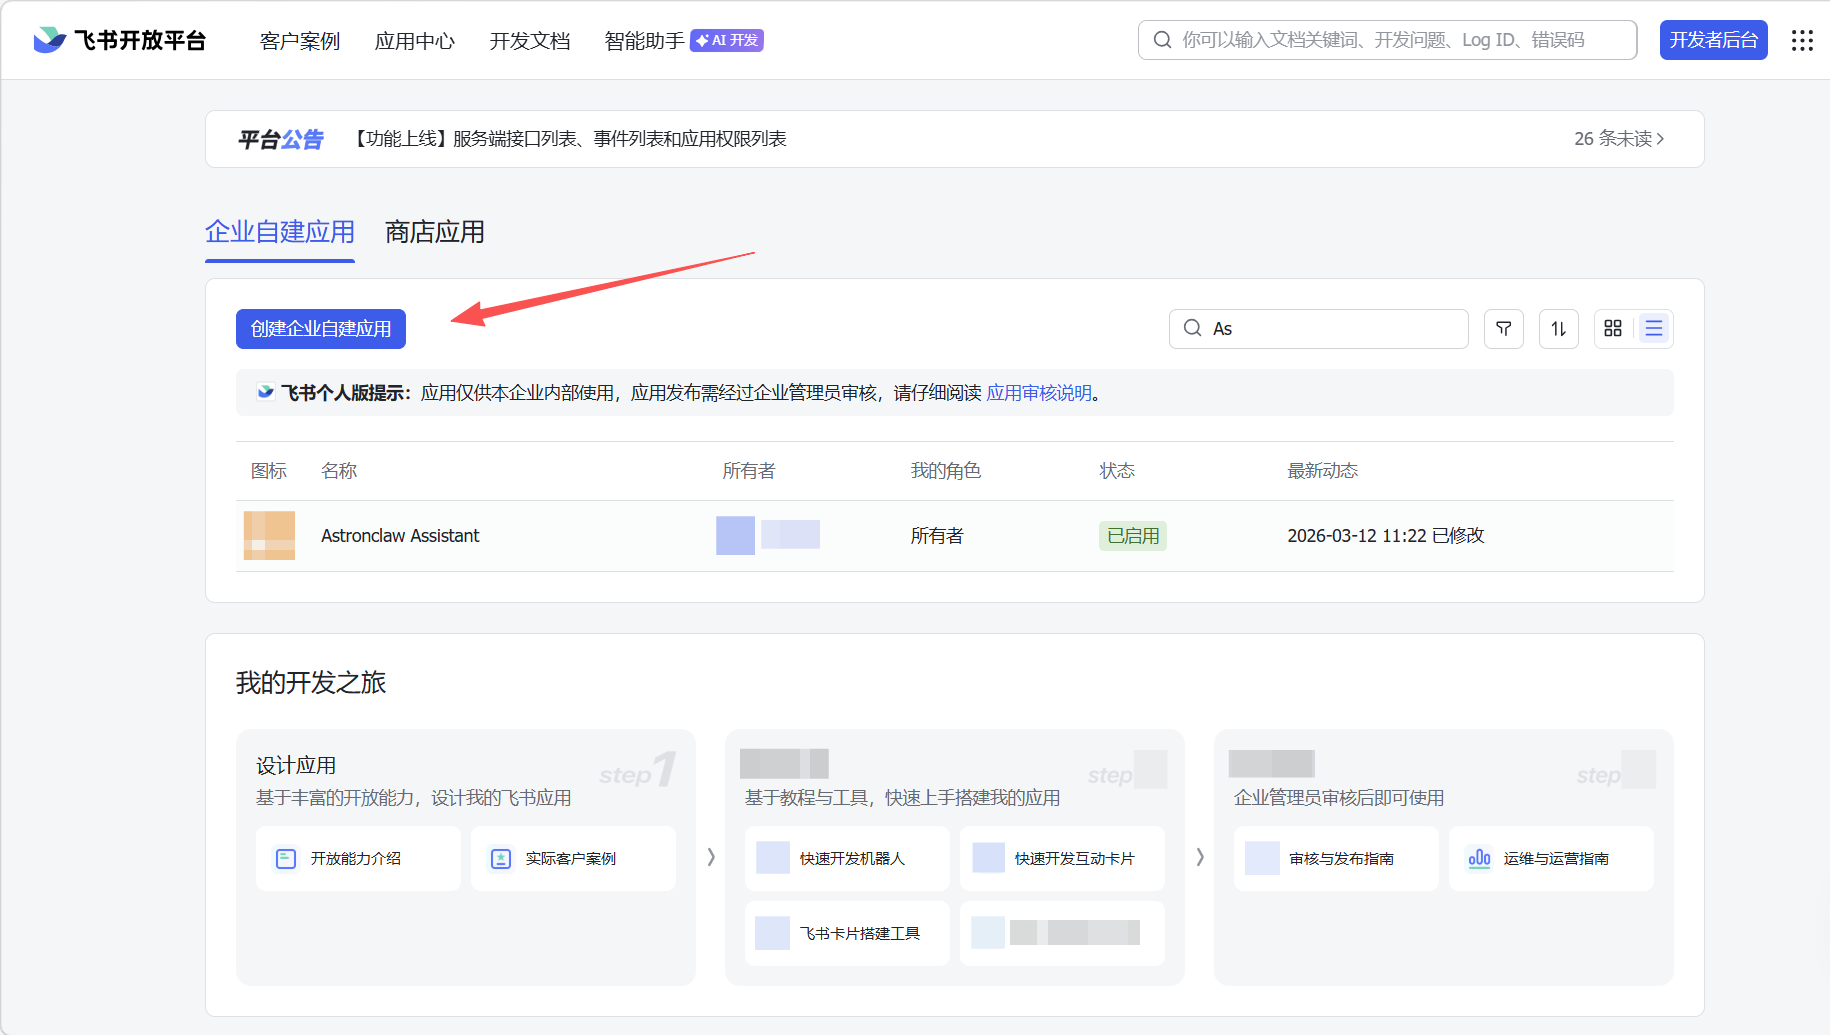
- Fill in the app information (Suggested App Name: AstronClaw Assistant), and click Create.
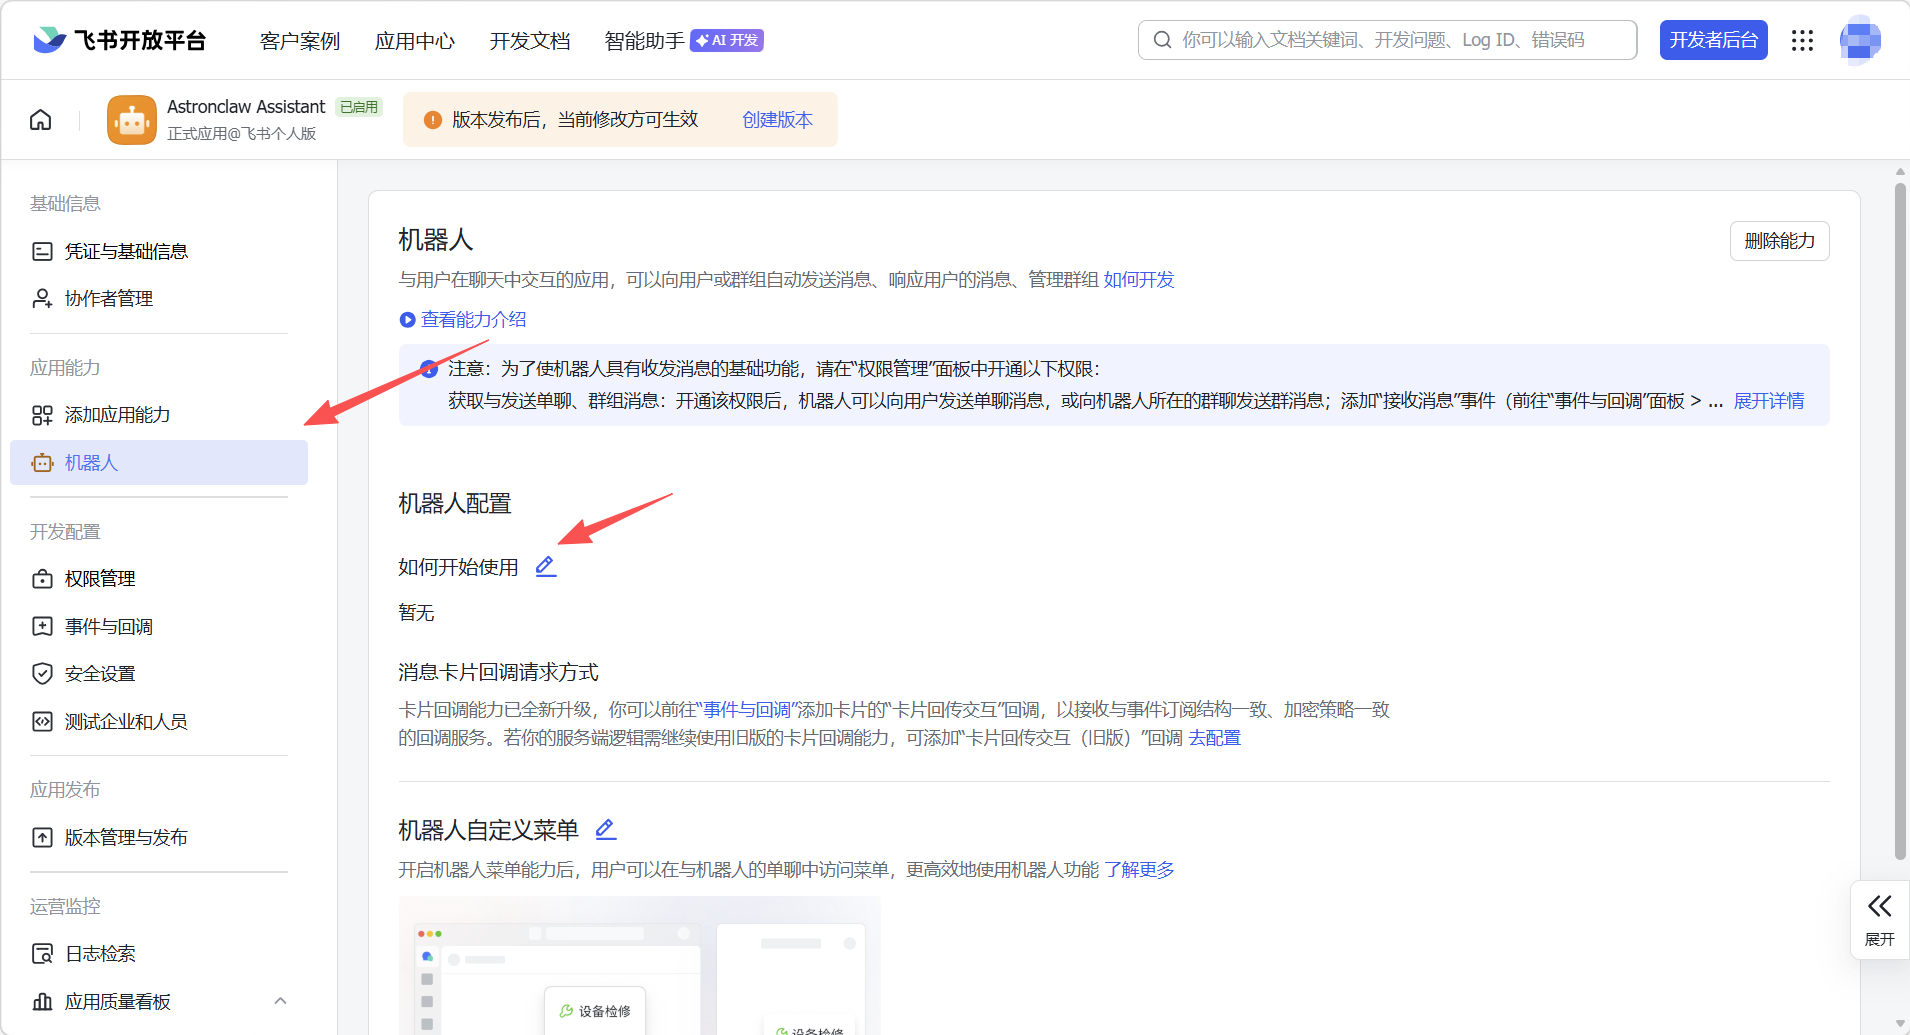
Step 2: Get App Credentials After entering the app background, click the left menu Credentials & Basic Info, copy the App ID and App Secret. This information will be used in the AstronClaw channel configuration. 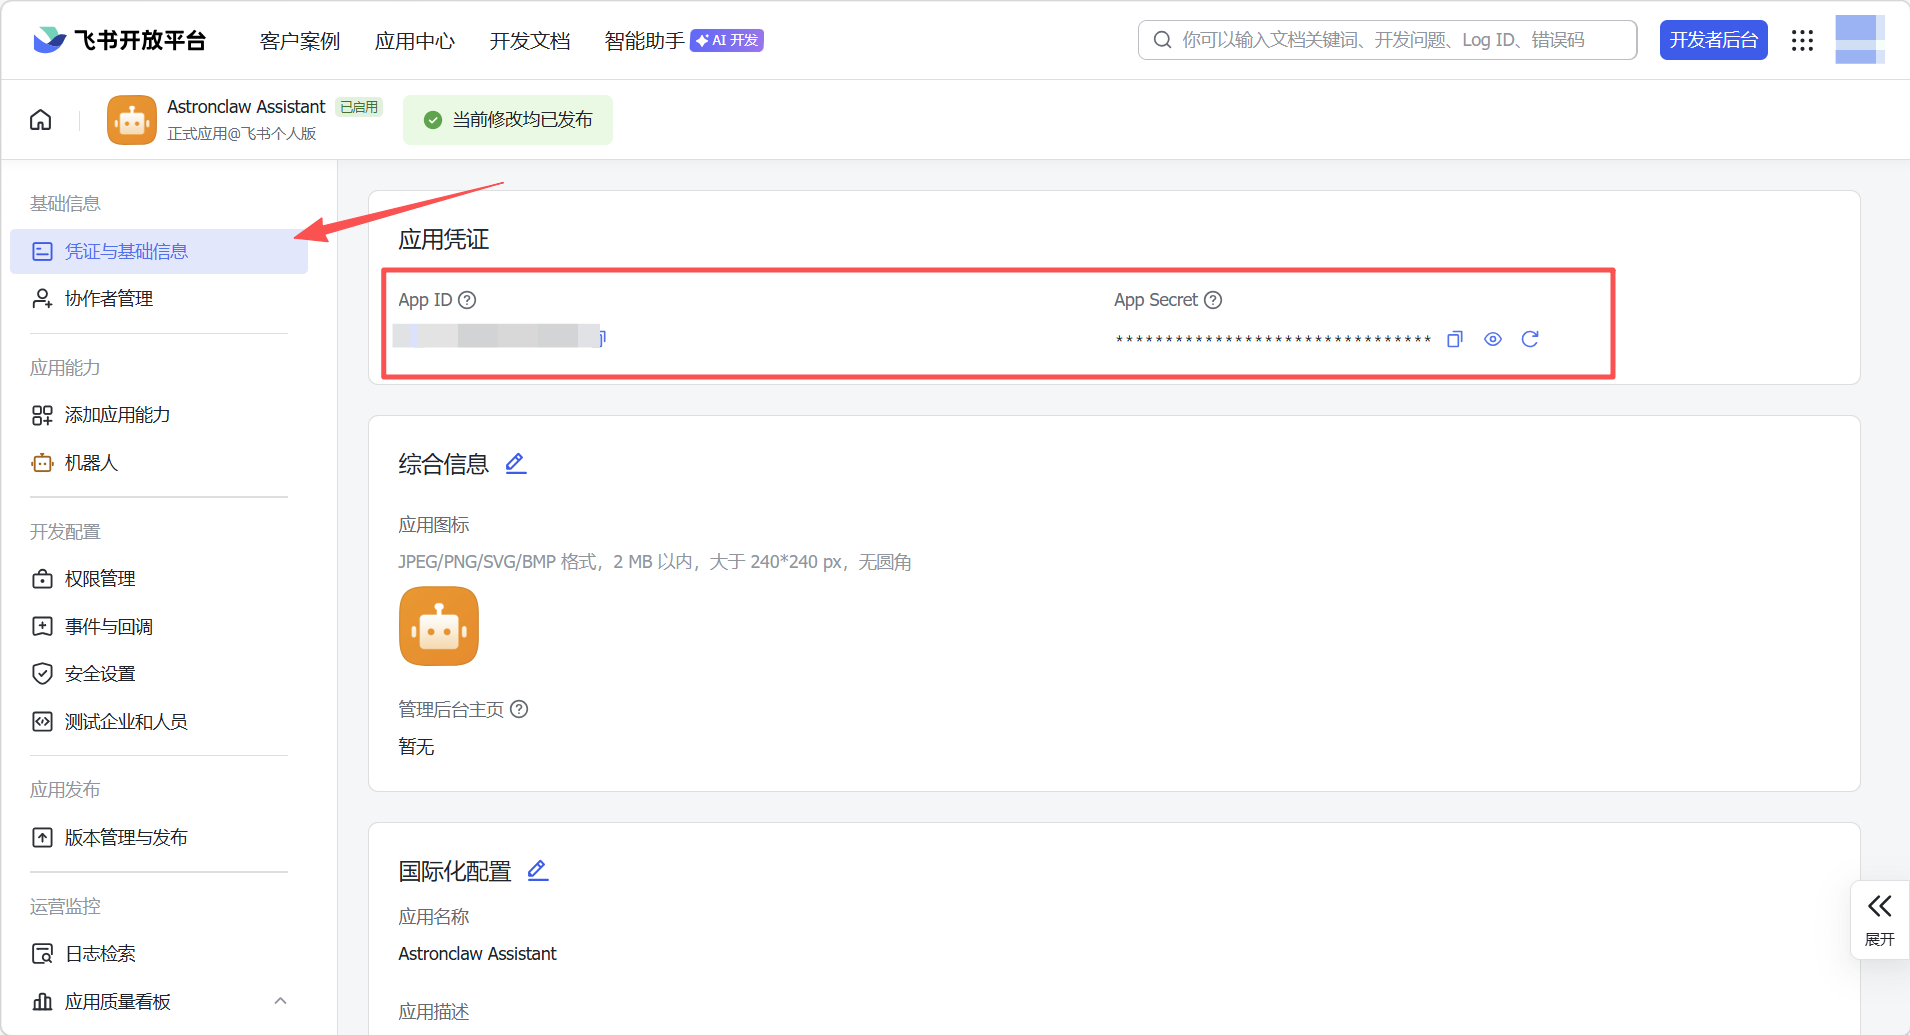
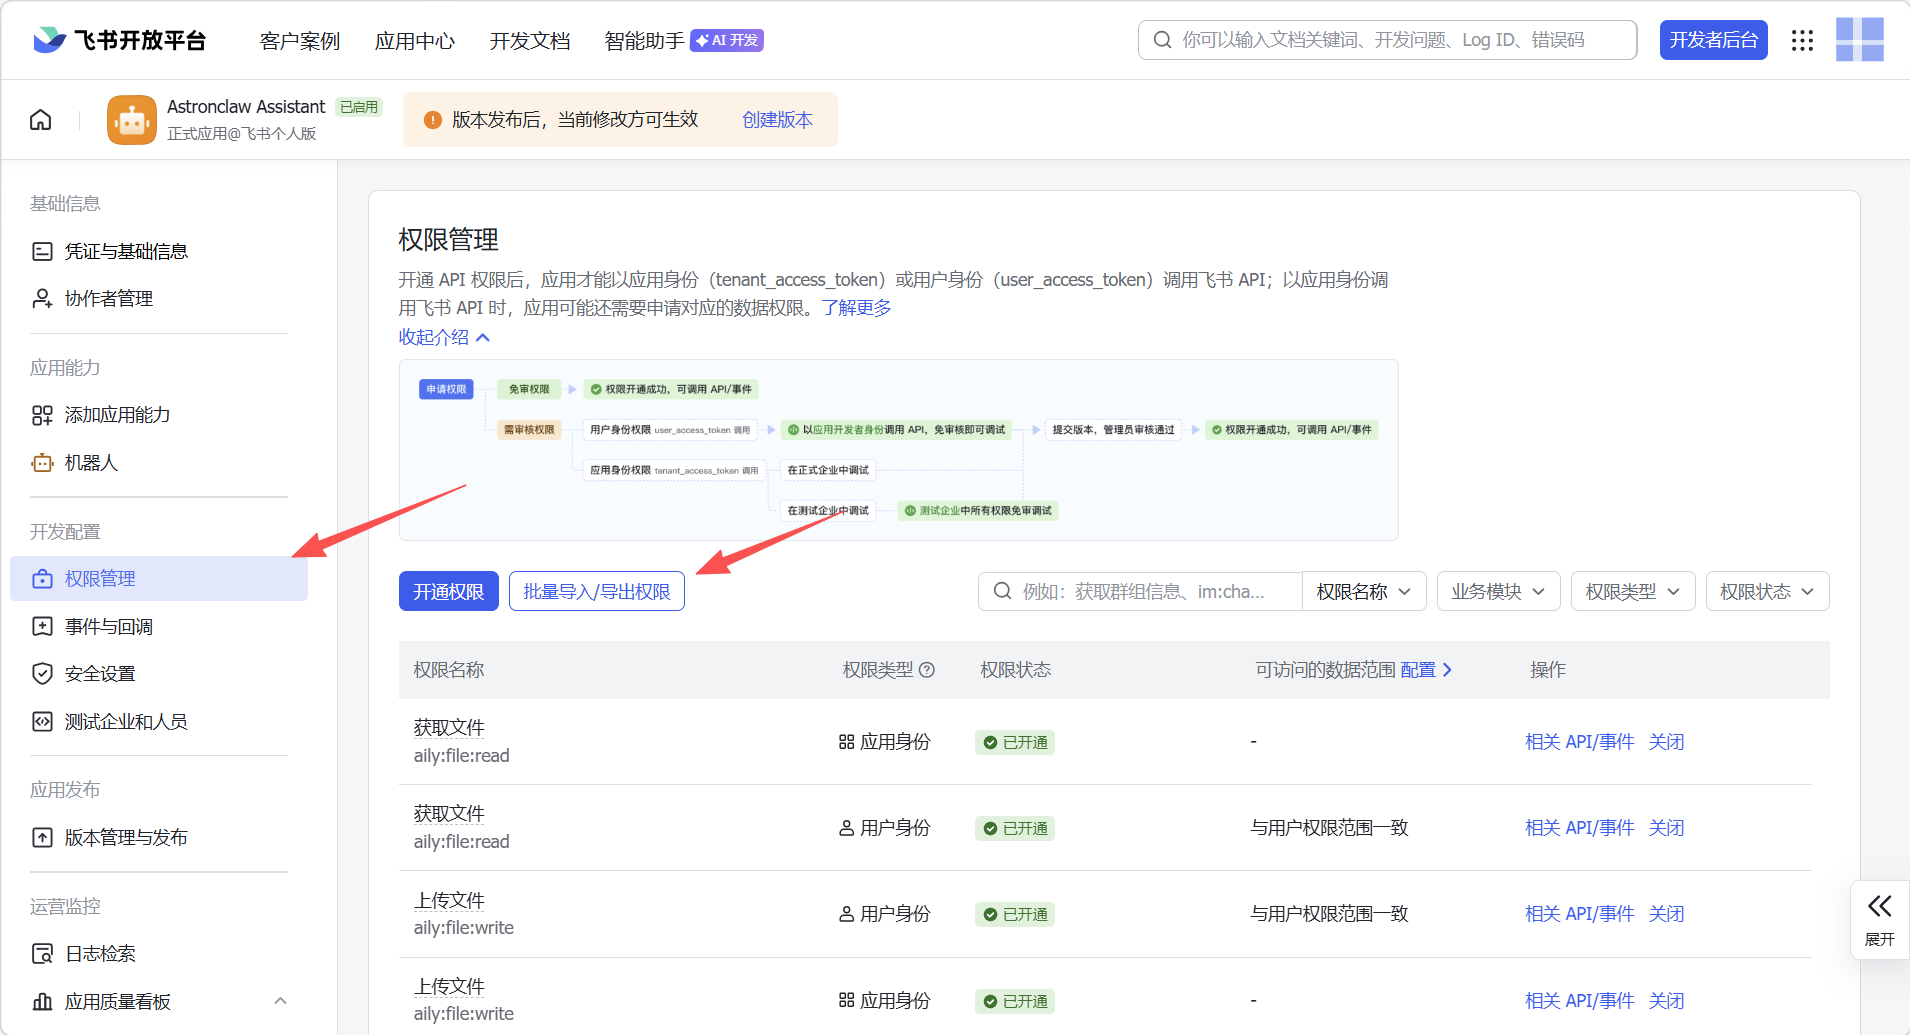
Step 3: Configure App Permissions and Enable Bot Capabilities
- Go to Permission Management in the left navigation, click the Batch Import button, and paste the JSON configuration to import required permissions with one click:
- On the App Capabilities > Bot page: Enable bot capabilities and configure the bot name:
Step 4: Configure Event Subscription
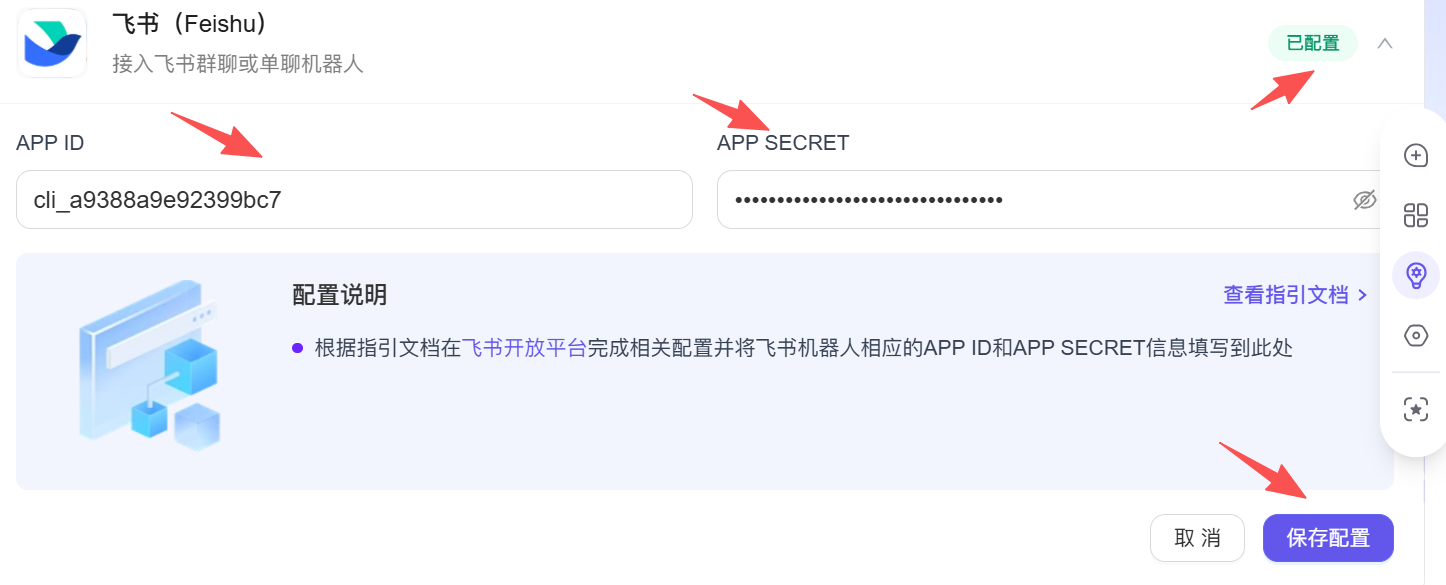
- Fill in the App ID and App Secret obtained in Step 2 on the AstronClaw "Channel Configuration" page, click save configuration, and wait for the top right corner to turn green (configured).
- Return to the Feishu configuration page to enable Event Subscription, choose to use a persistent connection to receive events, and click save.
- Add event:
im.message.receive_v1(Receive messages).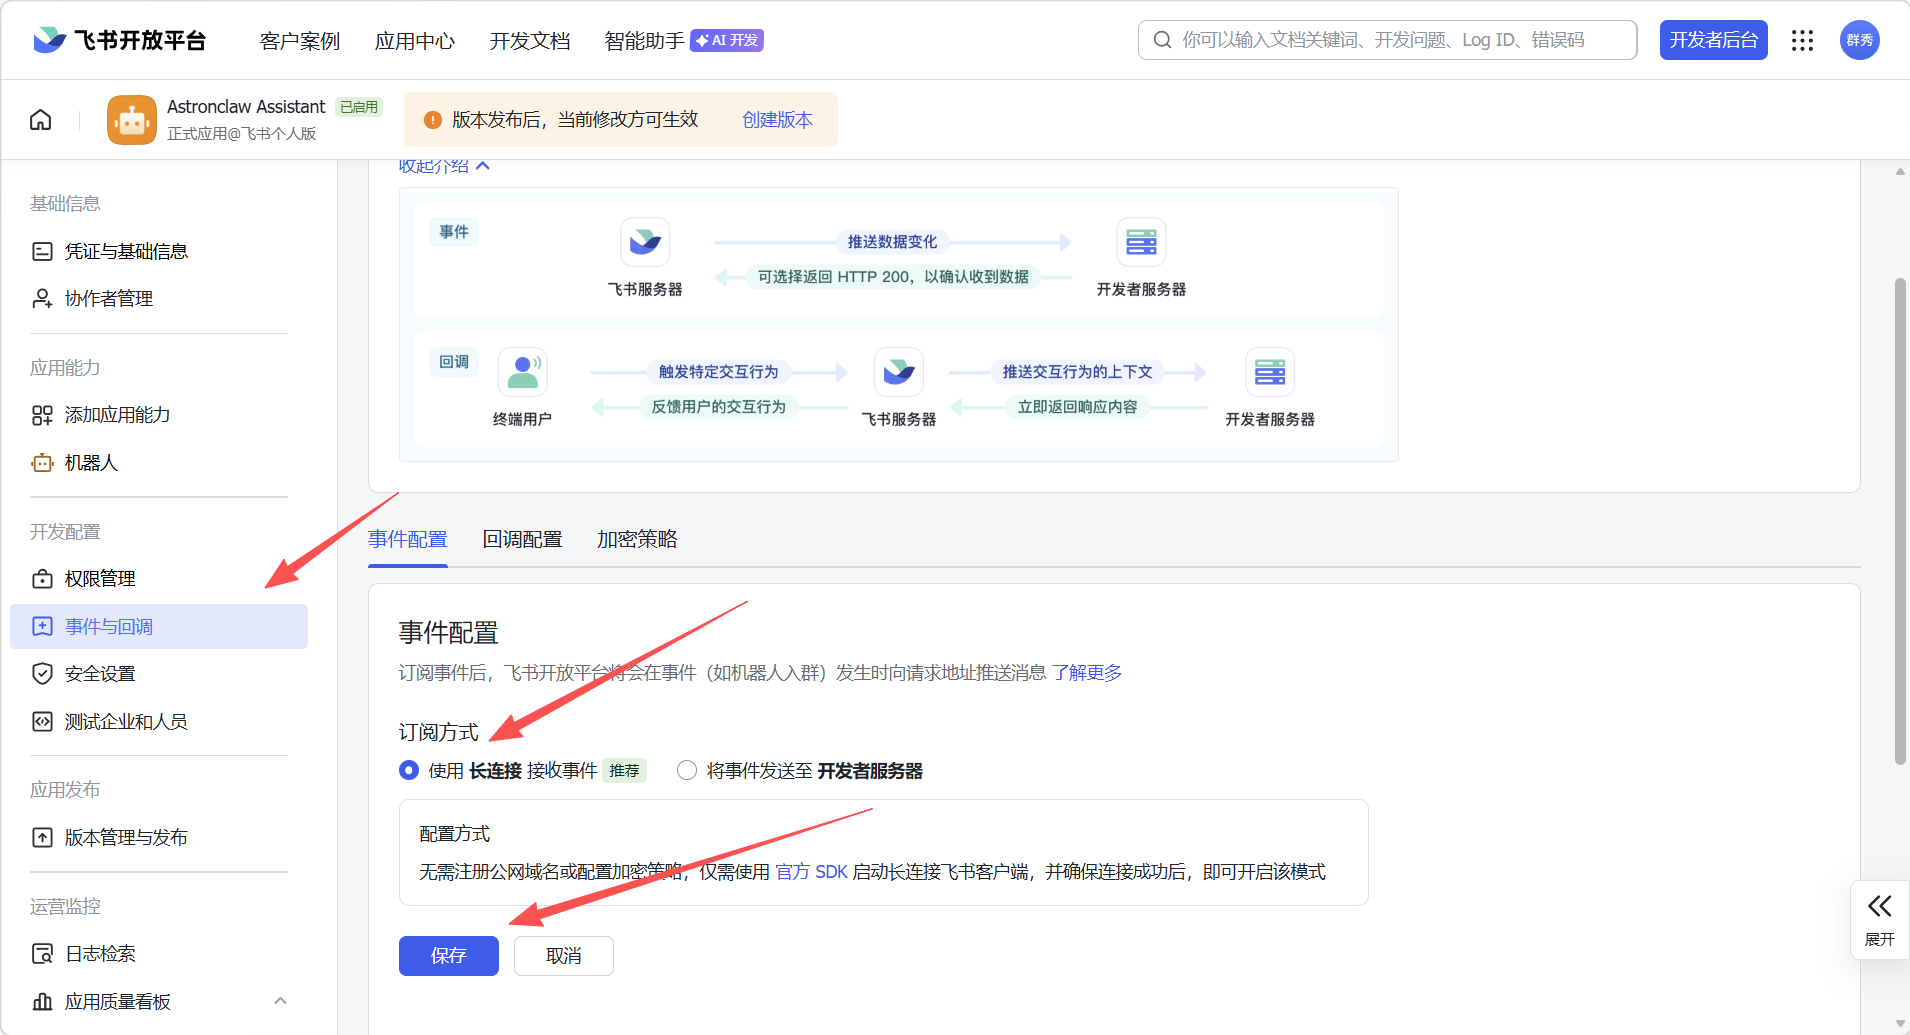

Step 5: Publish Feishu App Create a version on the Version Management and Publish page, submit for review, and publish.
DingTalk Channel Configuration Guide
Steps
Step 1: Create a DingTalk App
- Log in to the DingTalk Open Platform, select Enterprise Internal App > DingTalk App in the left directory tree, and click the Create App button.
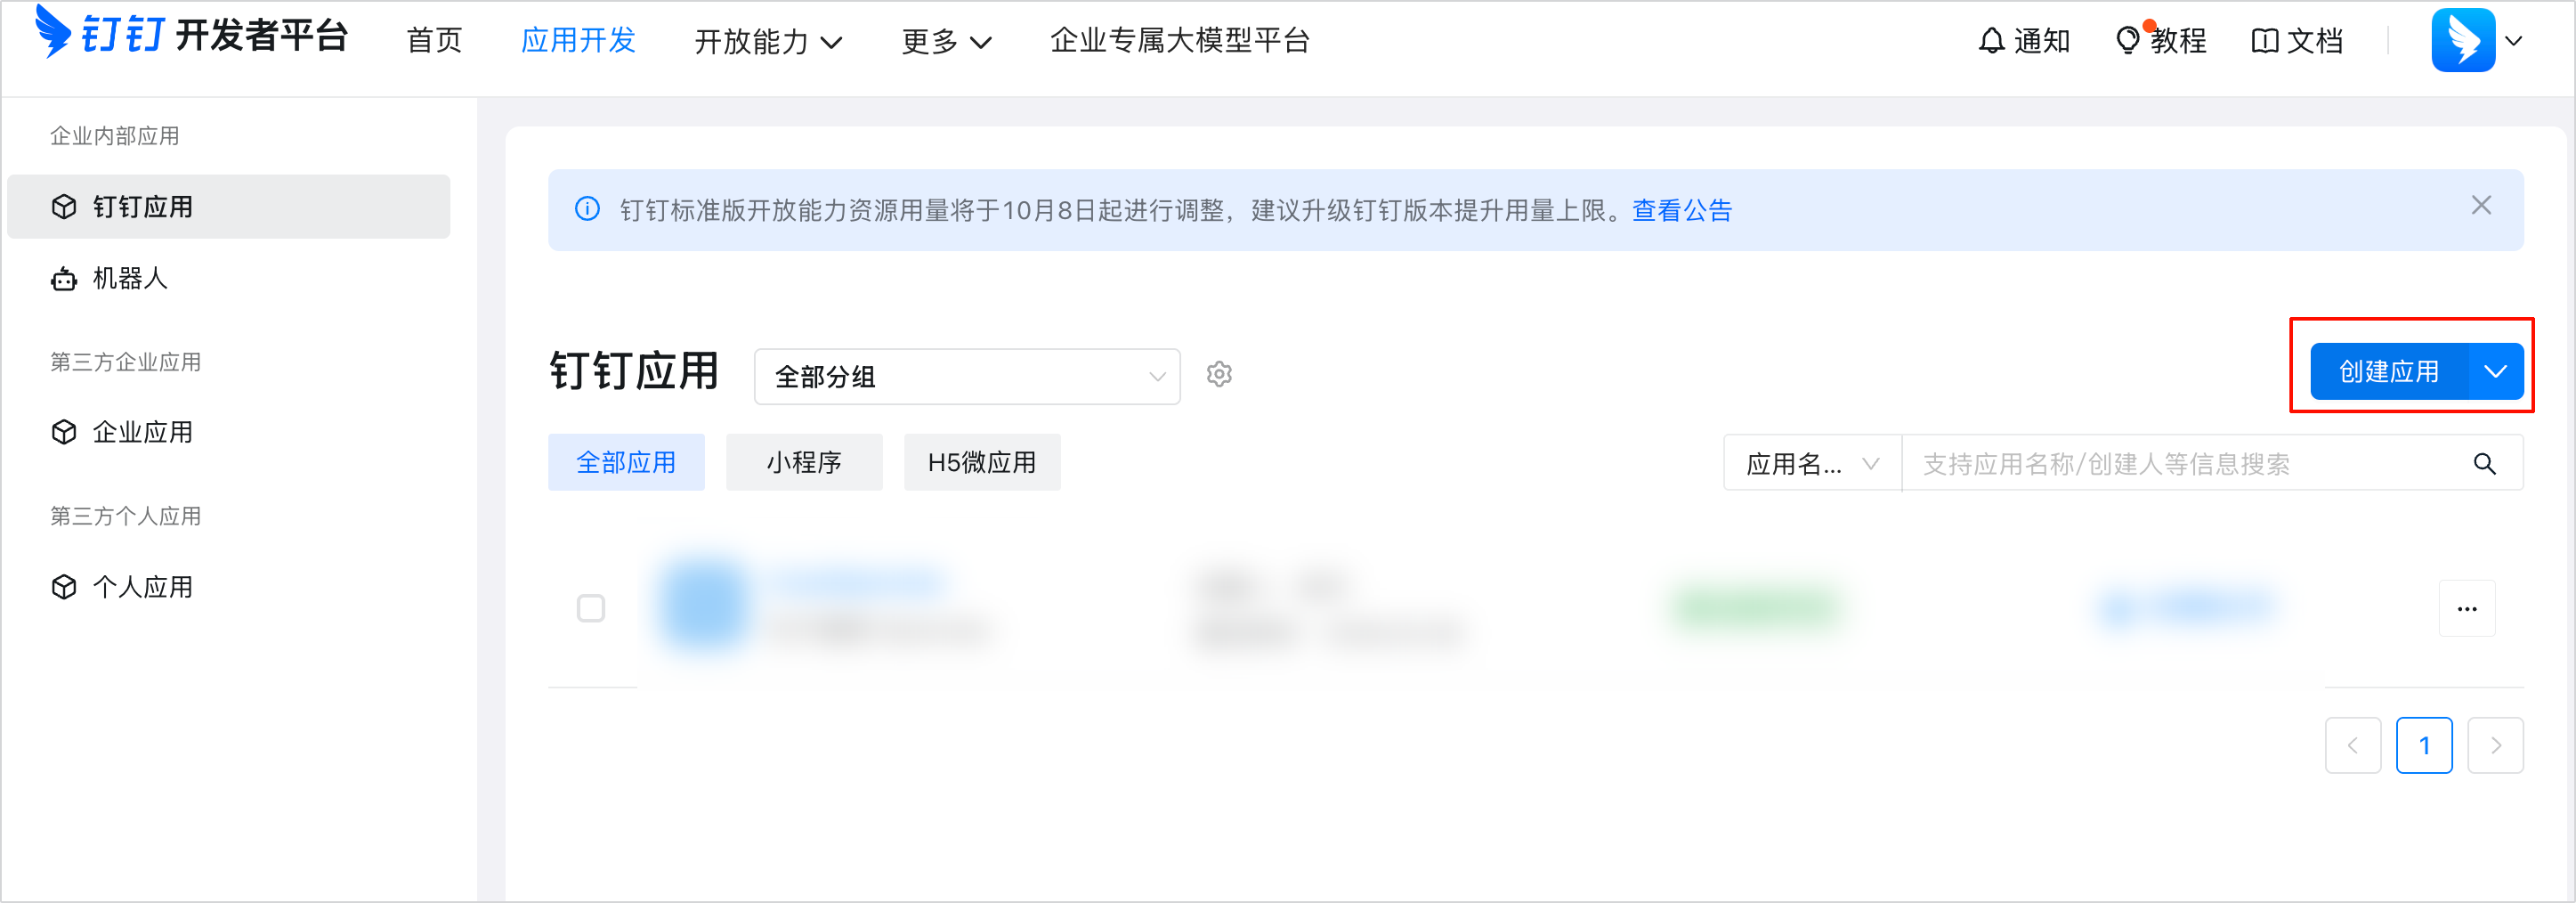
- After configuring the app name, icon, and other information, click Save.
Step 2: Add Permissions for DingTalk App Permissions required for the DingTalk app: Card.Instance.Write, Card.Streaming.Write, qyapi_robot_sendmsg.
- Select Development Configuration > Permission Management in the left directory tree.
- Search for
Card, check the interactive card instance write permission and AI card stream update permission, and apply in batch.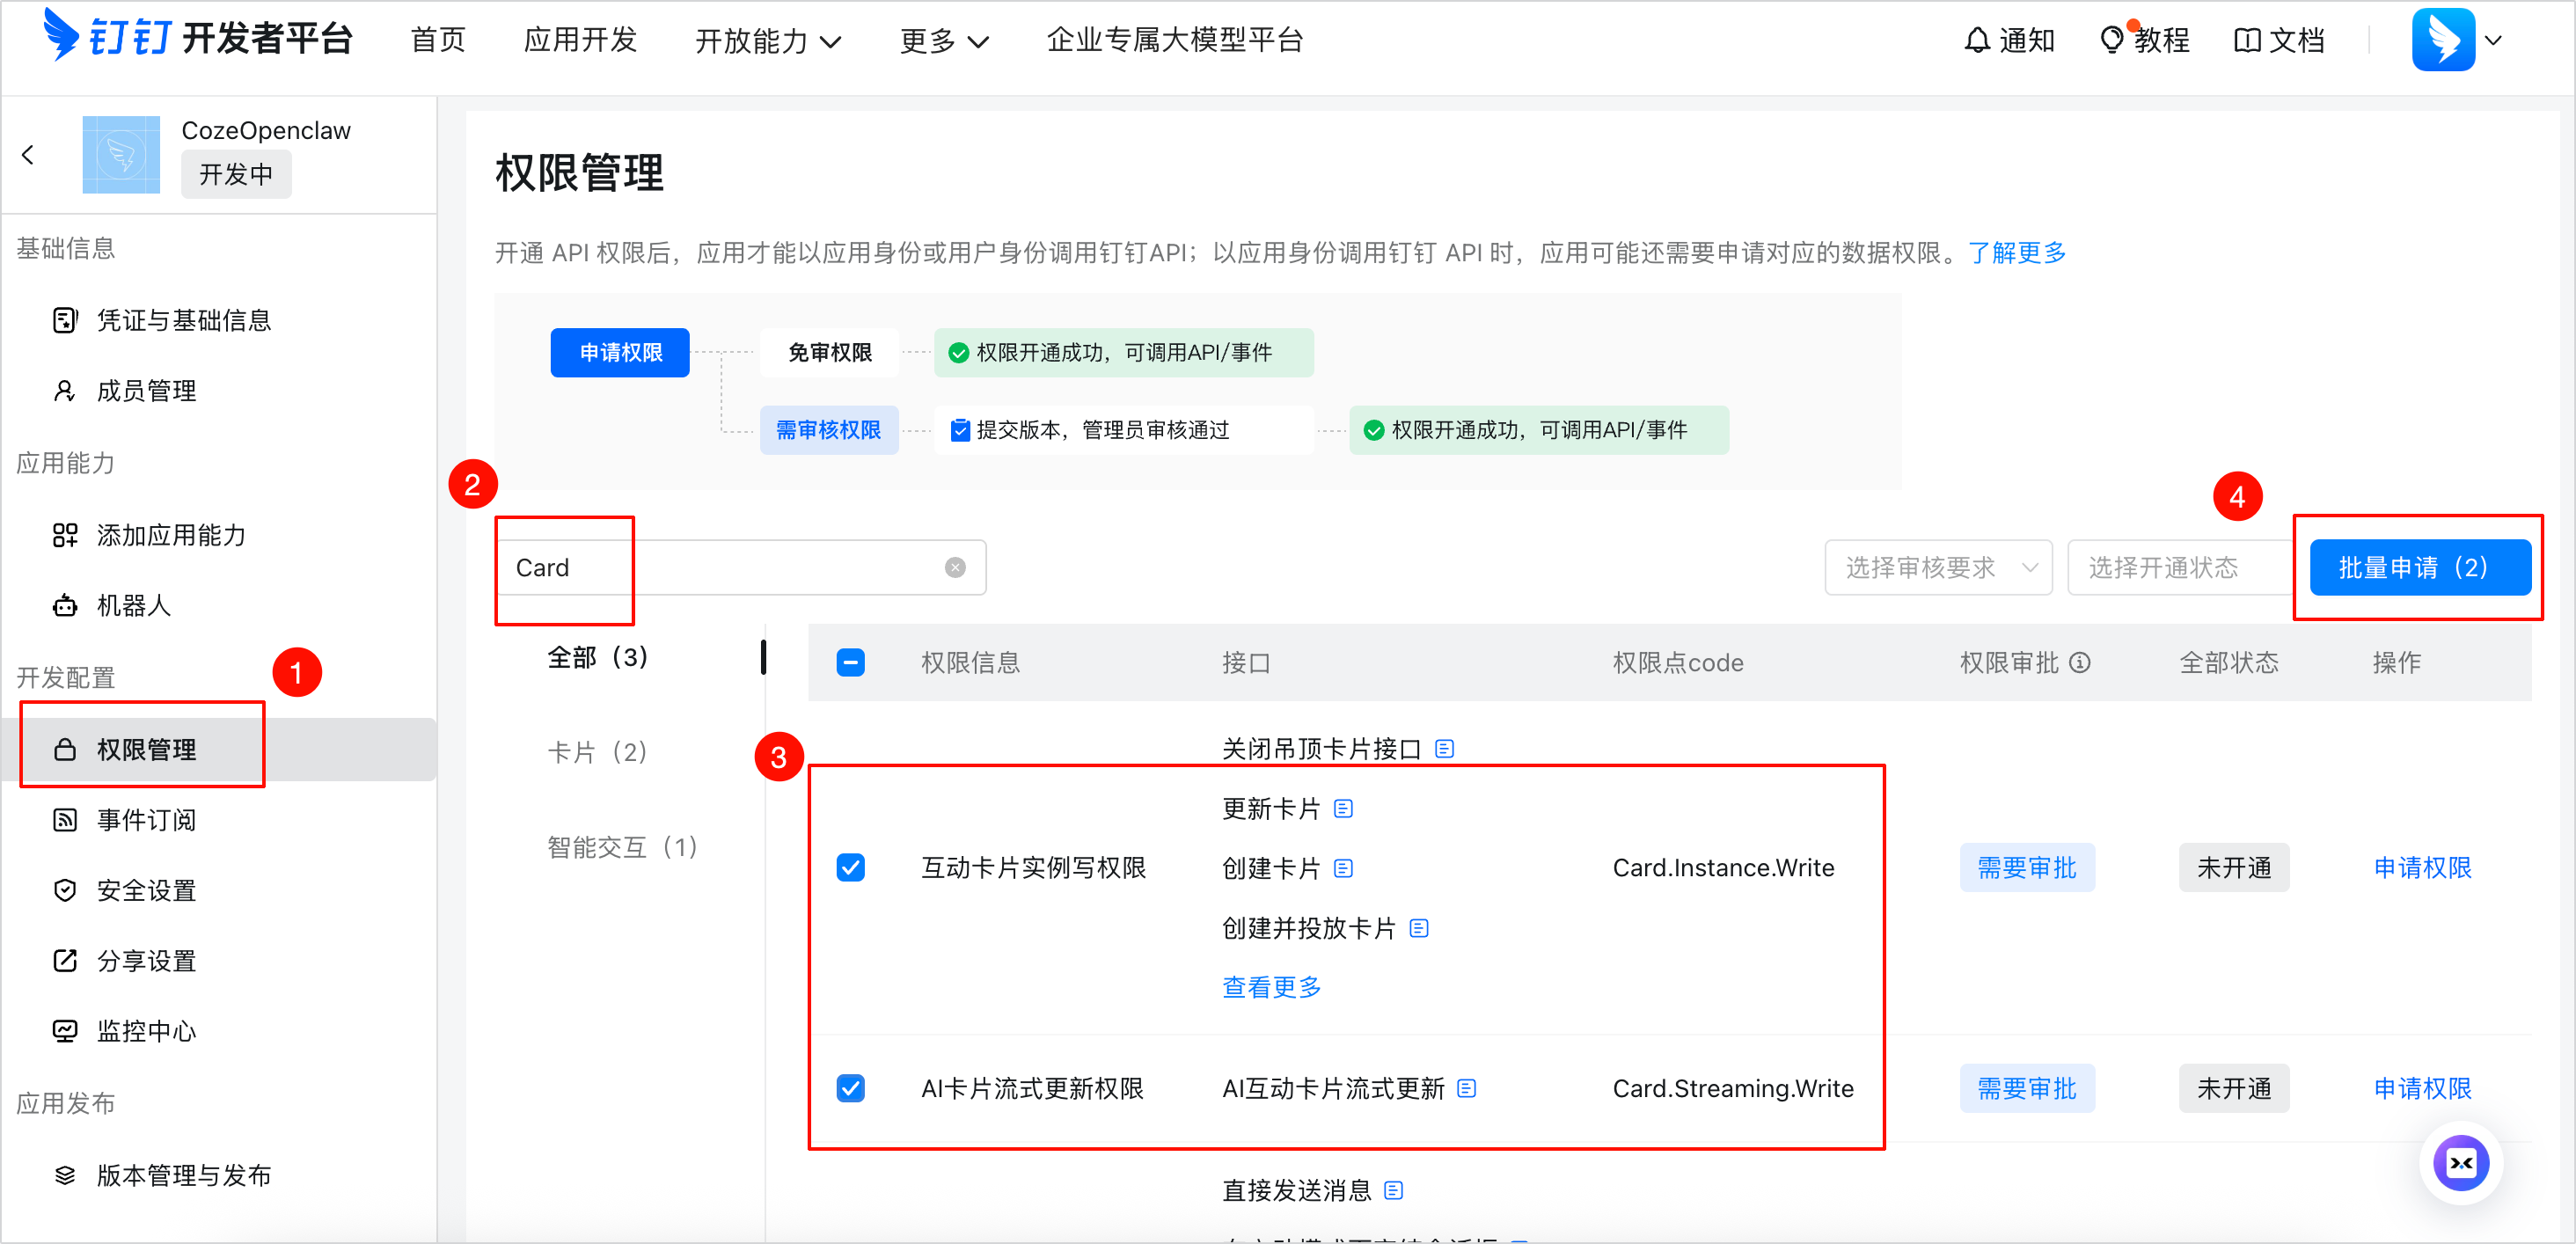
- Search for
qyapi_robot_sendmsgand open the permission to send messages for the enterprise internal robot.
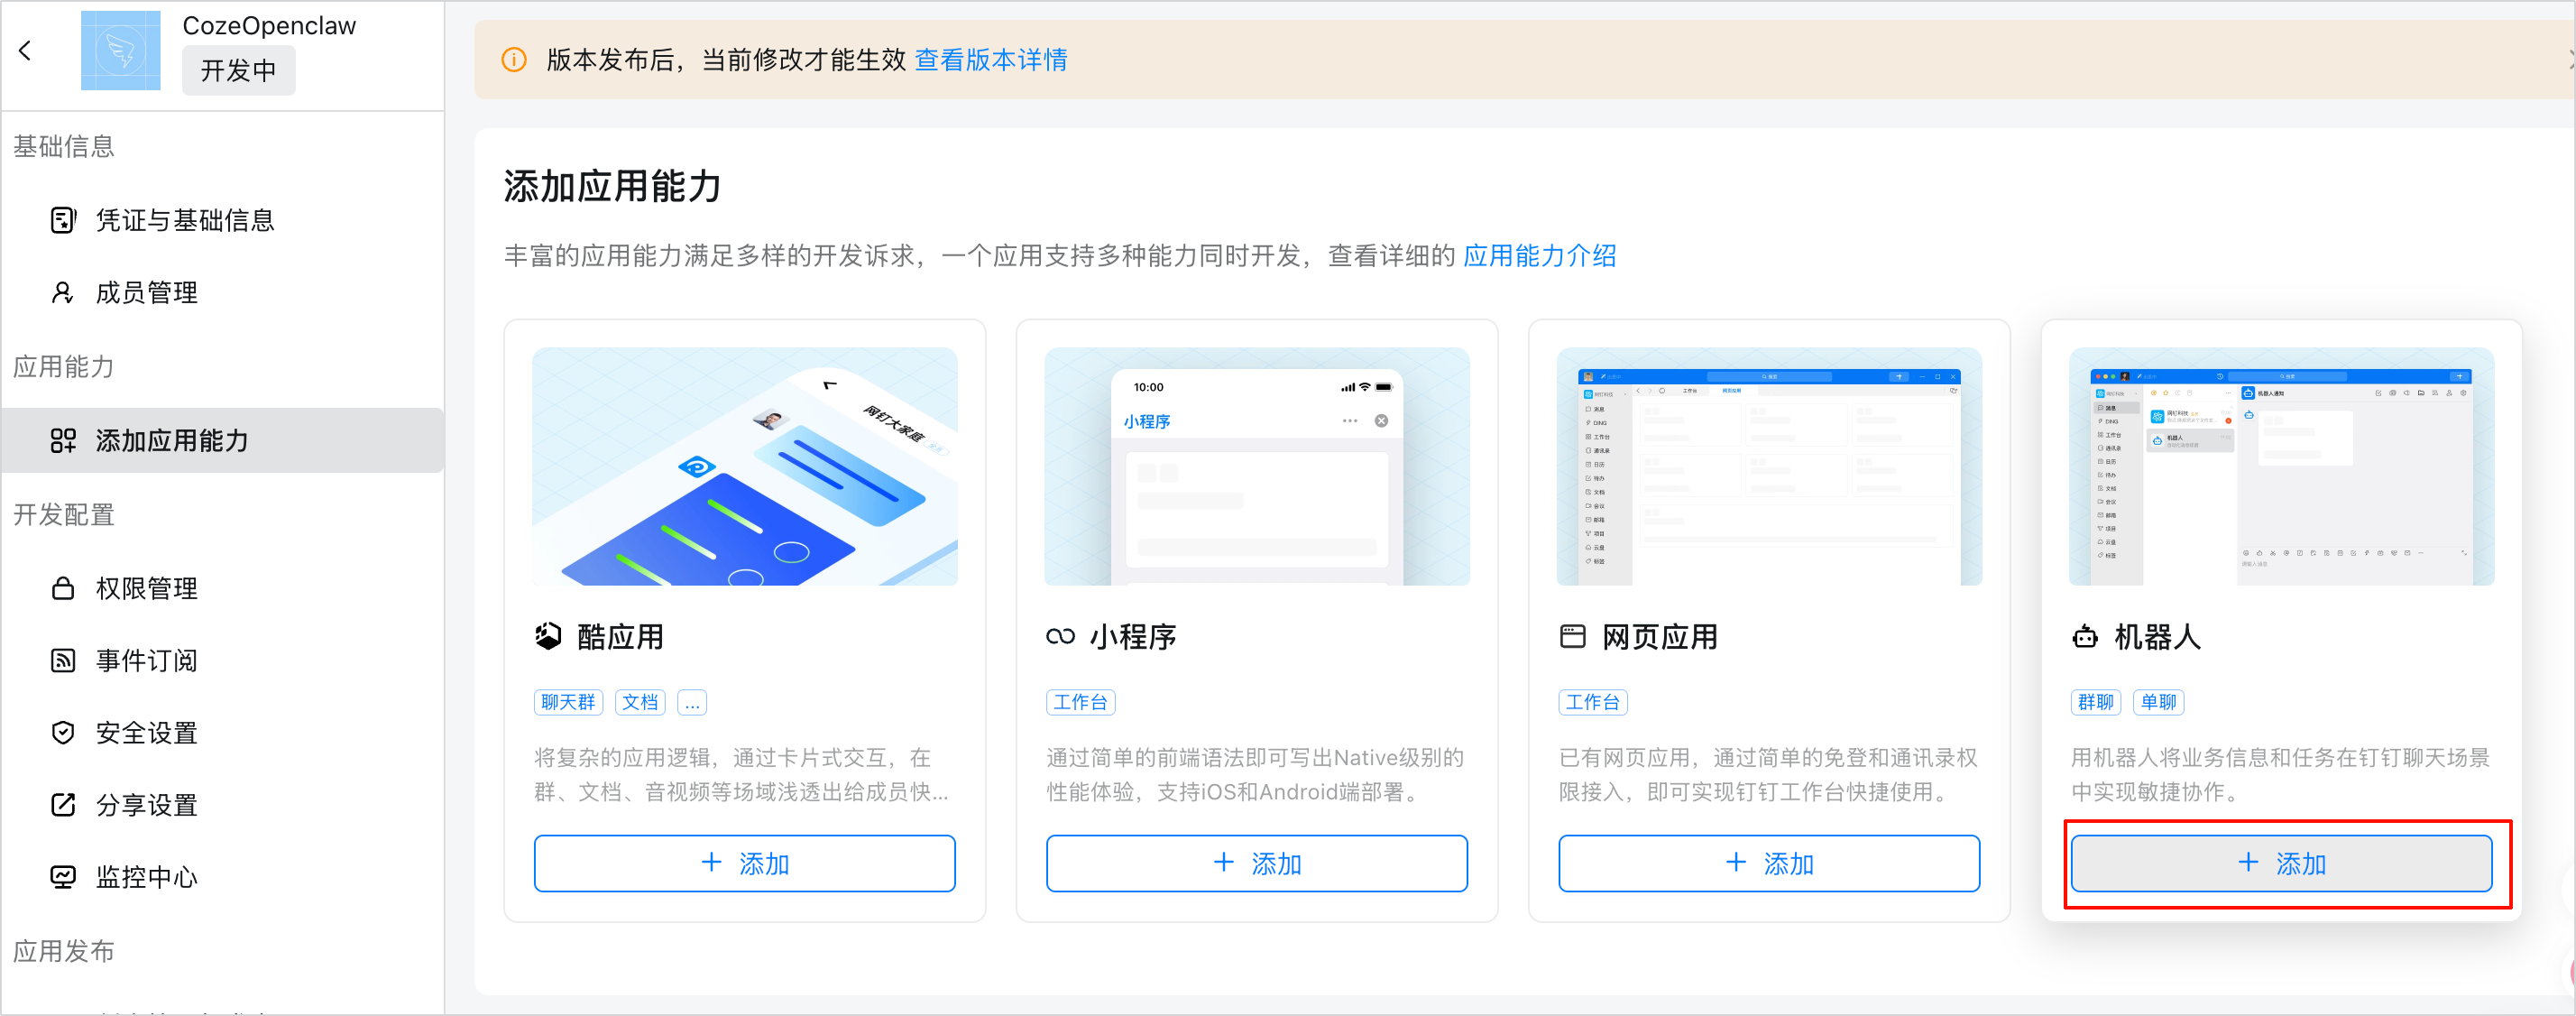
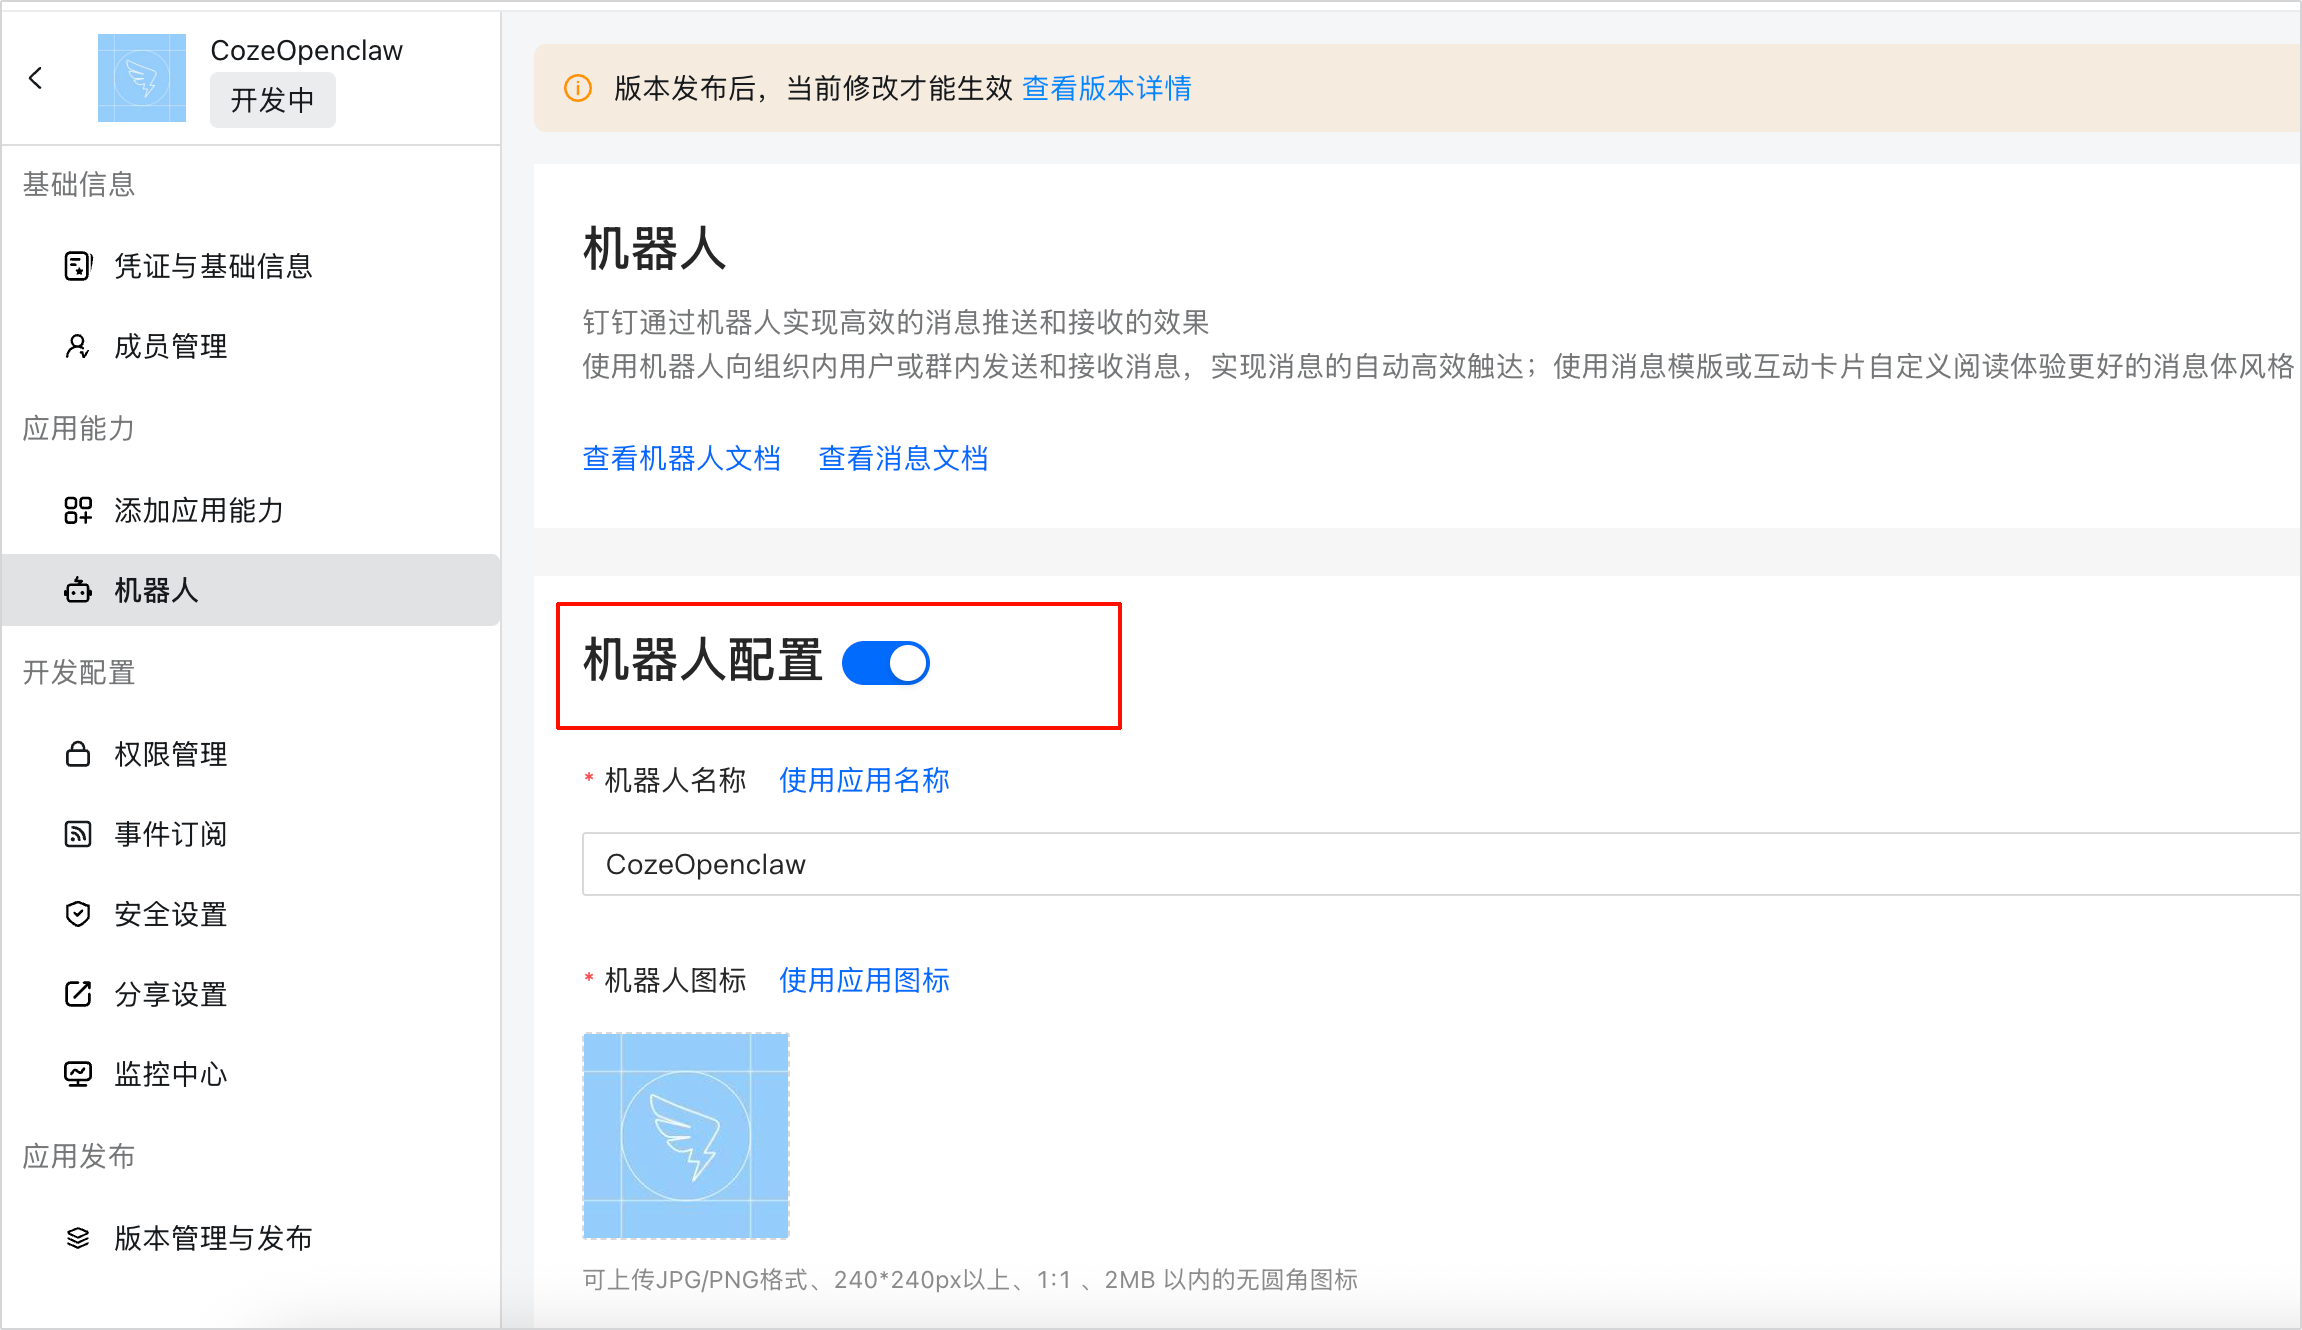
Step 3: Configure DingTalk Bot
- Select App Capabilities > Add App Capability, and add a bot.
- Turn on the bot configuration switch.
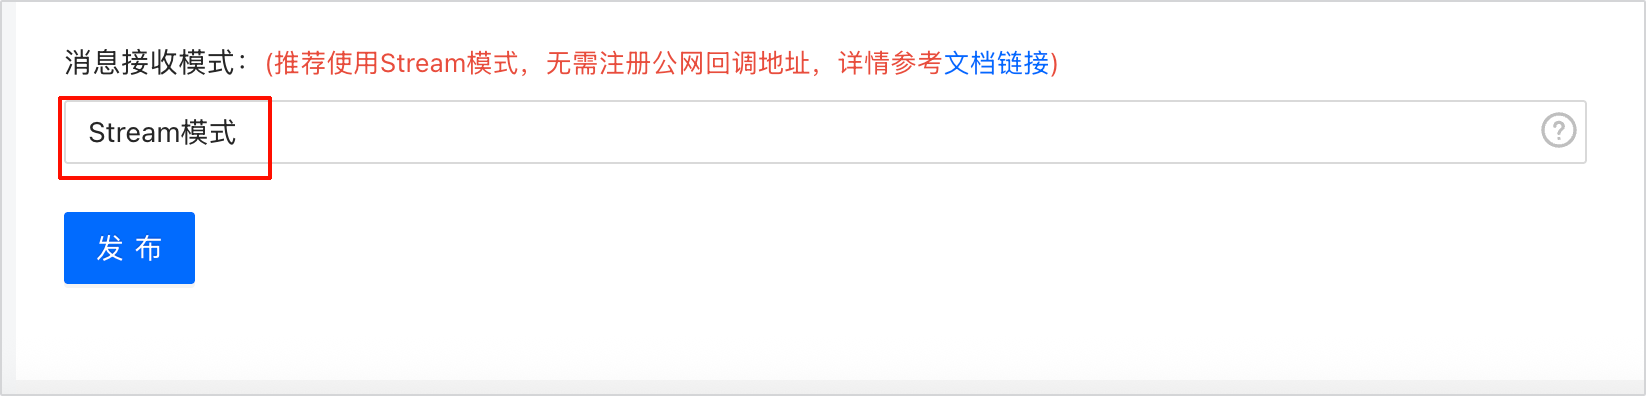
- Change the message receiving mode to Stream mode, and click publish to save the configuration.
Step 4: Publish App Version Create a new version and publish on the Version Management and Publish page. 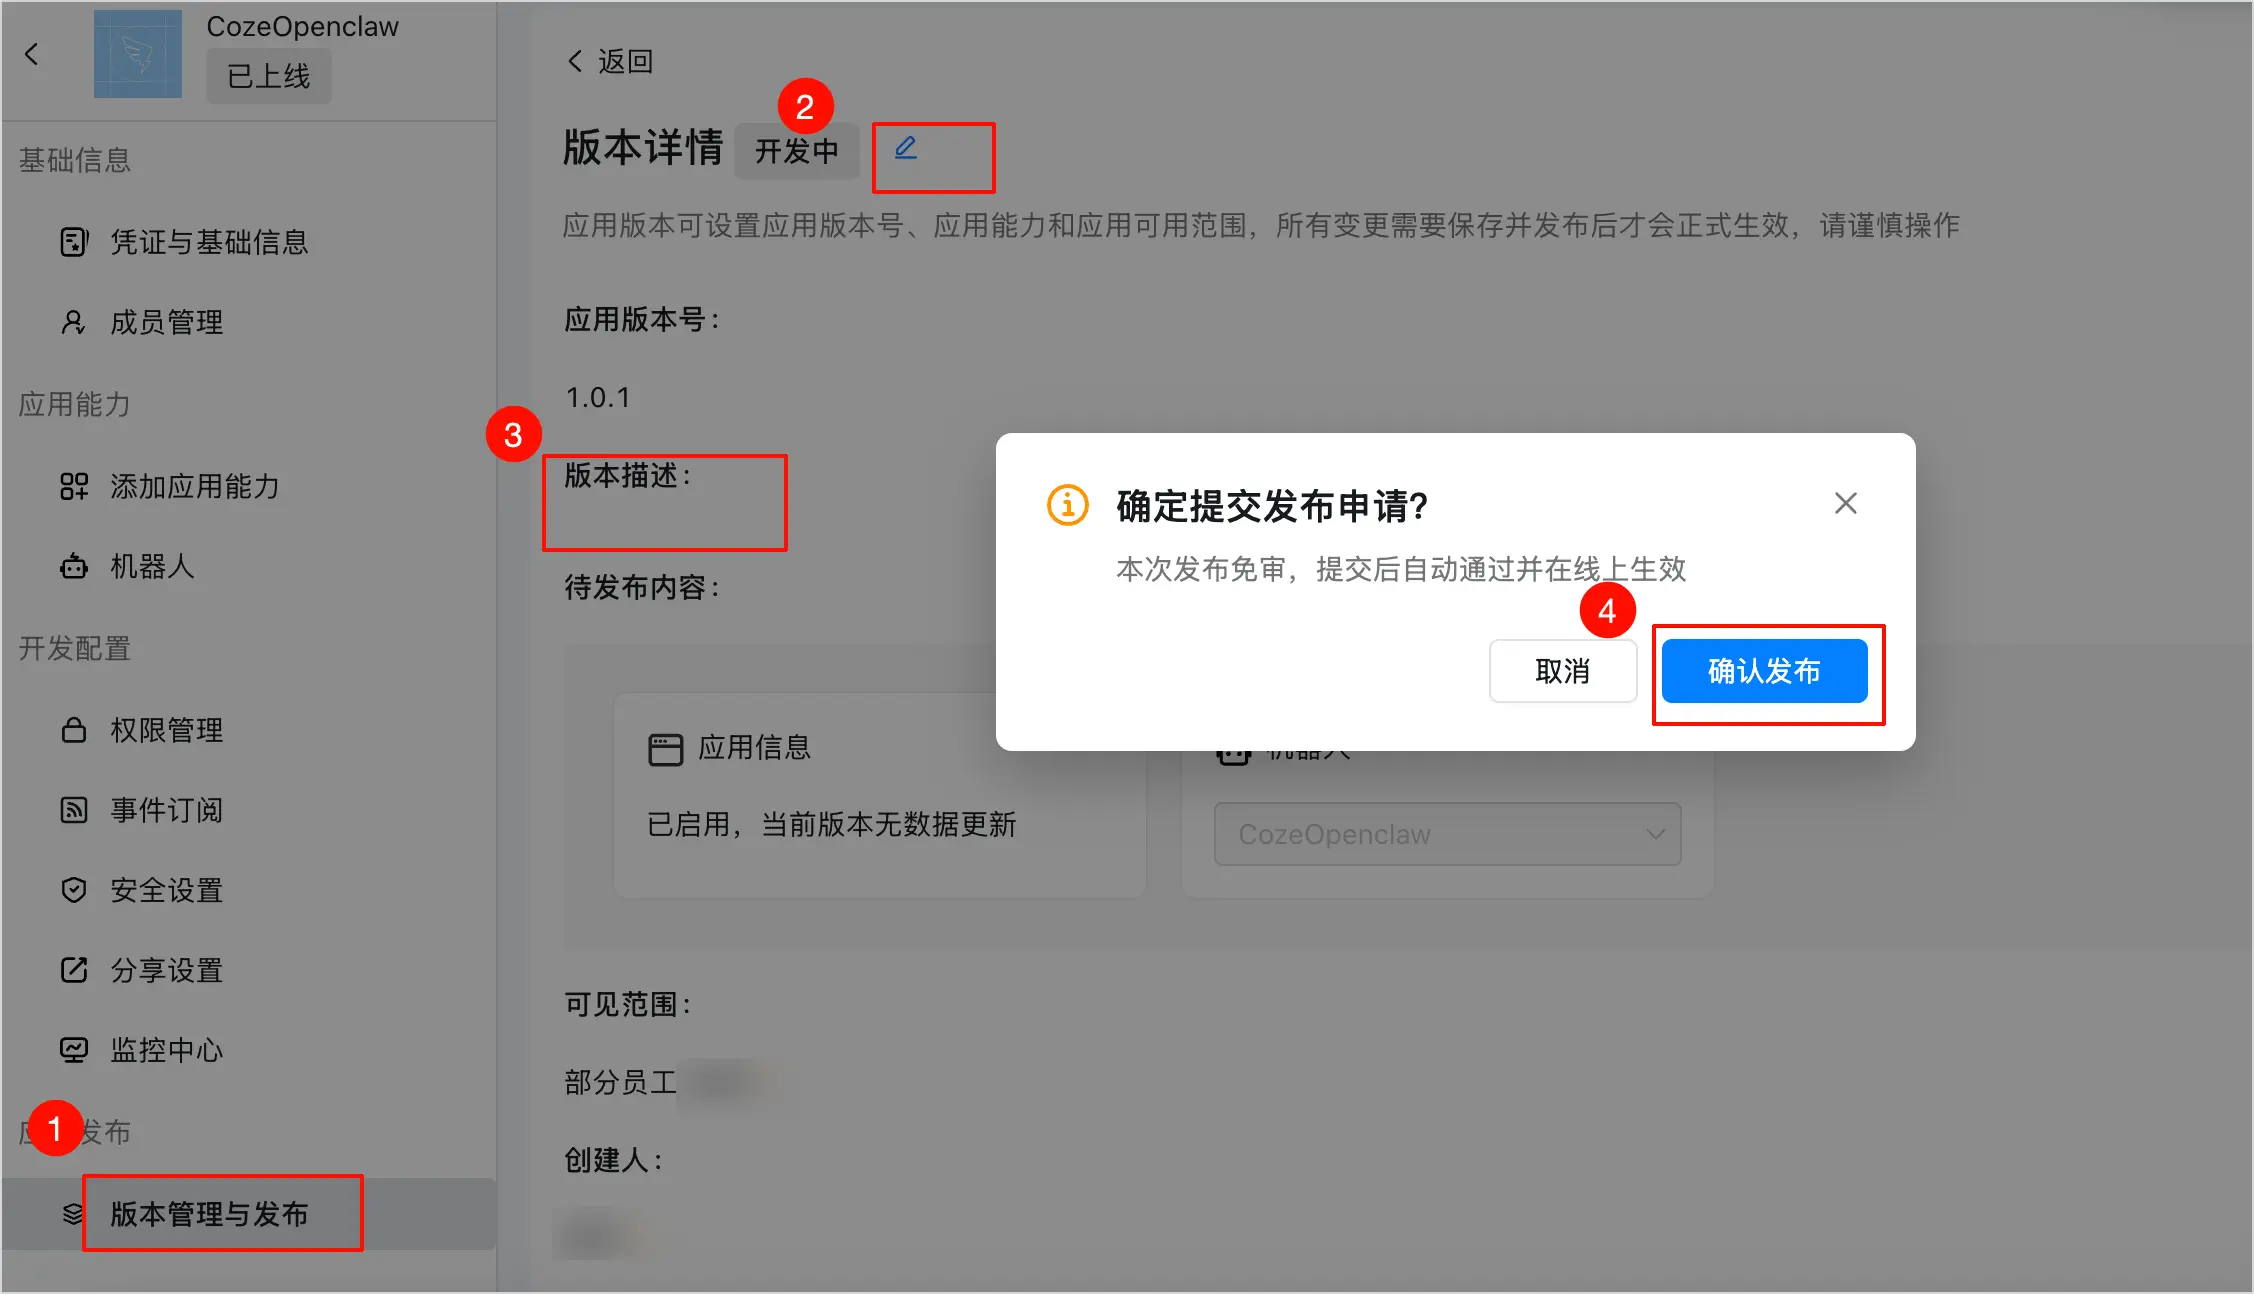
Step 5: Get App Info and Configure AstronClaw
- In Basic Info > Credentials & Basic Info, copy
Client ID,Client Secret, and other information.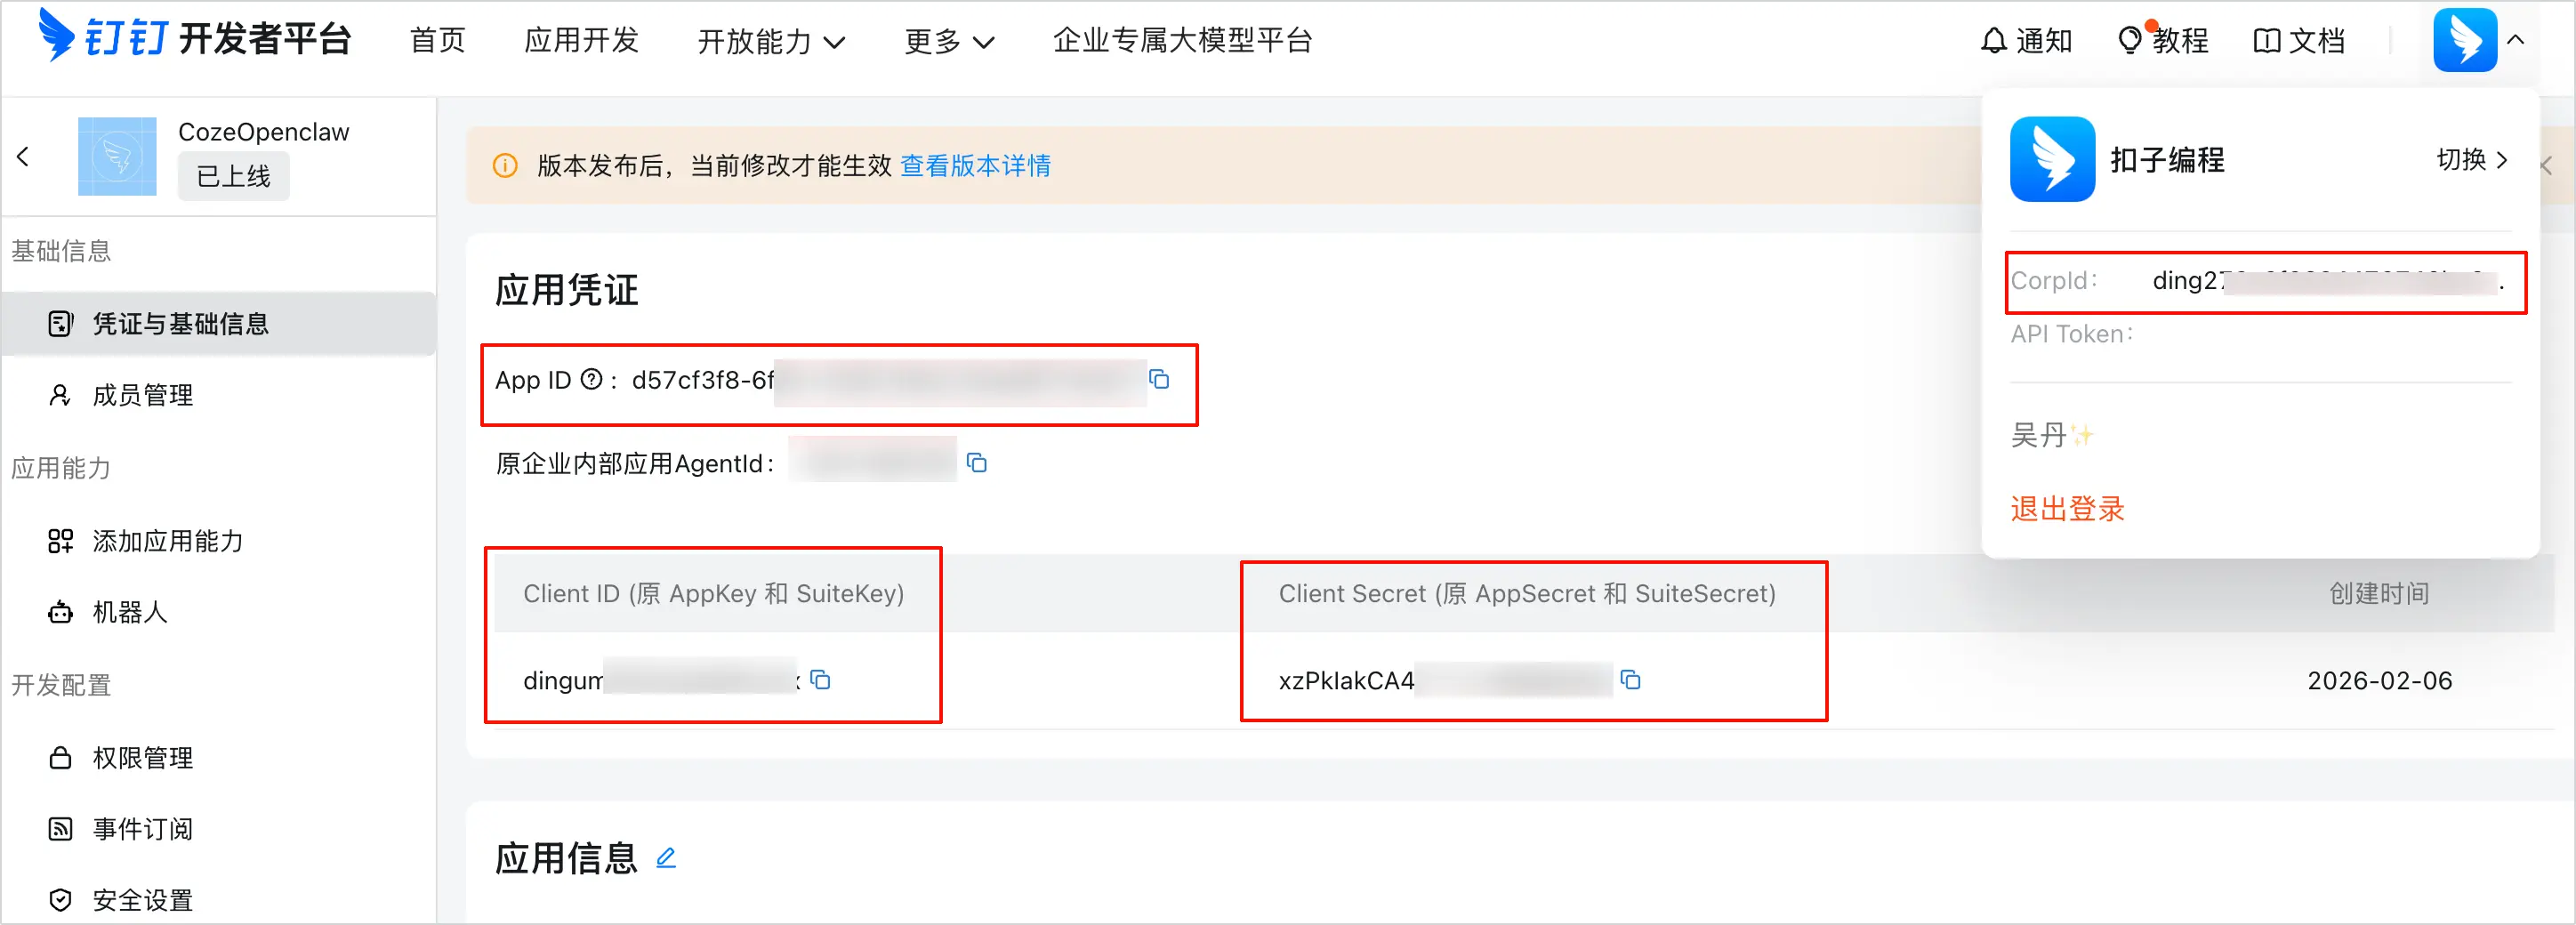
- Enter AstronClaw "Channel Configuration", select "DingTalk", fill in the credentials, and save.
WeCom Channel Configuration Guide
Method 1: Manual Configuration
Step 1: Create WeCom Bot
- Log in to the WeCom Management Background.
- Select Workspace > Smart Office in the left directory tree, and click Smart Bot.
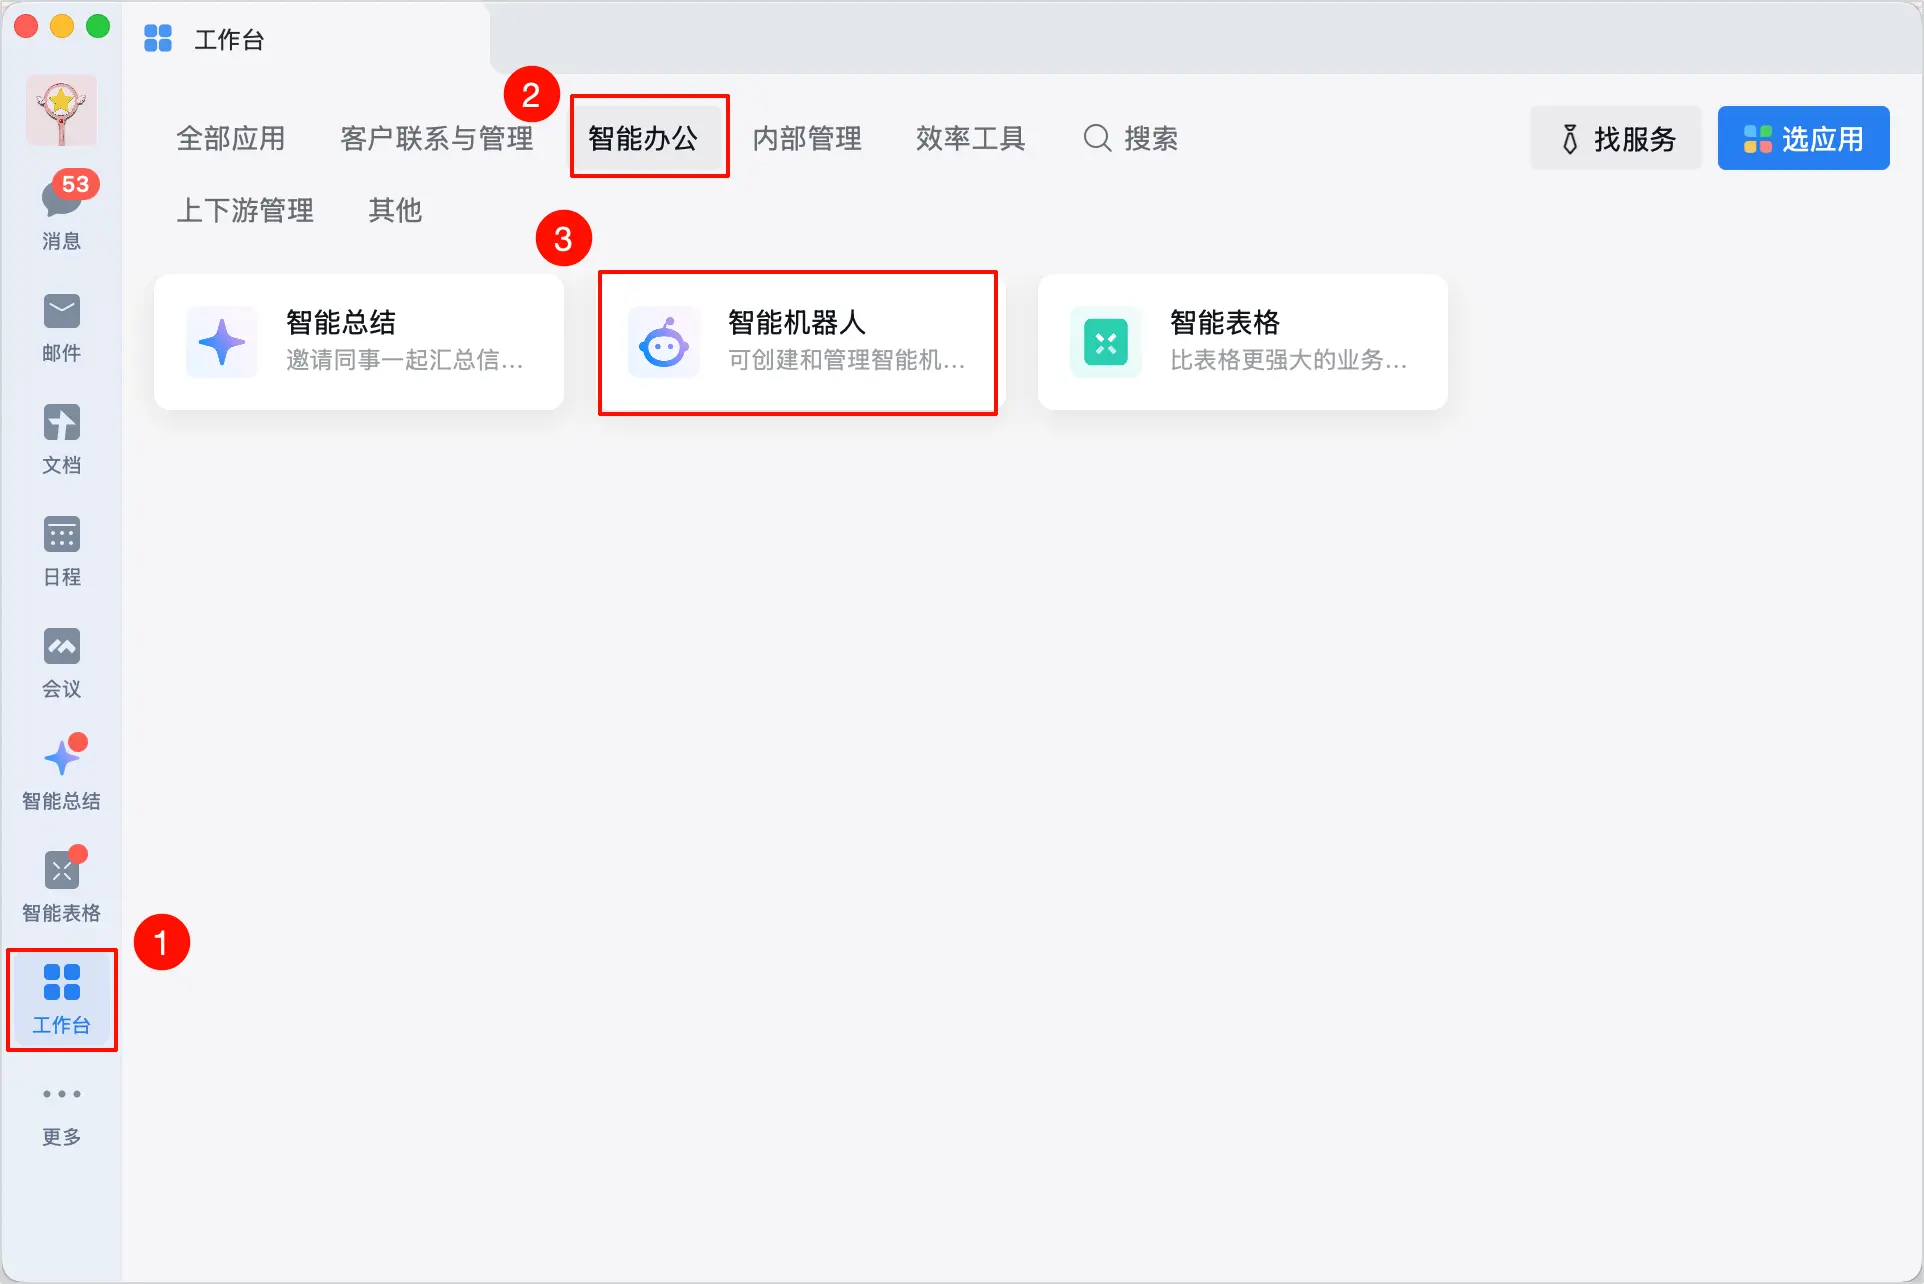
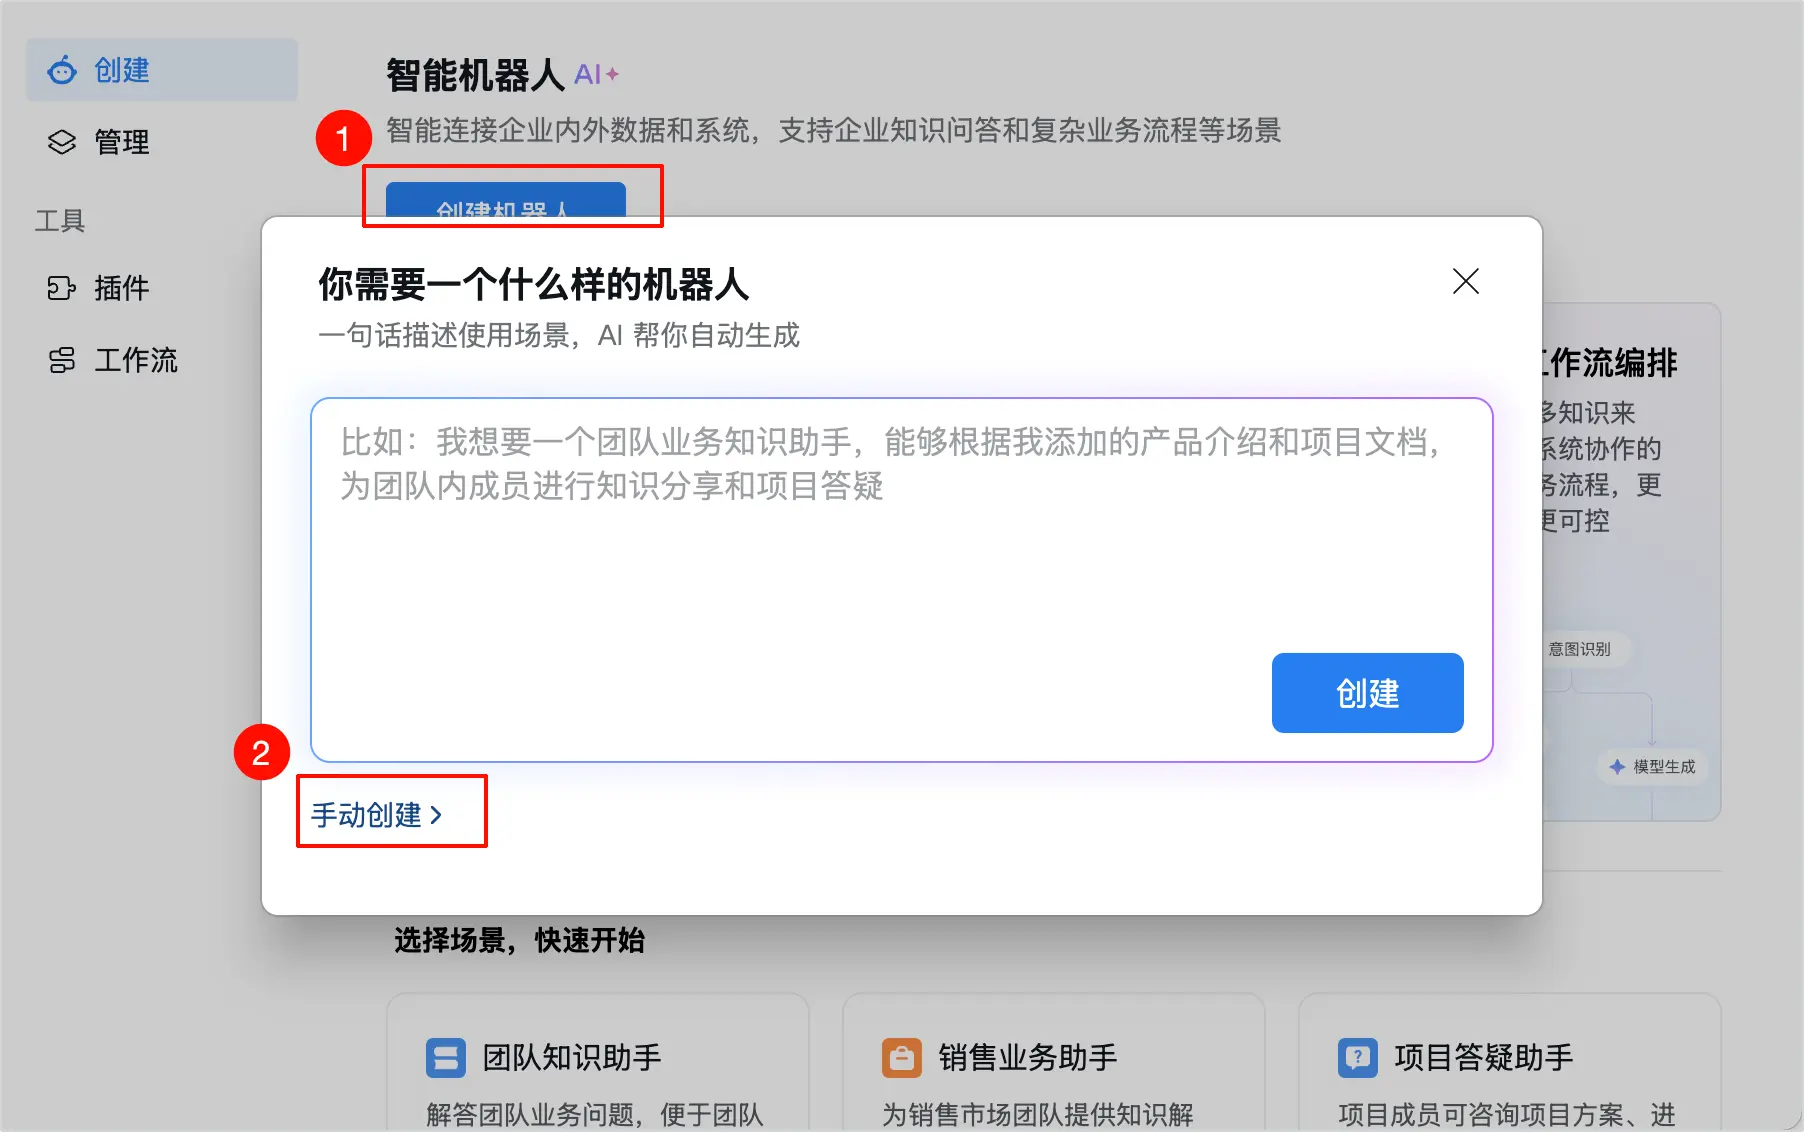
- Click Create Bot, and choose Manual Creation.
- Set the name and avatar of the bot.
Step 2: Enable Persistent Connection
- In the lower right corner of the bot configuration page, click API Mode Creation.
- Set the connection method to use a persistent connection.
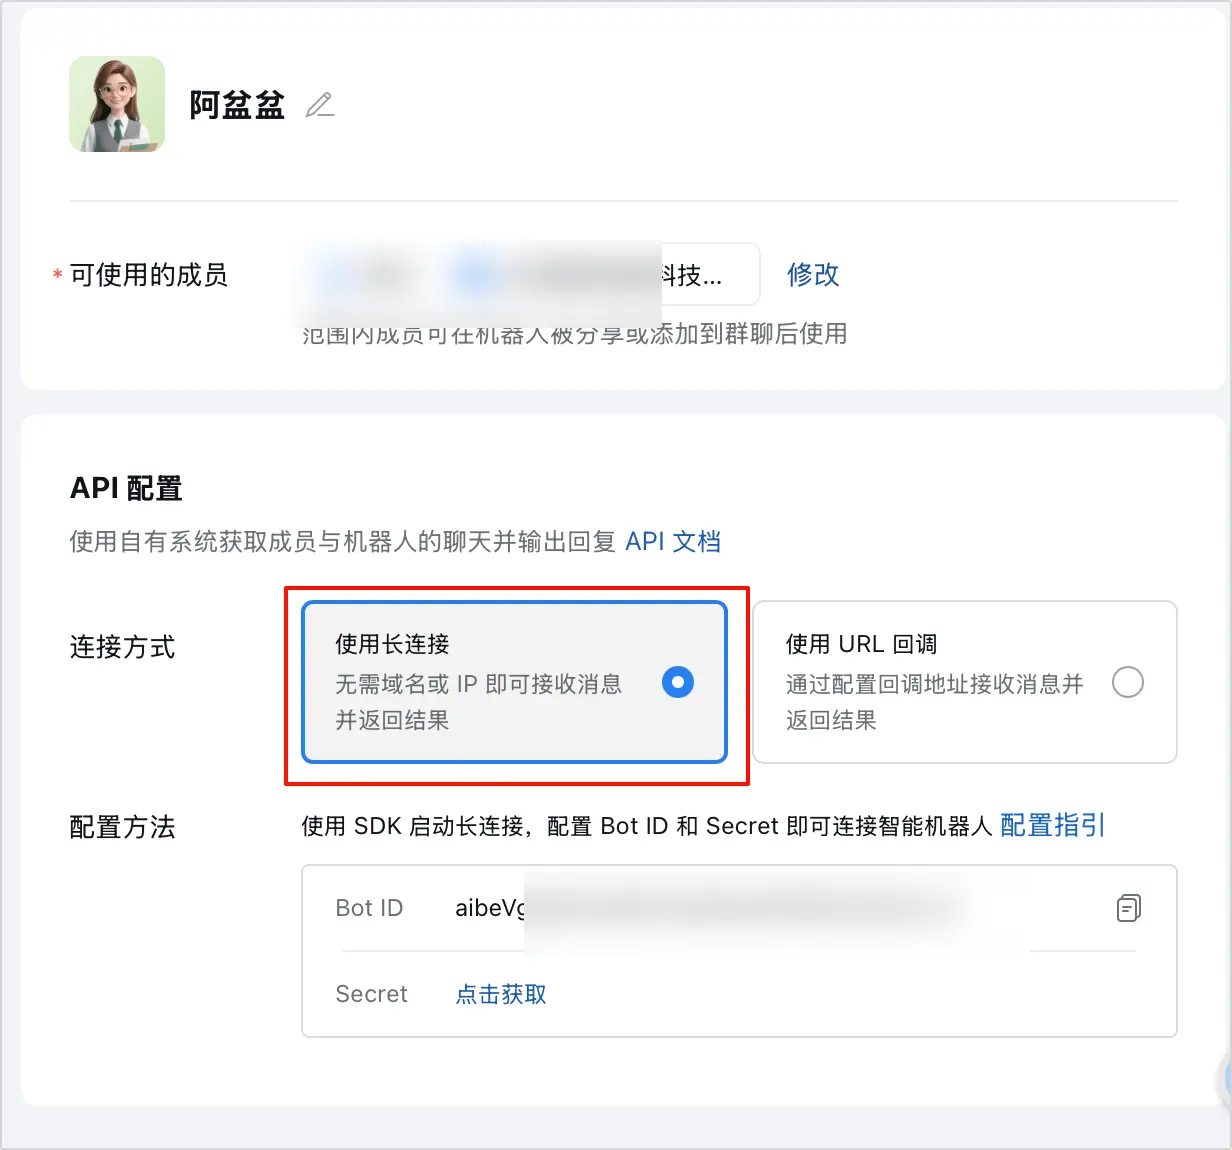
- Get Secret, copy Bot ID and Secret ID, and click Save.
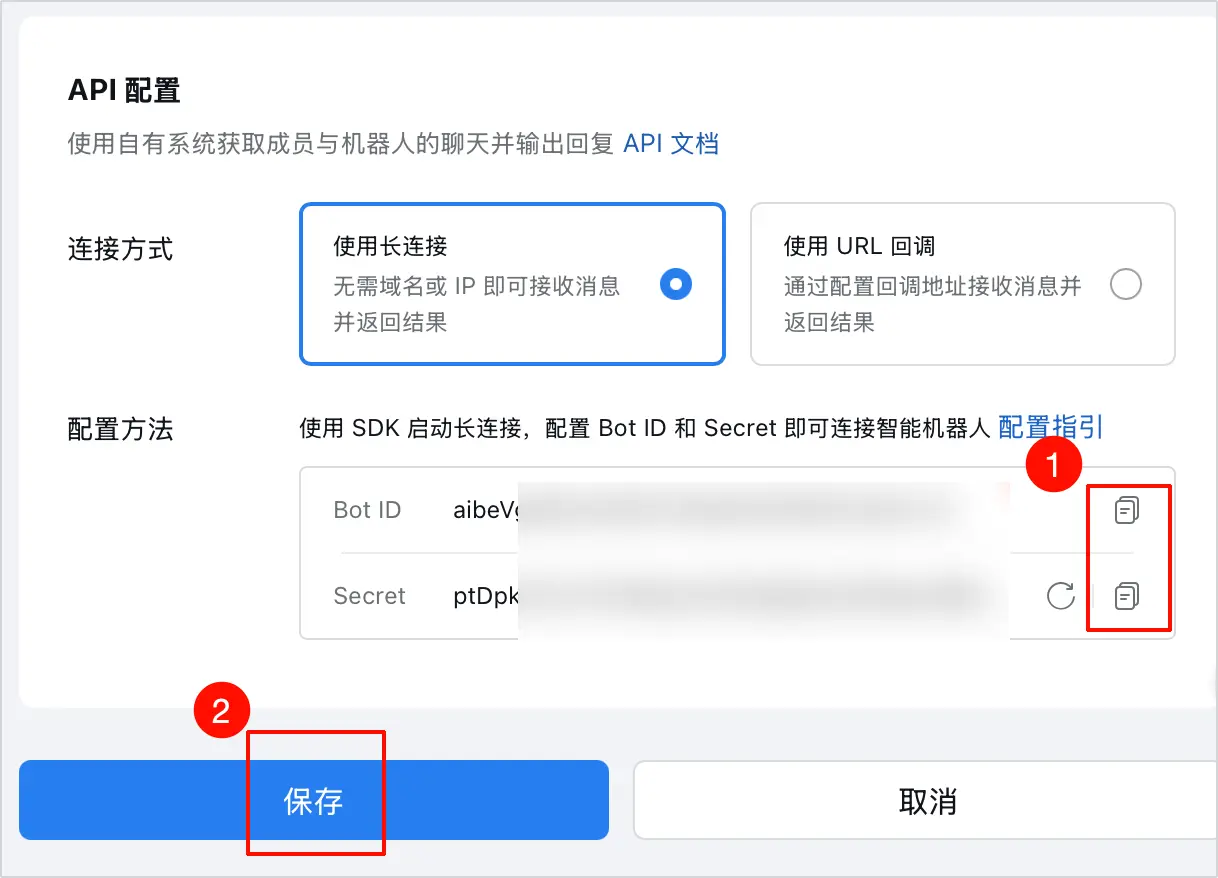
Step 3: Complete Configuration in AstronClaw Enter AstronClaw "Channel Configuration", select "WeCom", fill in the Bot ID and Secret, and click "Save Configuration".
Method 2: Scan Code Automatic Configuration (Recommended)
- Click get QR code on the AstronClaw configuration page, and use WeCom to scan the QR code to complete authorization configuration.
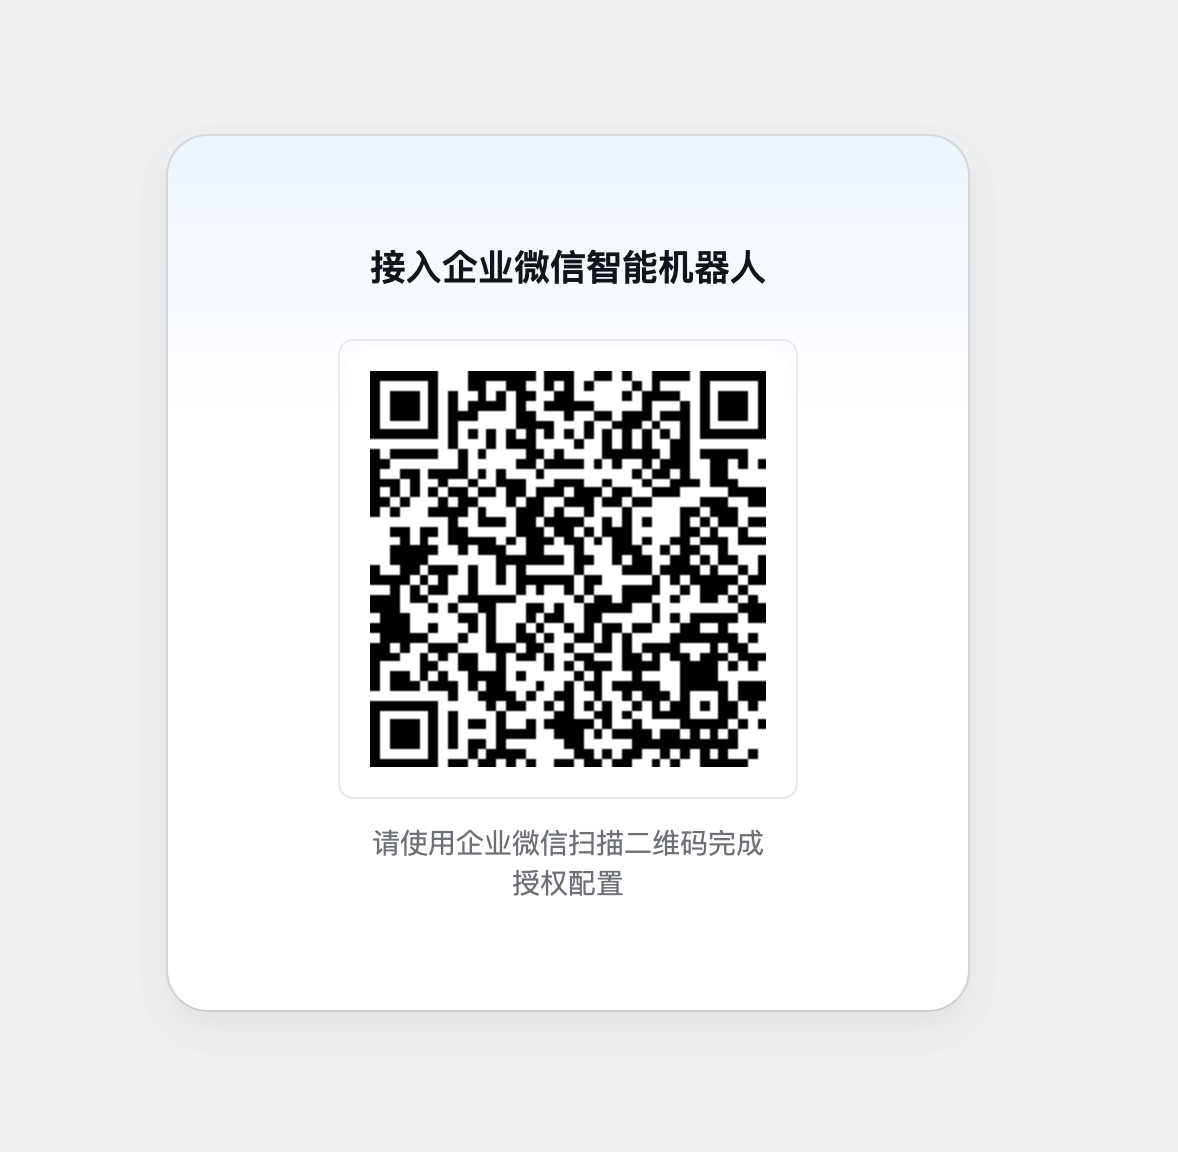
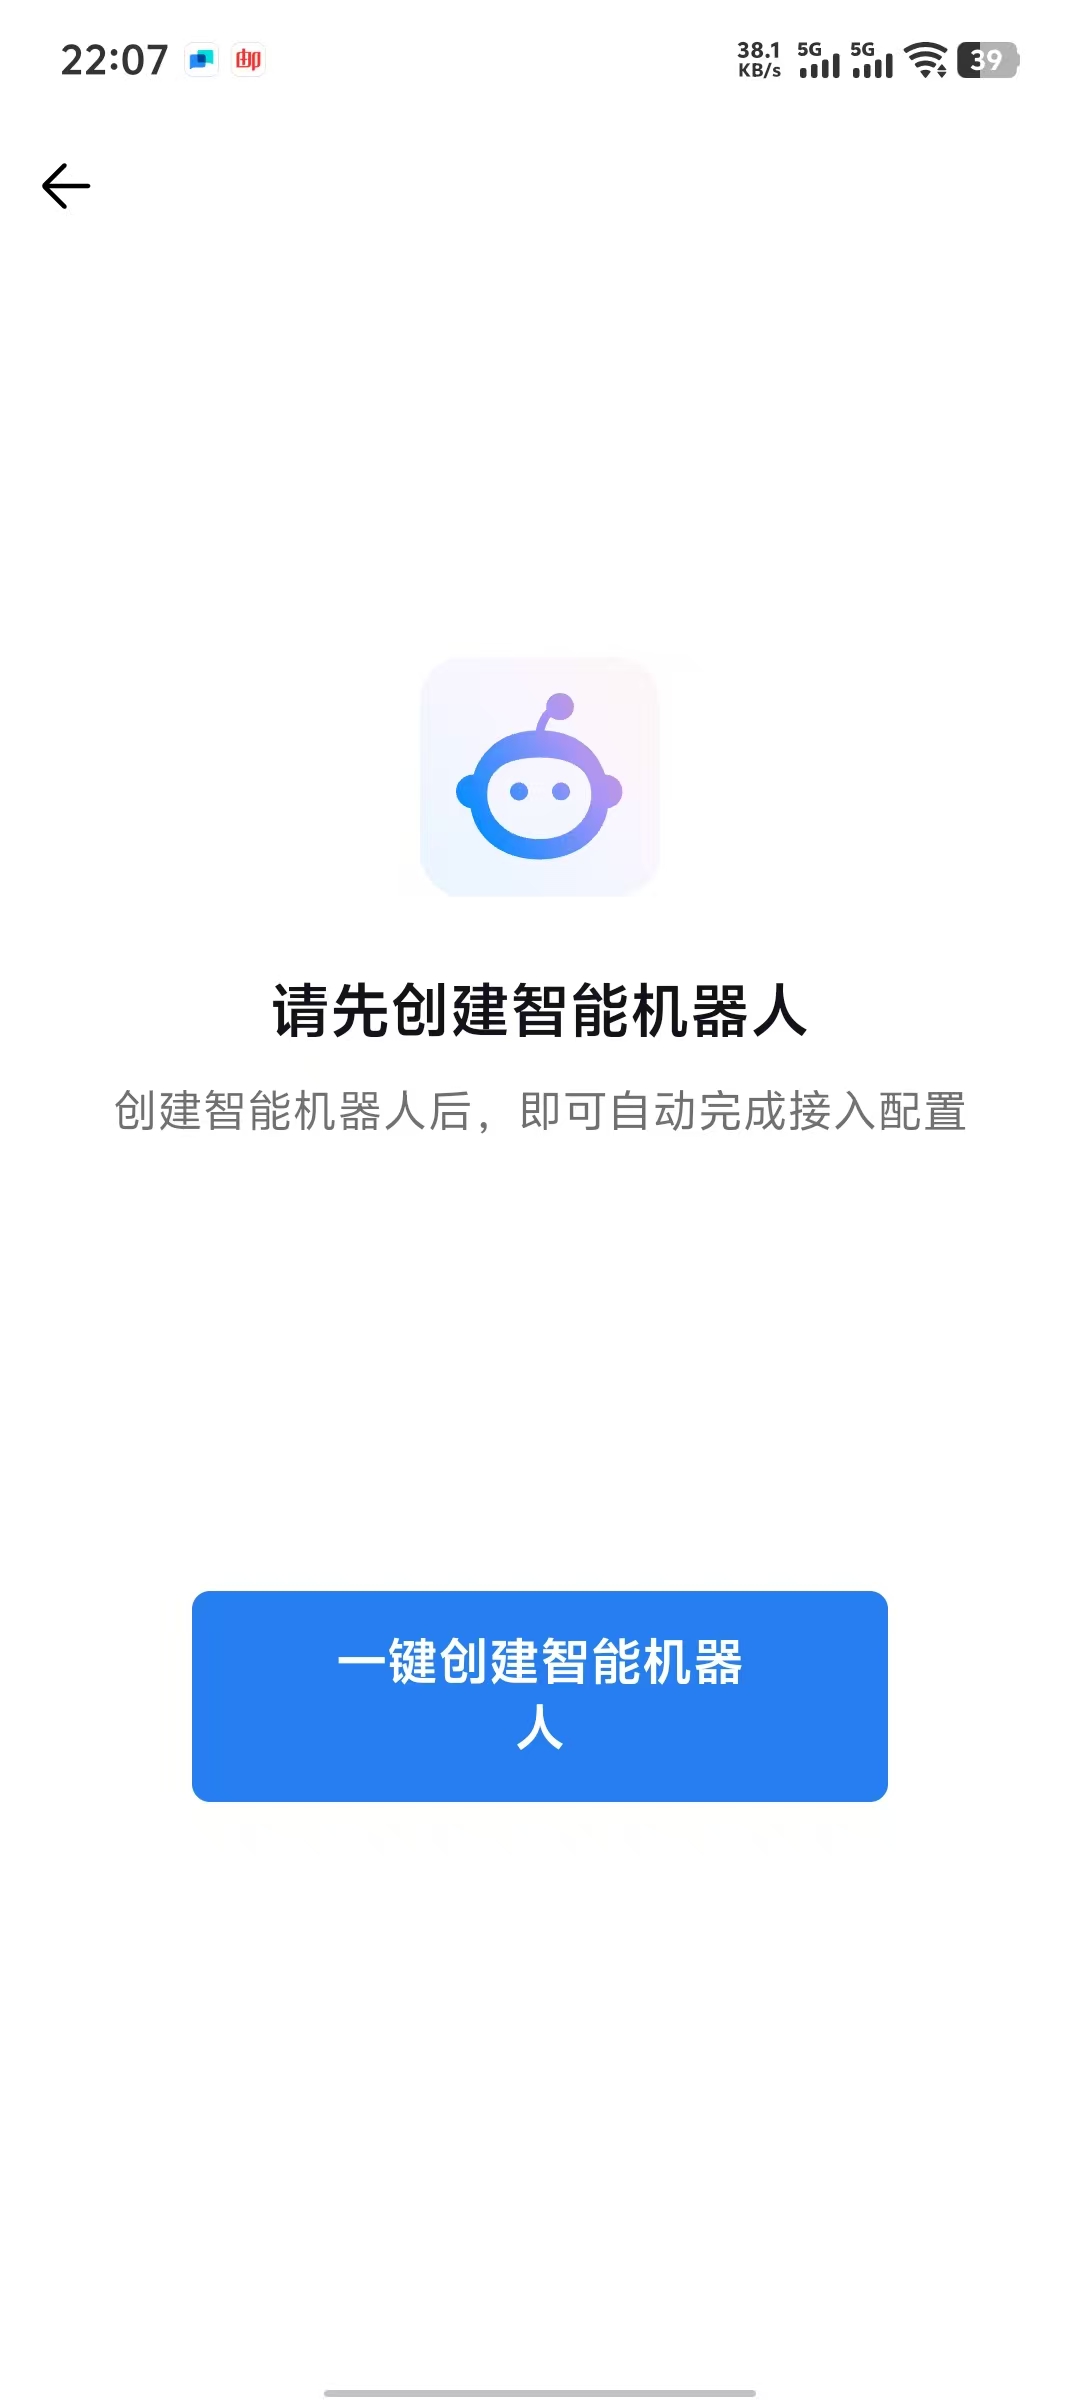
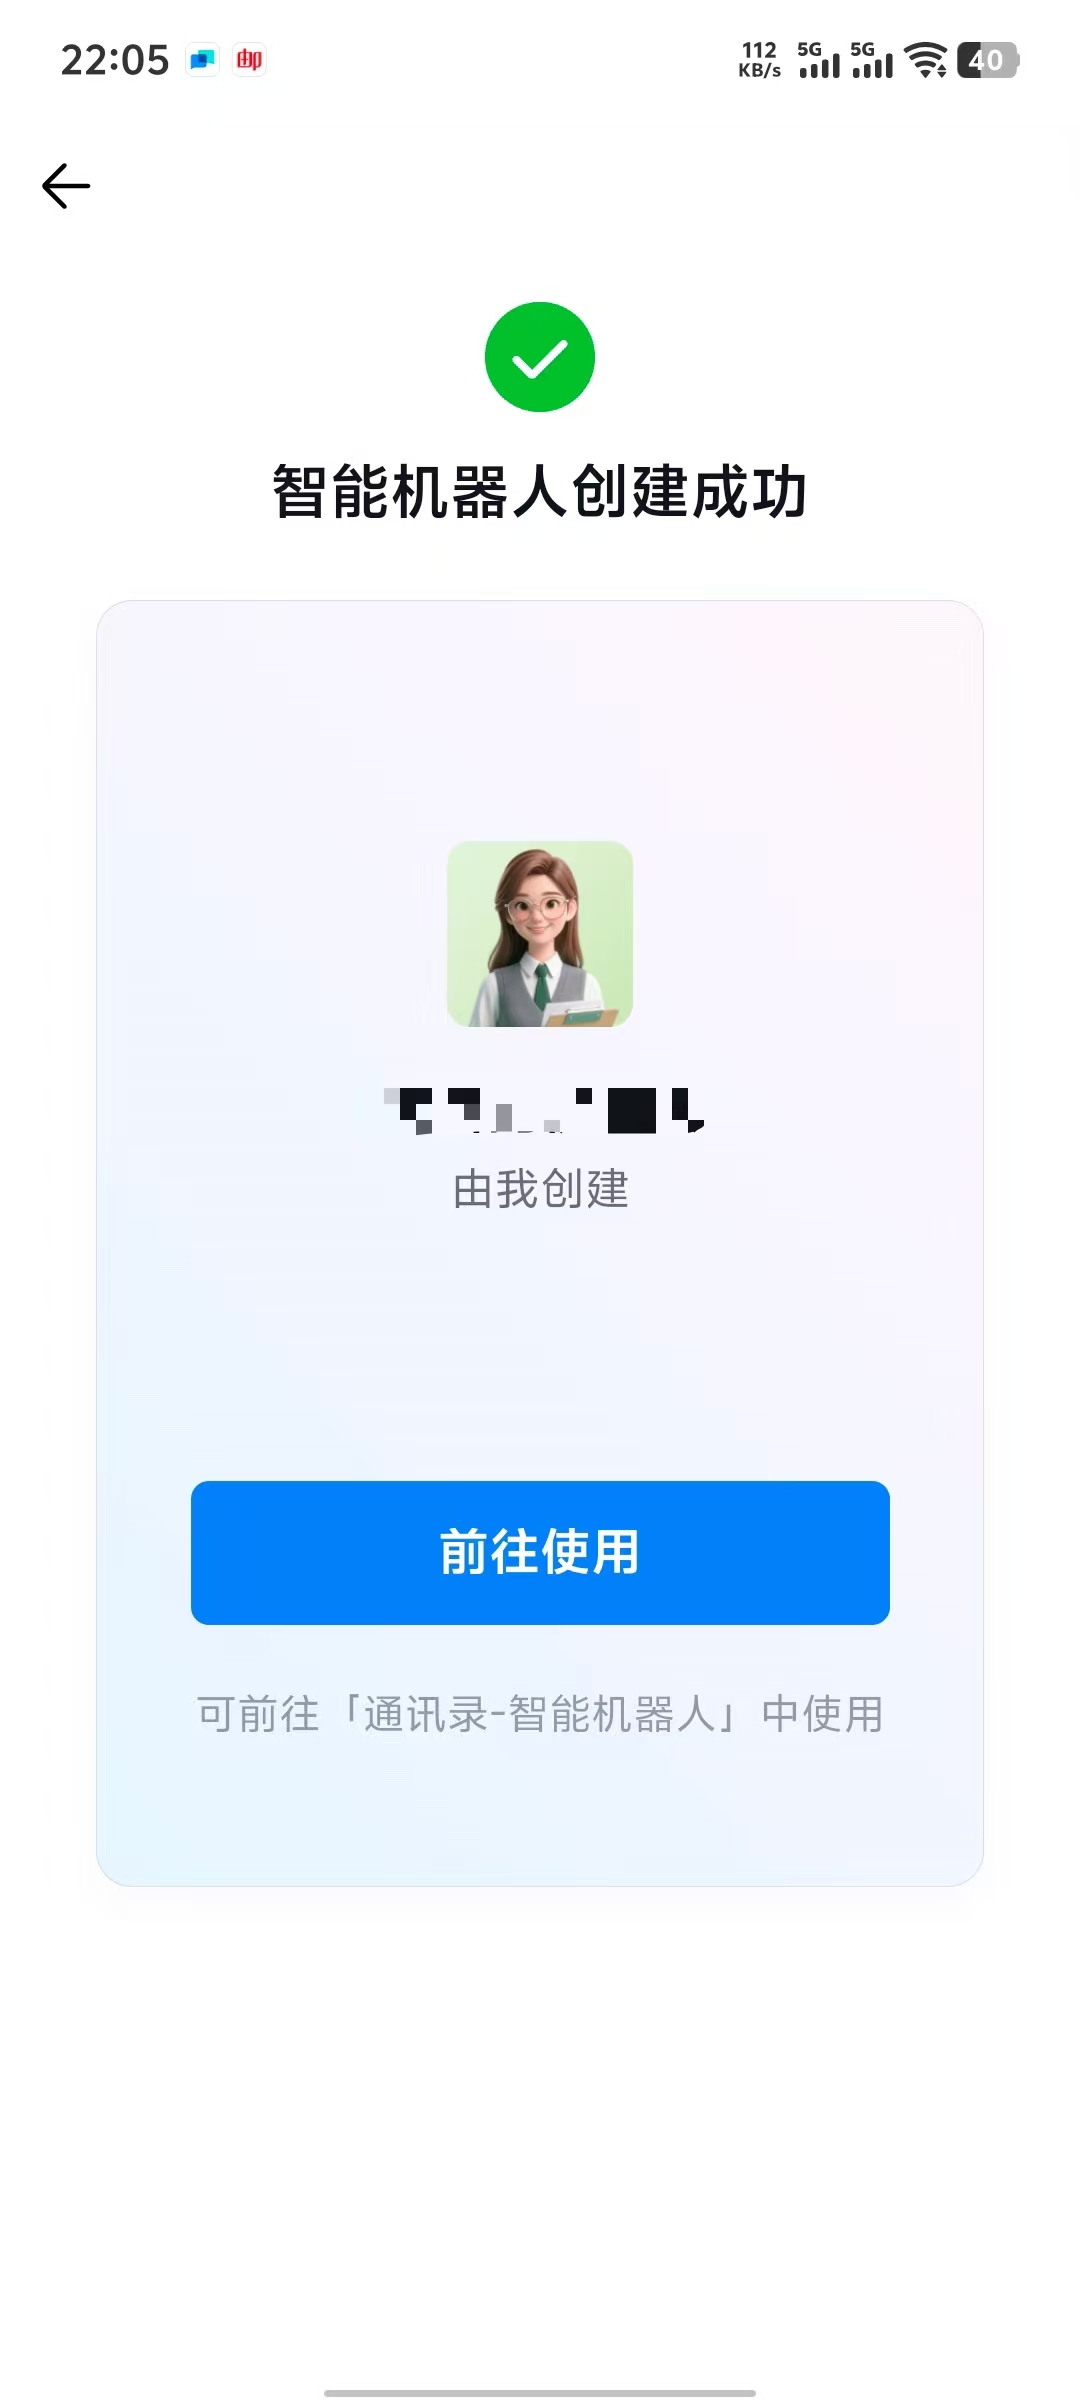
- Click "One-click Create Smart Bot", and it will be created automatically. The system will automatically identify and fill in the corresponding BOT ID and APP SECRET of the bot, click "Save Configuration".
WeChat Channel Configuration Guide
Prerequisites
- Successfully Deployed AstronClaw
- Entered the Channels configuration module
Steps
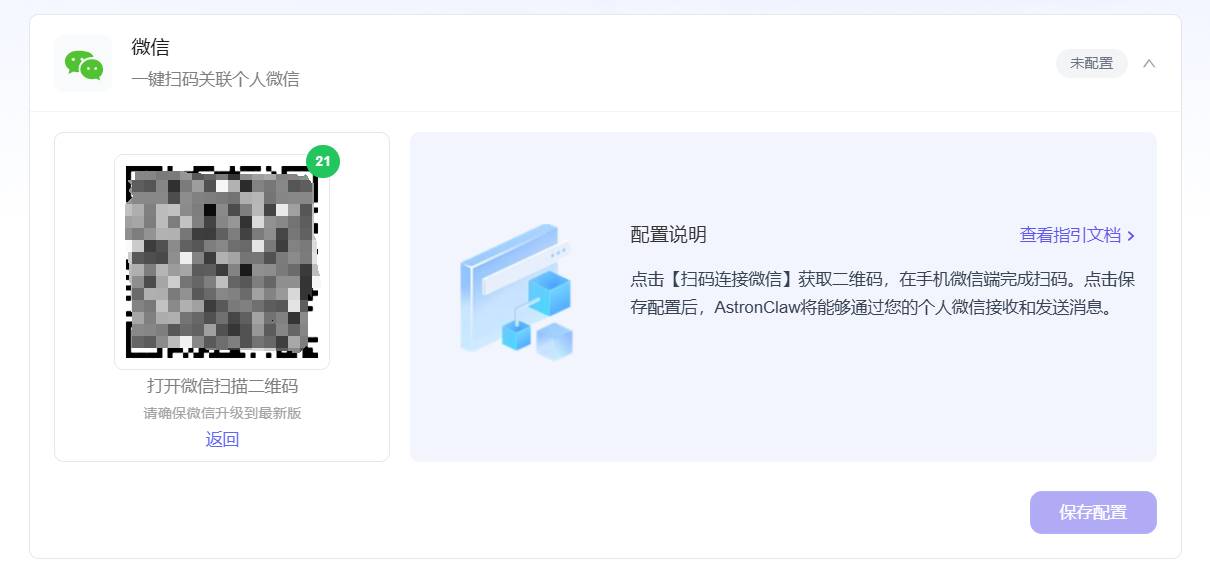
Step 1: Get QR Code in AstronClaw
- Enter the AstronClaw "Channel Configuration" page
- Select the "WeChat" channel
- Click "Scan to Connect WeChat", and a QR code will pop up
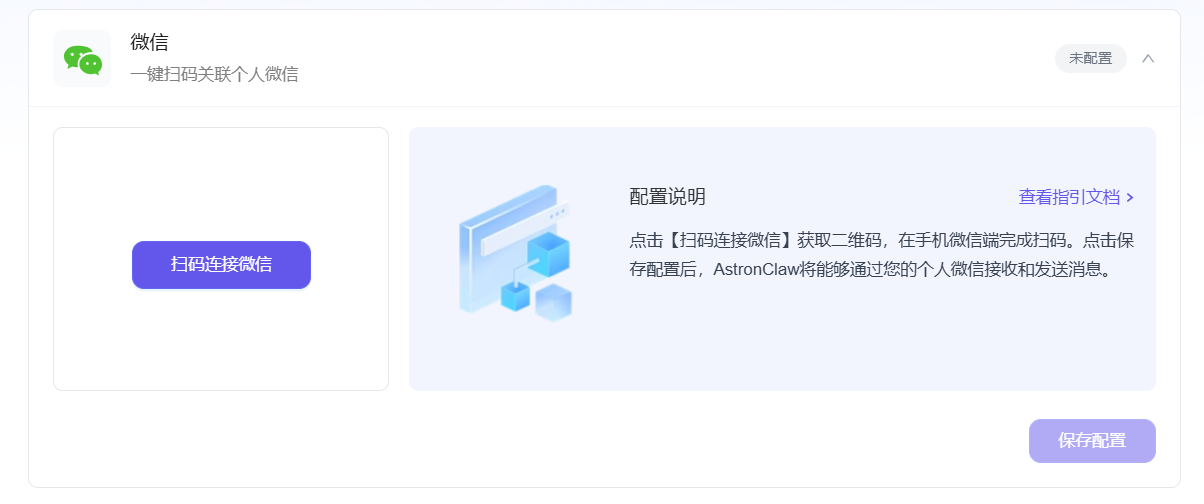
Step 2: Use WeChat to Scan Code Use WeChat to scan the QR code above, and click "Connect" on the pop-up page to complete binding. 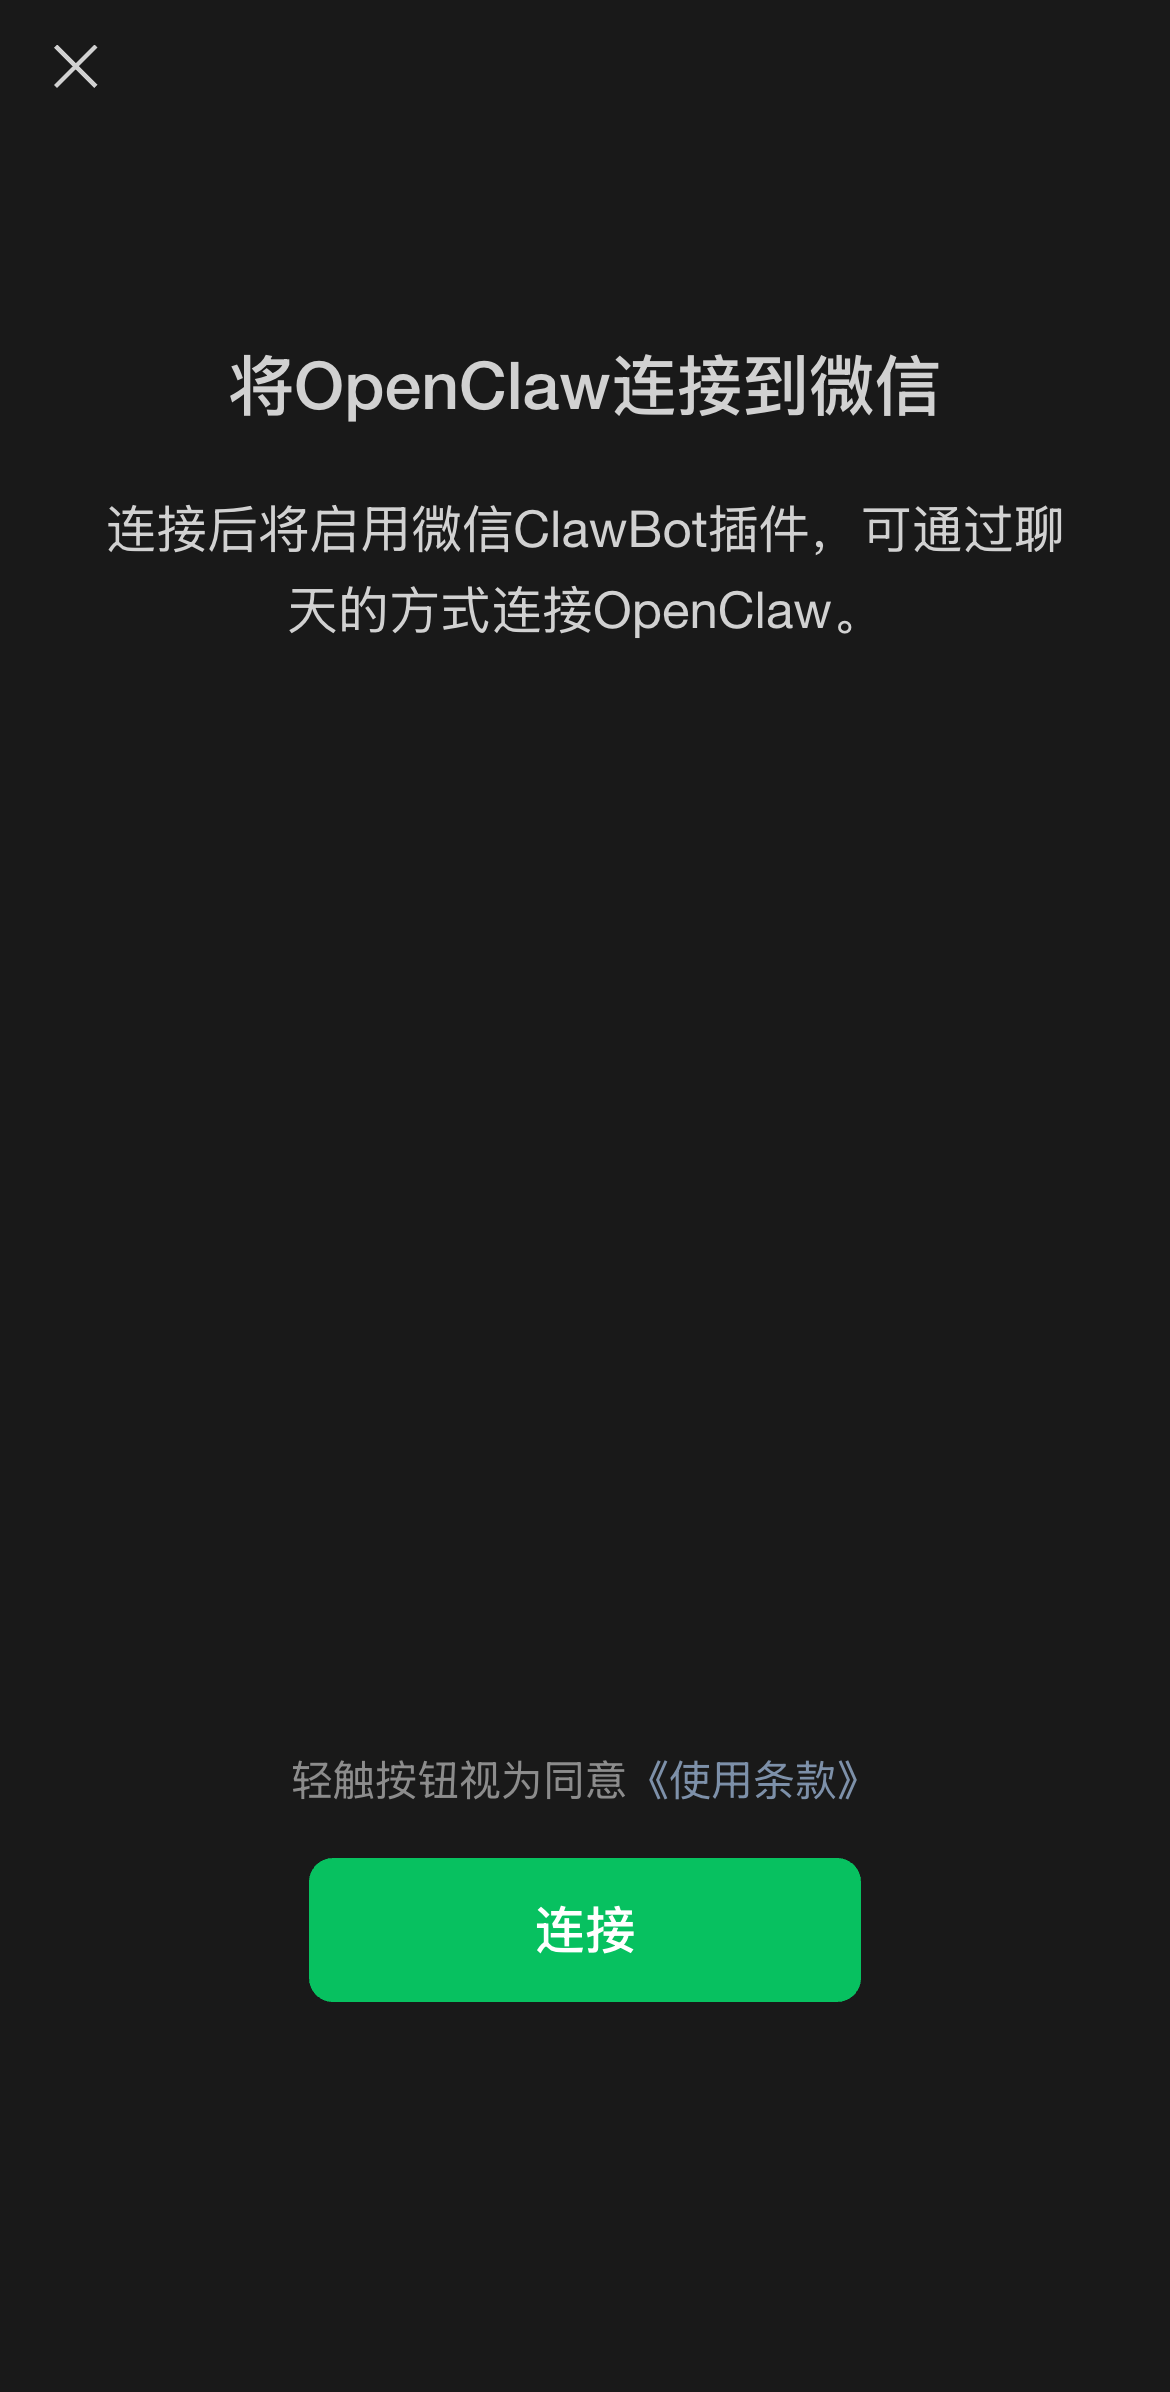
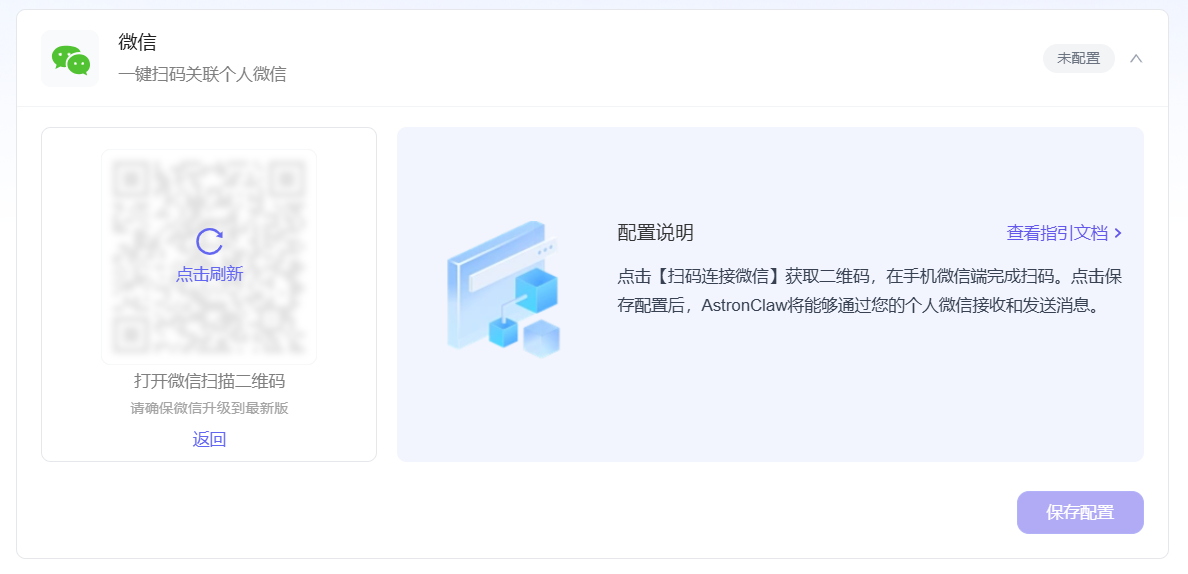
Note: The QR code is valid for 30 seconds. If it times out, please click "Click to Refresh" on the mask layer to get it again.
Add Multiple Accounts and Unbind
Add Multiple Accounts: If you need to associate multiple WeChat accounts, click "+ Add Account" and repeat the scan steps above. 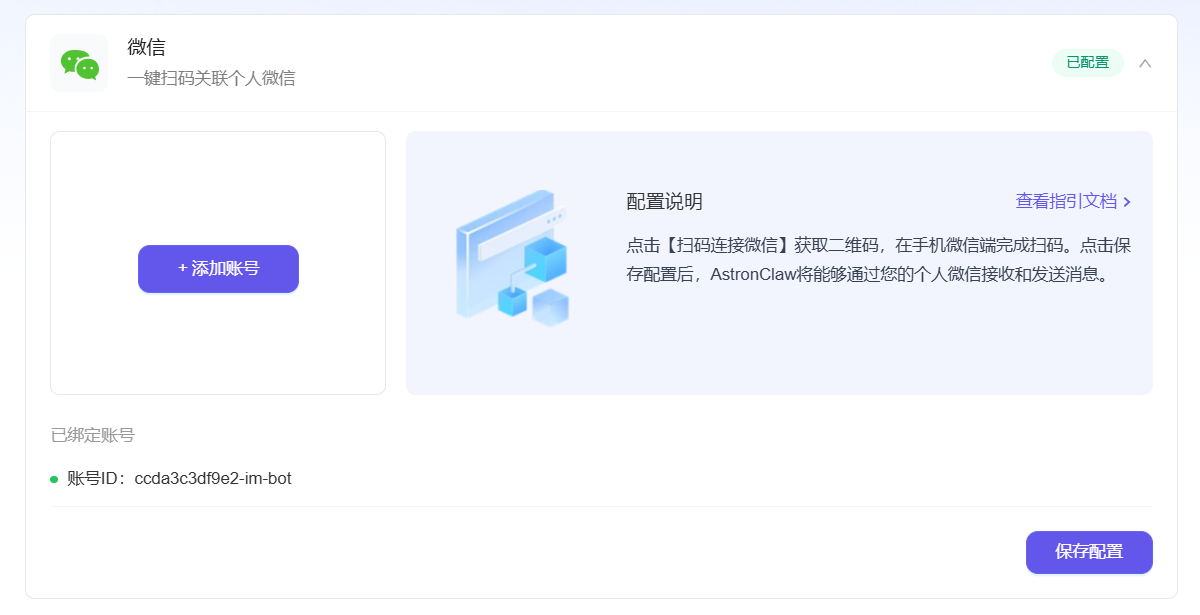
Weibo Channel Configuration Guide
Step 1: Get Credentials Open the Weibo client and send a private message to https://weibo.com/u/6808810981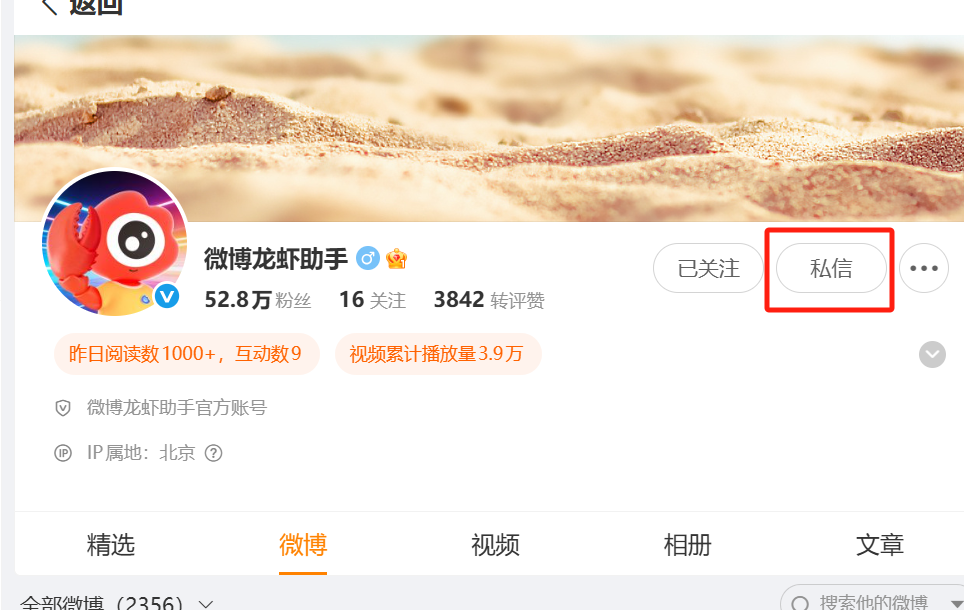
Send private message: Connect Lobster. Get the app credentials: 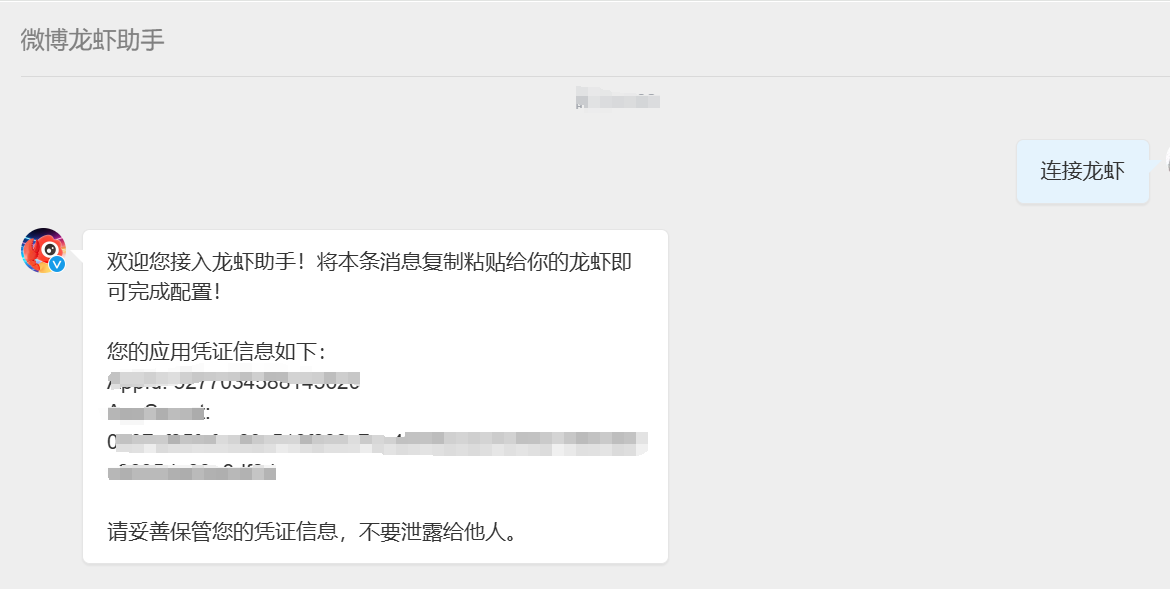
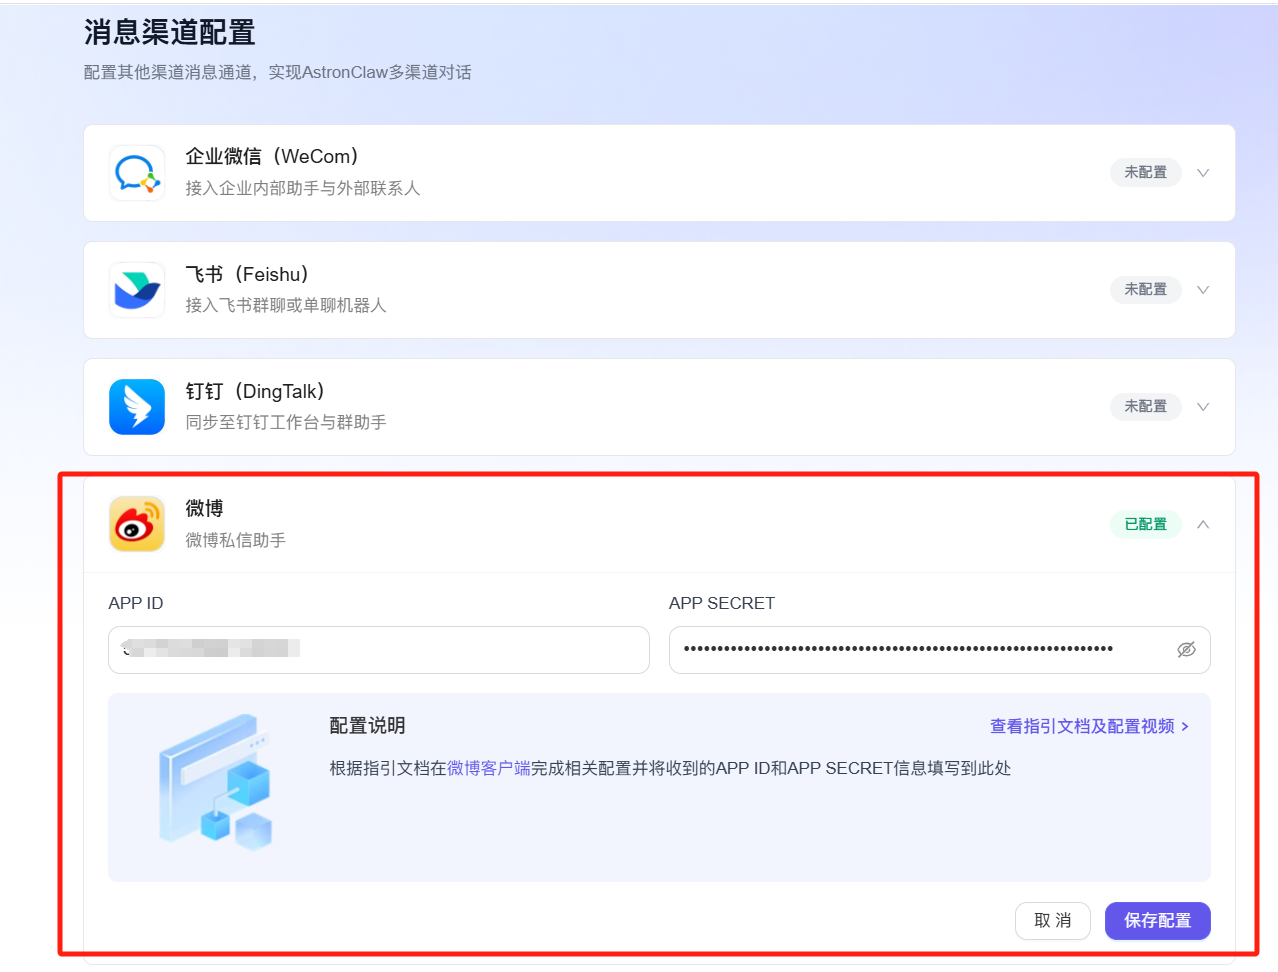
Step 2: Complete Configuration in AstronClaw
- Enter the AstronClaw "Channel Configuration" page
- Select the "Weibo" channel
- Fill in the App Id and AppSecret obtained in Step 1
- Click "Save Configuration"